
Khandvi recipe is a Gujarati snacks recipe which is crazily popular all over India for its unique taste, texture, flavour and charming look. It is basically a small bundle of joy prepared with besan aka gram flour, yogurt, water and a few other specific ingredients. Its soft, melts in the mouth and full of refreshing flavours. Whether it’s Holi or Diwali, mela or marriage ceremony, khandvi Gujarati recipe always appears as an integral part of any celebration. It is one of the most versatile and healthy snacks recipe Indian which can be served as breakfast, snack and even as a side with a cup of tea.

Table of Contents
About the recipe
Frequently Asked Questions
Tips and Suggestions
How to make Khandvi (step wise photos)
Recipe Card
What is khandvi?
Khandvi recipe is an immensely popular Gujarati snacks recipe which is beloved by the whole nation, especially in Gujarat and Maharashtra. It is also known as dahi vadi or pataudi in Gujarati and suralichi vadi in Marathi.
Khandvi is a savoury snacks recipe prepared with gram flour, yogurt and water mixture. First, the batter is cooked and then spread on smooth surface. Its cut into thin strips and rolled up. On the top tempering is added for extra taste and flavour. It is soft, smooth, and tender in texture and is slightly spicy and salty in taste. It is mostly relished as snacks or breakfast with tea.
Khandvi recipe can be prepared in three different ways.
- Khandvi on stove top
- Khandvi in microwave
- Khandvi in pressure cooker
The most common question arise in people’s mind is which one tastes better?
According to me, in each way khandvi tastes outstanding if it is prepared with equal attention, ease, love, and the correct proportion of ingredients. Though everyone has their own preferences, but in both ways, you can prepare a perfect soft and delicious khandvi dish. Today I am going to share the traditional khandvi recipe on stove top.
I must say khandvi Gujarati recipe is a tricky recipe and you should have some basic cooking knowledge before trying your hands on it. It may not come perfectly on your very first attempt but once you get the correct proportion of ingredients and correct consistency of cooking the batter then it will become one of your savior and handy recipes. Whenever you have surprise visitors at home, it could be a perfect way to treat them without much hassle. In fact, on lazy weekends khandvi could be a great option for snacks.
I am a huge fan of Gujarati cuisine, especially the snacks items like dhokla, fafda, dabeli, khandvi and many more. When I was in India, I used to buy dhokla and khandvi from sweet shops on regular basis. But after coming to the UK, I started craving for those delights.
So today, I have come up with the full-proof khandvi recipe which never disappoints me. In fact, I always get praised a lot for this easy, handy and delicious recipe. I have shared this recipe with many of my friends and they just loved it. To make the recipe easier for you, I have mentioned all the tips and tricks below for the perfect results.
Gujarati khandvi is one of the most economic and healthy snacks recipe Indian which is prepared with limited ingredients. It can be had any time of the day, whether its breakfast, snacks, or as a side of the main course. Each ingredient is easily available in any Indian kitchen pantry or Asian section of supermarkets. The best part of the recipe is that you can double or triple the amount which I have mentioned in the ingredient section to prepare more khandvi.
Khandvi recipe step-by-step photos and instructions have been provided in the ‘Instruction’ section of the recipe. If you follow each step of my recipe precisely then you will get perfectly soft and delicious Gujarati khandvi. But before directly jumping into the recipe, let me share a few interesting things about the recipe.
Frequently asked Questions
Can I use buttermilk instead of yogurt and water?
Yes of course. Buttermilk is basically a mixture of yogurt and water. If you have buttermilk with you then you can use it for the recipe.
Is khandvi gluten-free?
Well NO. But it can be made gluten-free. I have used Hing aka asafoetida in the recipe. You can use either gluten-free hing or skip it to prepare gluten-free khandvi.
Why do I get cracks on my khandvi during the time of rolling?
If the khandvi mixture is spread thick then you will get cracks during the time of rolling. Try to spread the mixture as thin as possible.
Can I make the khandvi without stuffing?
Yes of course.
Should I apply oil on the surface before spreading the khandvi mixture?
Honestly no. Applying the oil is not necessary if you have cooked it perfectly. It will easily come out after cooling down. In fact, sometimes it has become difficult to spread the mixture evenly for applying oil. If you still want to apply oil to the surface then I must suggest you use just a single drop of oil.
How long khandvi can be stored?
Khandvi can be kept in an airtight container for 24 hours in a cool, dry, and dark place away from sunlight. In a refrigerator, it can be stored for 3-4 days.
How can I reheat Khandvi?
Khandvi can be eaten cool or at room temperature. I suggest not reheating it. You can keep the khandvi out of the refrigerator for an hour before serving.
Tips to prepare perfect Khandvi
- Please follow the measurement to get the perfect result.
- Add ginger paste and green chillies into the batter for a refreshing flavour and heaty touch.
- You can adjust the amount of green chilli according to your taste.
- Always strain the batter through a sieve before cooking to avoid any lumps, sticking at the sides-bottom, and to get a smooth texture.
- Always cook khandvi on low flame. It is a slow-cooking recipe. So be patient.
- Stir the mixture continuously with a spatula for perfect and even cooking.
- Try to use a flat surface non-stick pan for the recipe.
- Cook the khandvi mixture till custard-like consistency when the mixture turns heavy and plonk, not in a pourable consistency.
- After cooking the batter, spread it as quickly as possible on a flat surface. Once it cools down, the mixture will turn solid.
- Try to spread the khandvi mixture as thin as possible on a steel plate or on a clean kitchen slab. If you spread it too thick then the khandvi will get cracks during the time of rolling.
- Spread the khandvi mixture with a knife or icing scraper.
- Allow the content to rest for 4-5 minutes before rolling.
- Don’t add too much stuffing into the khandvi or else it will be difficult to roll.
- Please don’t skip any ingredient from the tempering. Each ingredient is equally essential to flavour up the dish.
- Don’t forget to sprinkle some chopped coriander leaves and grated coconut for garnishing.
How to make khandvi
To prepare the khandvi recipe, first chop coriander leaves and keep some grated coconut handy.
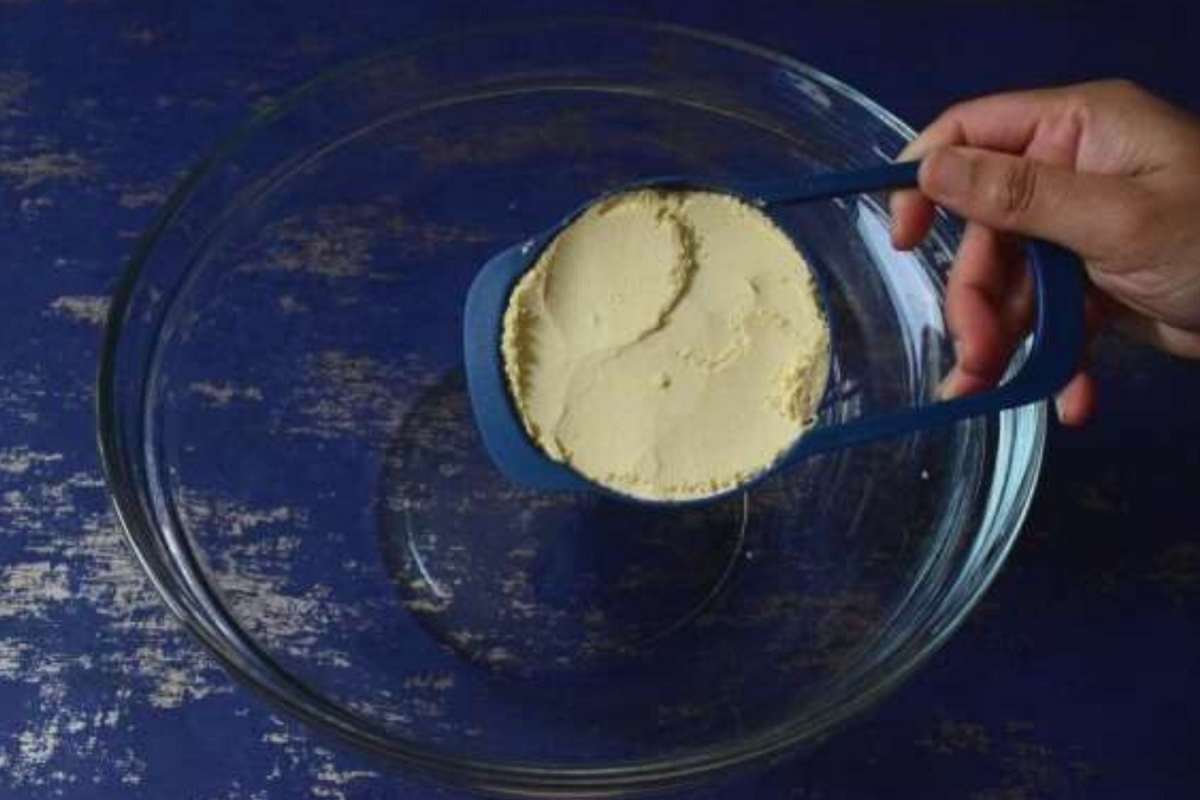
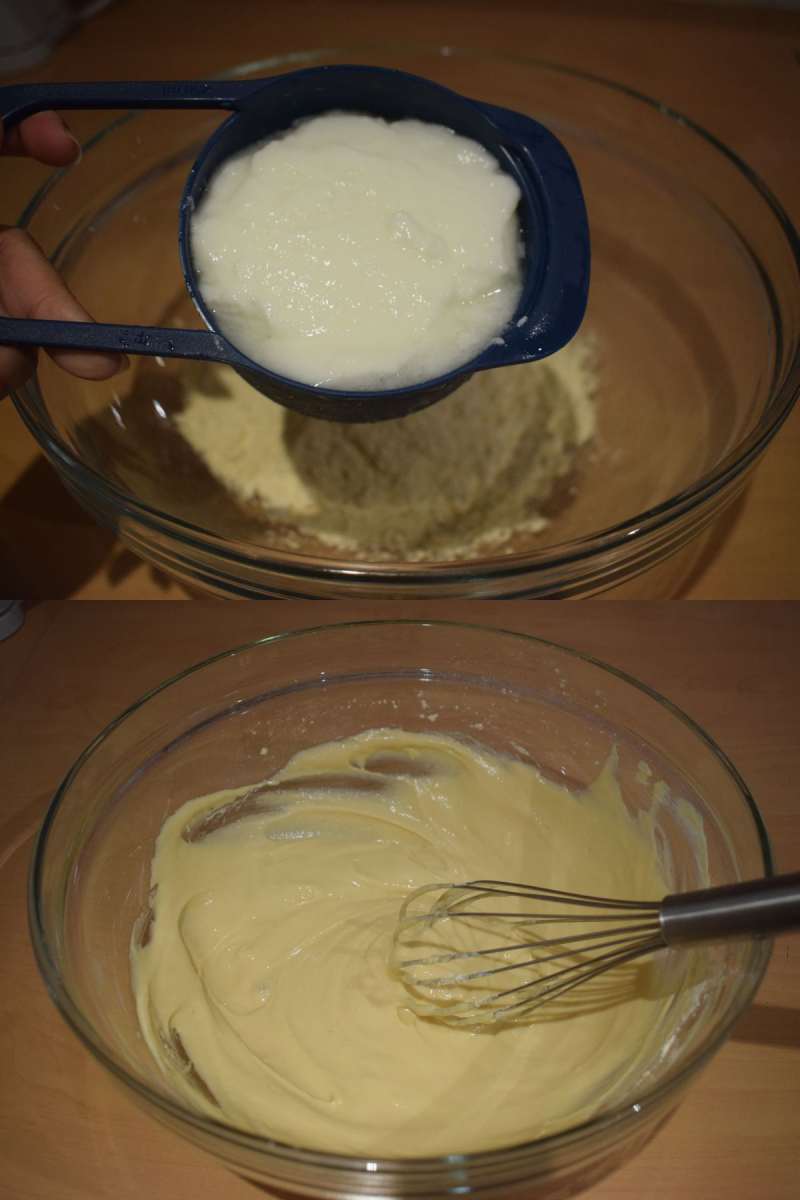
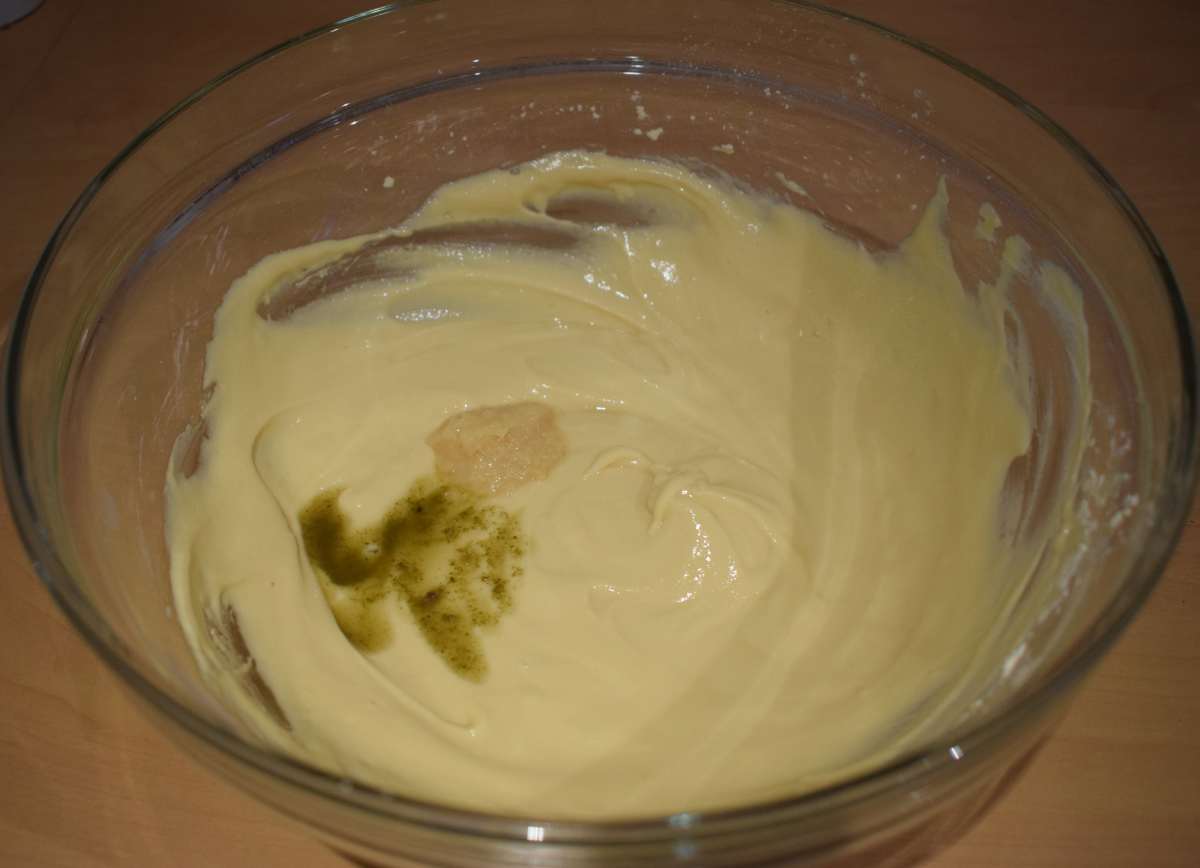
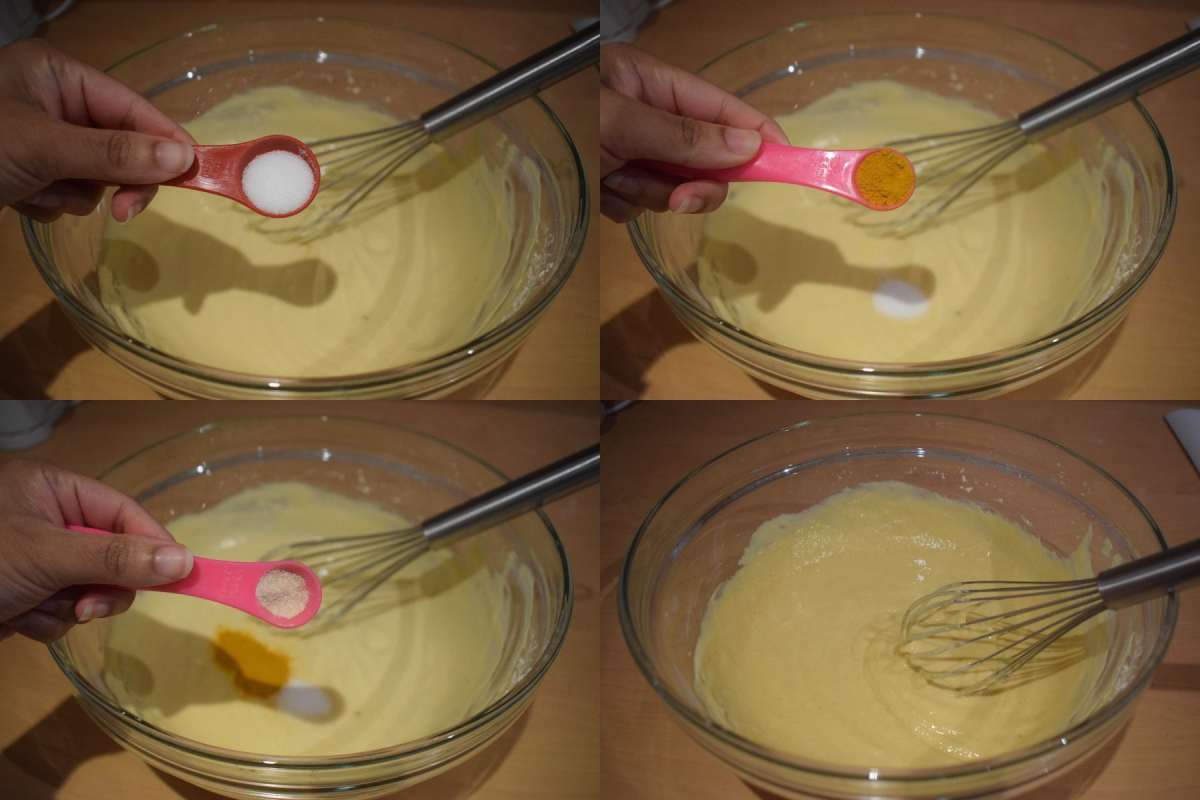
Then take a large mixing bowl and add besan aka gram flour in it. Now, add yogurt slowly into the besan and mix it with a whisker. Add ginger paste, green chilli paste, salt, turmeric powder, and hing, one by one into the bowl and mix it thoroughly. Then add water and mix it nicely.
Put a pan on low flame and set a sieve on it. Strain the batter to avoid any lumps. Then cook the khandvi batter on low flame for 10-11 minutes. Stir the mixture continuously to prevent lumps and to let it stick at the bottom and sides. Once the batter gets thickened like custard consistency and when it’s not pourable and goes plonk, switch off the flame immediately. Don’t overcook or else the mixture will turn blob and it would not be spreadable.
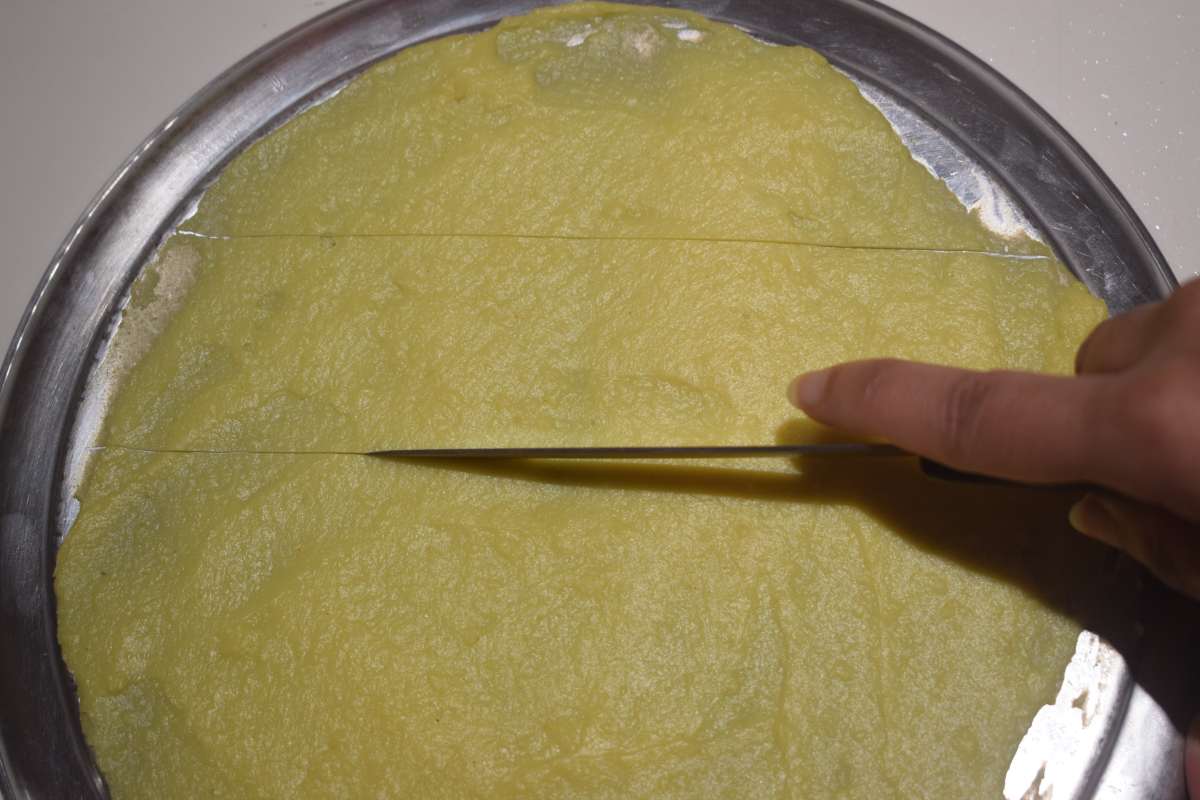
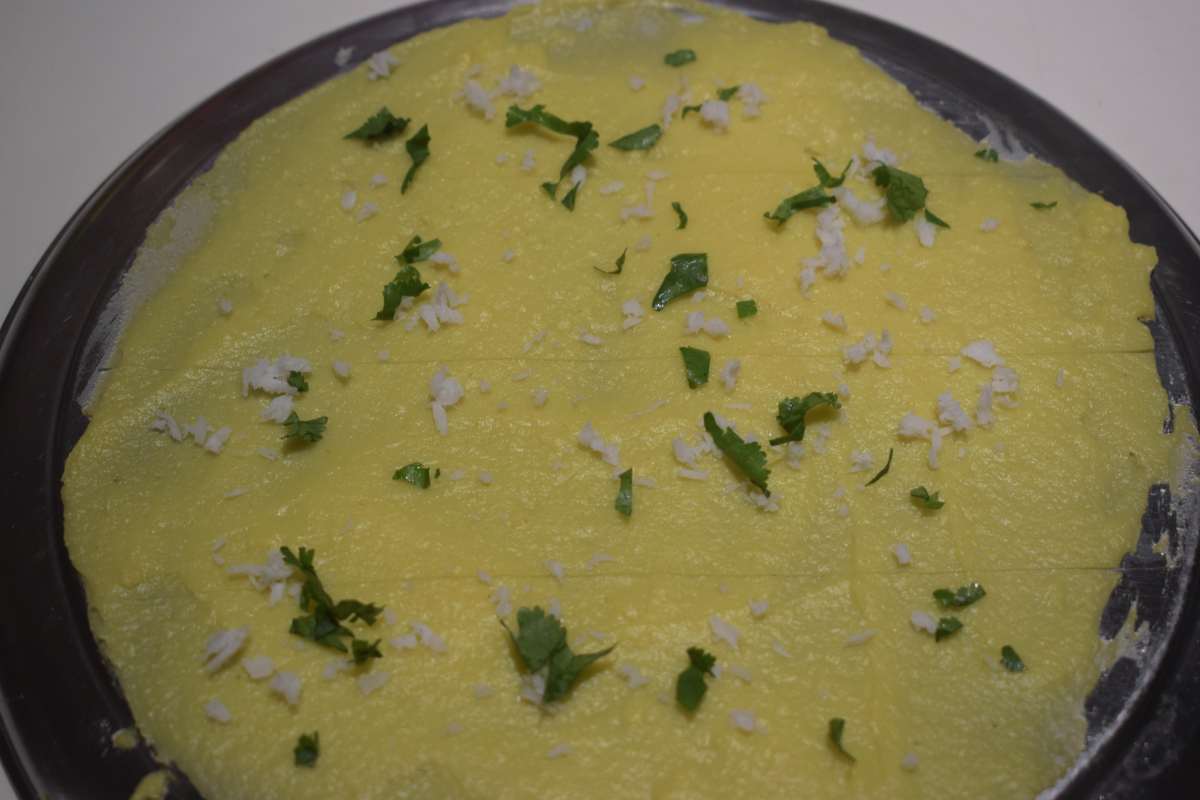
Take a steel plate and pour some khandvi mixture on it and spread it quickly as thin as possible with a knife or icing scraper. Spread all the mixture as quickly as possible either on steel plates or on clean kitchen top. Allow it to cool down for 3-4 minutes. Then cut it into thin strips. Sprinkle some grated coconut and chopped coriander leaves on it. Then gently roll each strip tightly and place it on plate.
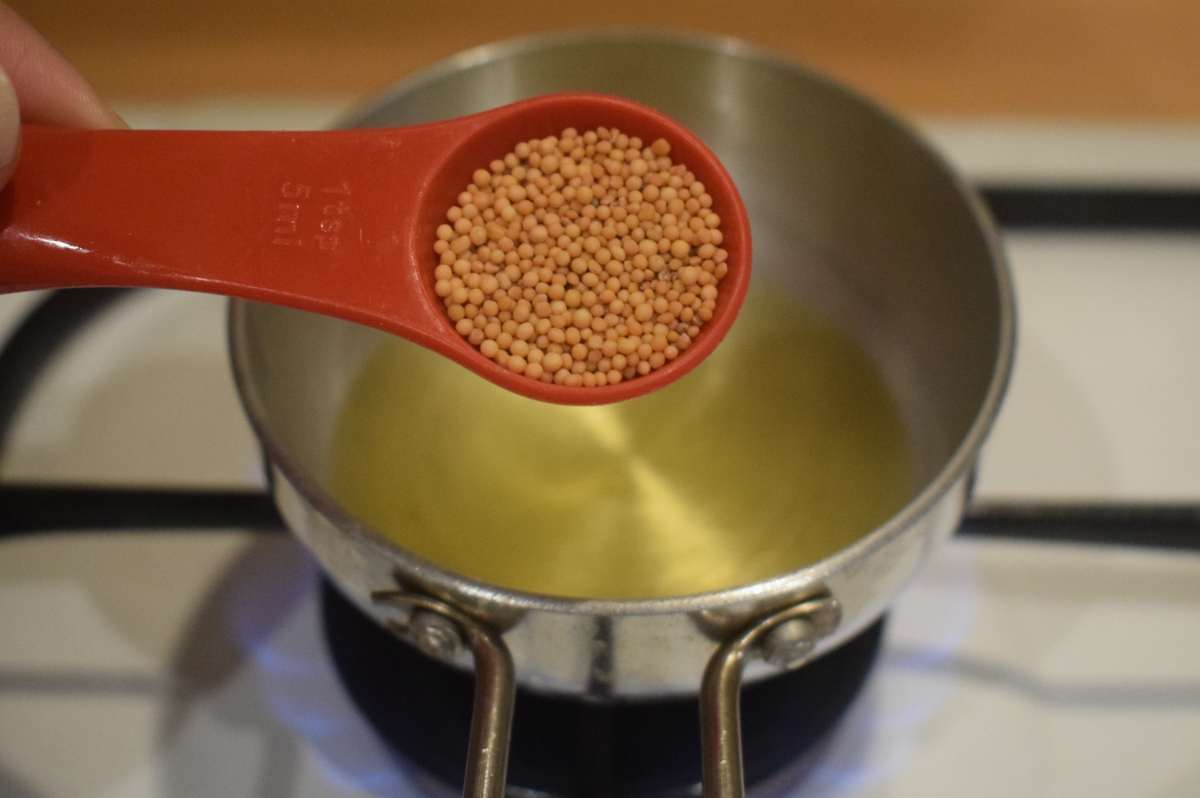
Now it’s time for tempering the khandvi. Take a pan and pour oil into it. Once the oil is hot, add mustard seeds and let them crackle. Add sesame seeds, curry leaves, green chillies and let them crackle and change colour.
Then pour the tempering along with oil on the khandvis. Sprinkle some more grated coconut and chopped coriander leaves on the top.
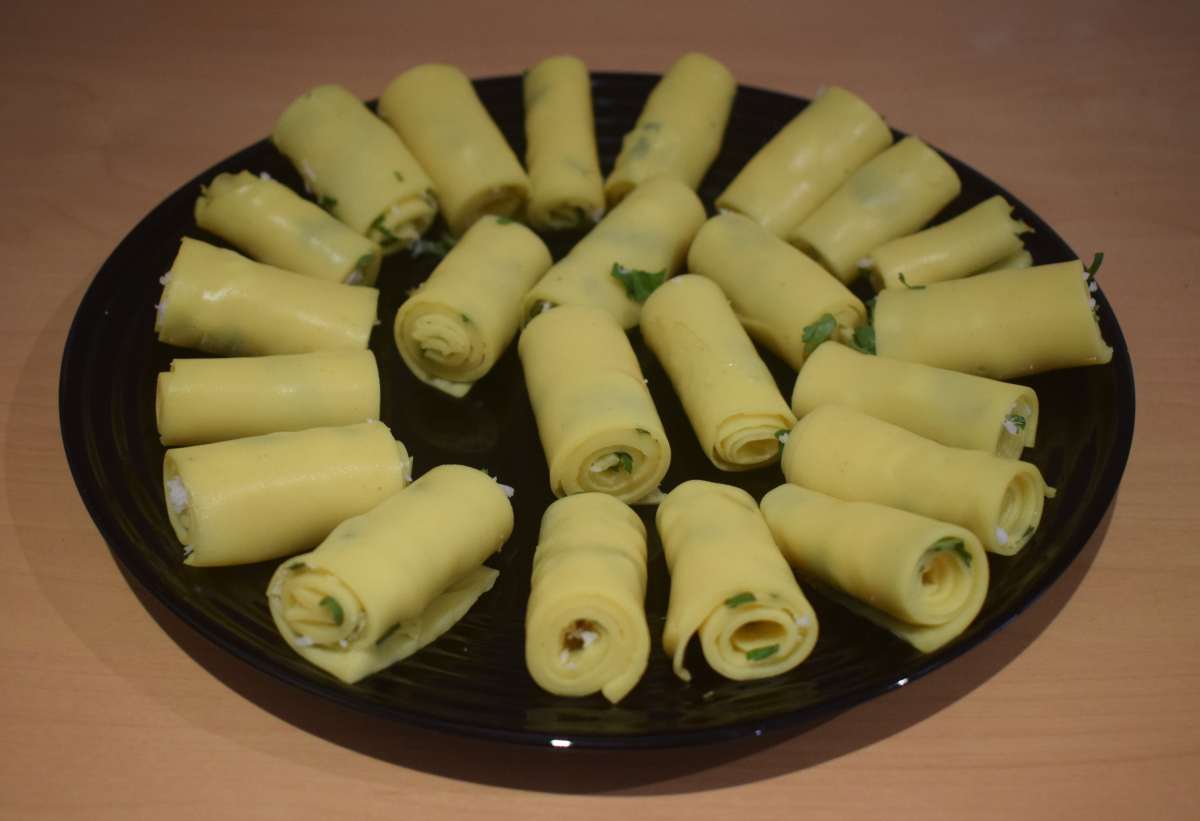
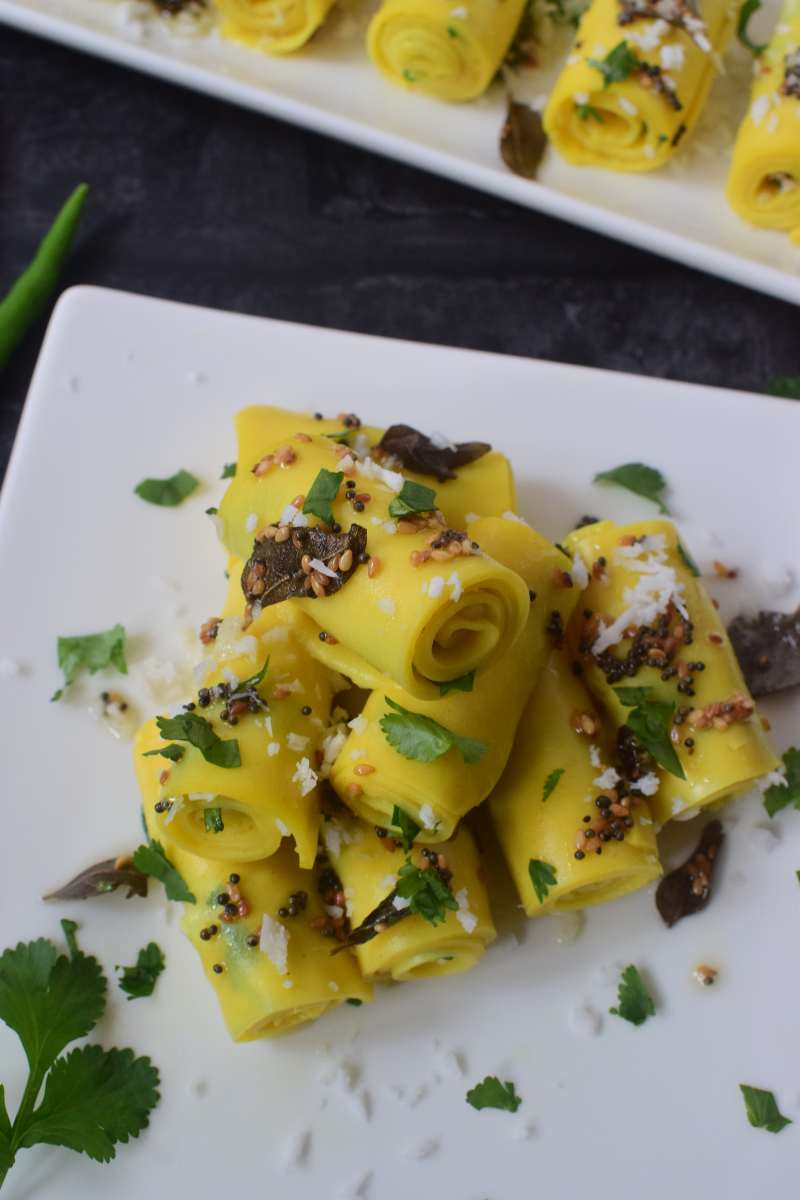
Take the pieces out carefully and serve them on a plate and enjoy with a cup of hot tea.
Many Indian snacks recipes vegetarian have already been shared in my previous posts. You can check a few of them like
Instant dhokla recipe
Dabeli
Sabudana vada
Baked mathri
..And Many more…

Ingredients:
1 cup = 250 ml
For the khandvi batter
- 1 cup Gram flour (Besan)
- 1 cup Yogurt (Dahi)
- 2 cups of Water
- ½ tablespoon Ginger paste
- 1 teaspoon green Chilli paste
- ½ teaspoon Turmeric powder
- ¼ teaspoon Asafoetida (Hing)
- ¾ teaspoon Salt, adjust accordingly
For the filling
- 2 tablespoons Coriander leaves
- 2 tablespoons grated Coconut
For the tempering of khandvi
- 2 tablespoons Oil
- 1 teaspoon Mustard seeds
- 1 teaspoon Sesame seeds
- 12-15 Curry leaves
- 2 green Chillies, chopped
For garnishing
- 1 tablespoon Coriander leaves
- 1 tablespoon grated Coconut
Instructions:
Making khandvi
- First, chop coriander leaves and keep some grated coconut handy.
- Take a large mixing bowl and add 1 cup besan aka gram flour in it.
- Add 1 cup of yogurt slowly into the besan and mix it with a whisker.
- Add ½ tablespoon ginger paste, 1 teaspoon green chilli paste into the bowl and mix it.
- Add salt, ½ teaspoon turmeric powder, and ¼ teaspoon hing aka asafoetida, one by one into the bowl and mix it thoroughly.
- Add 2 cups of water slowly into the mixture and mix it nicely till smooth.
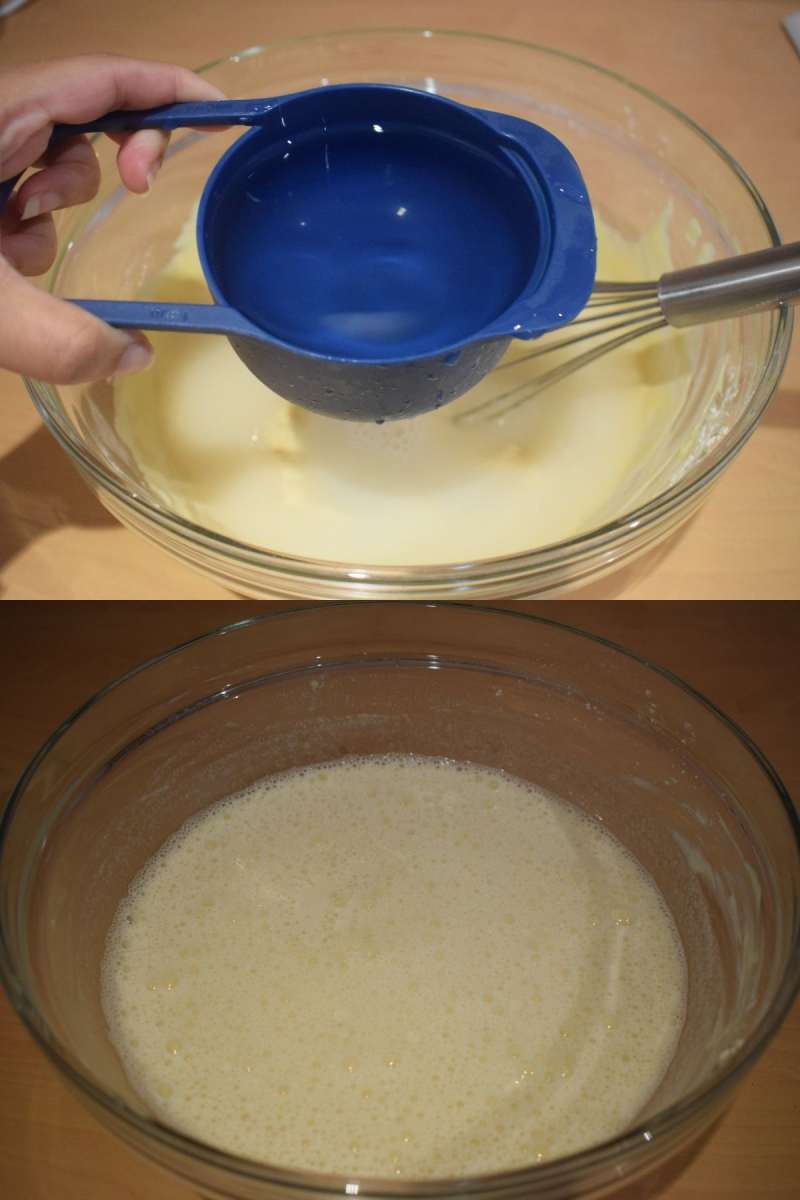
- Put a pan on low flame and set a sieve on it. Strain the batter to avoid any lumps.
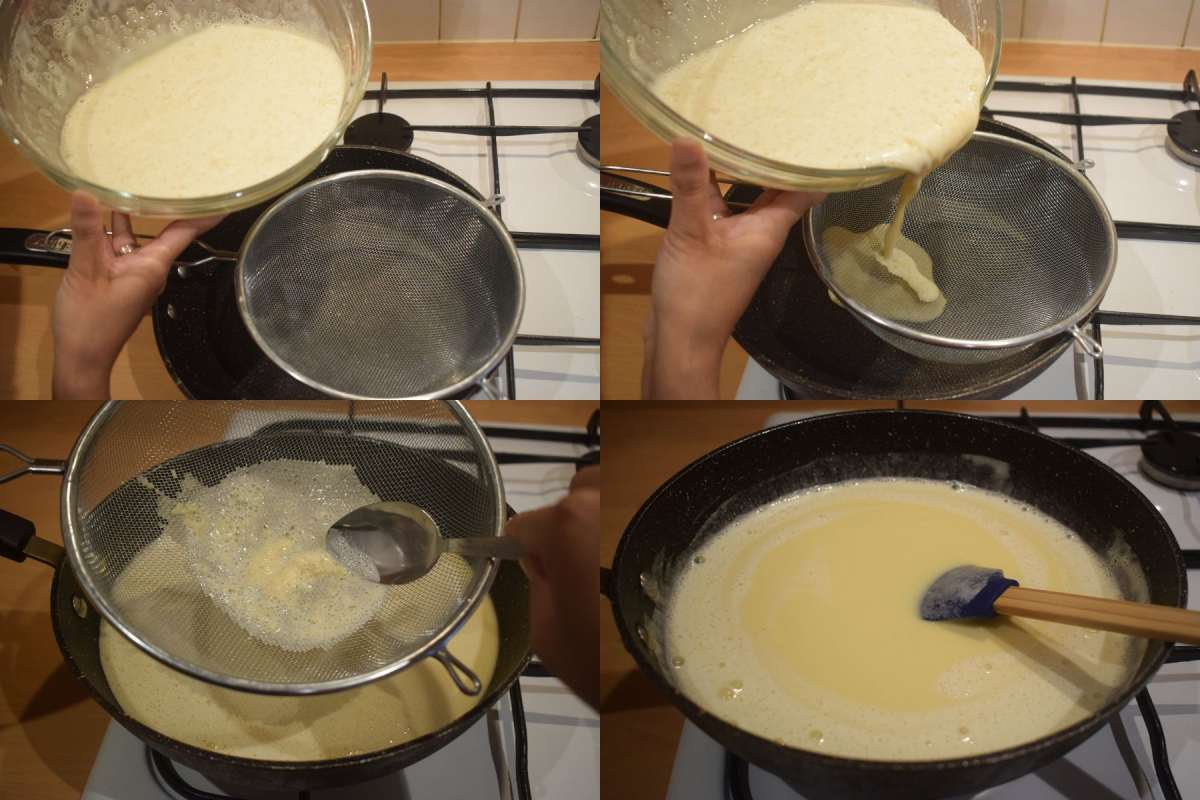
- Cook the khandvi batter on low flame for 10-11 minutes. Stir the mixture continuously to prevent lumps and to let it stick at the bottom and sides. Once the batter gets thickened like custard consistency and when it’s not pourable and goes plonk, switch off the flame immediately. Switch off the flame immediately. For me, it took exactly 10 minutes.

- The duration of cooking may vary due to the quantity of cooking, the heat of the hob, quality of ingredients etc.
- Note: Don’t overcook or else the mixture will turn blob and it would not be spreadable.
Note:
Making khandvi rolls
- Take a steel plate and pour some khandvi mixture on it and spread it quickly as thin as possible with a knife or icing scraper.
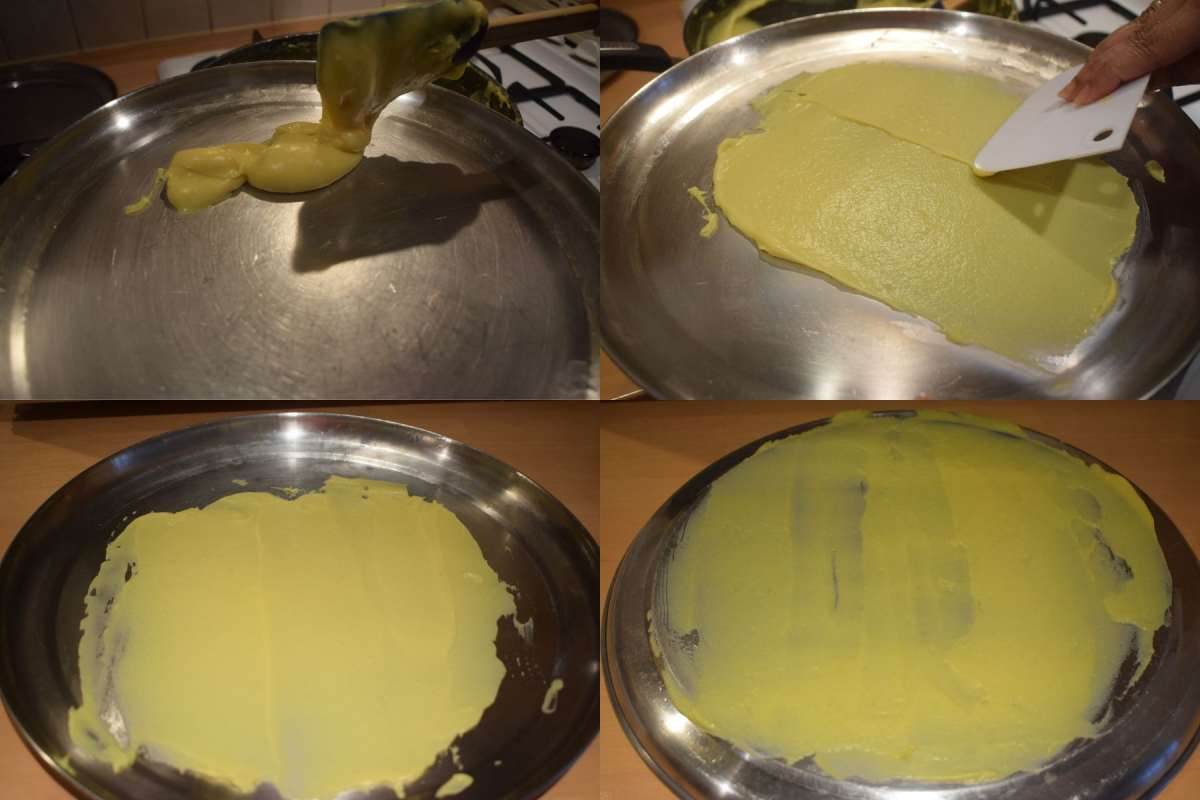
- Spread the rest of the mixture as quickly as possible either on steel plates or on a clean kitchen top. Allow it to cool down for 4-5 minutes. No need to refrigerate them.
- Cut them to thin strips with a knife.
- Sprinkle some grated coconut and chopped coriander leaves on it.
- Gently roll each strip tightly using your fingers and place it on a plate.
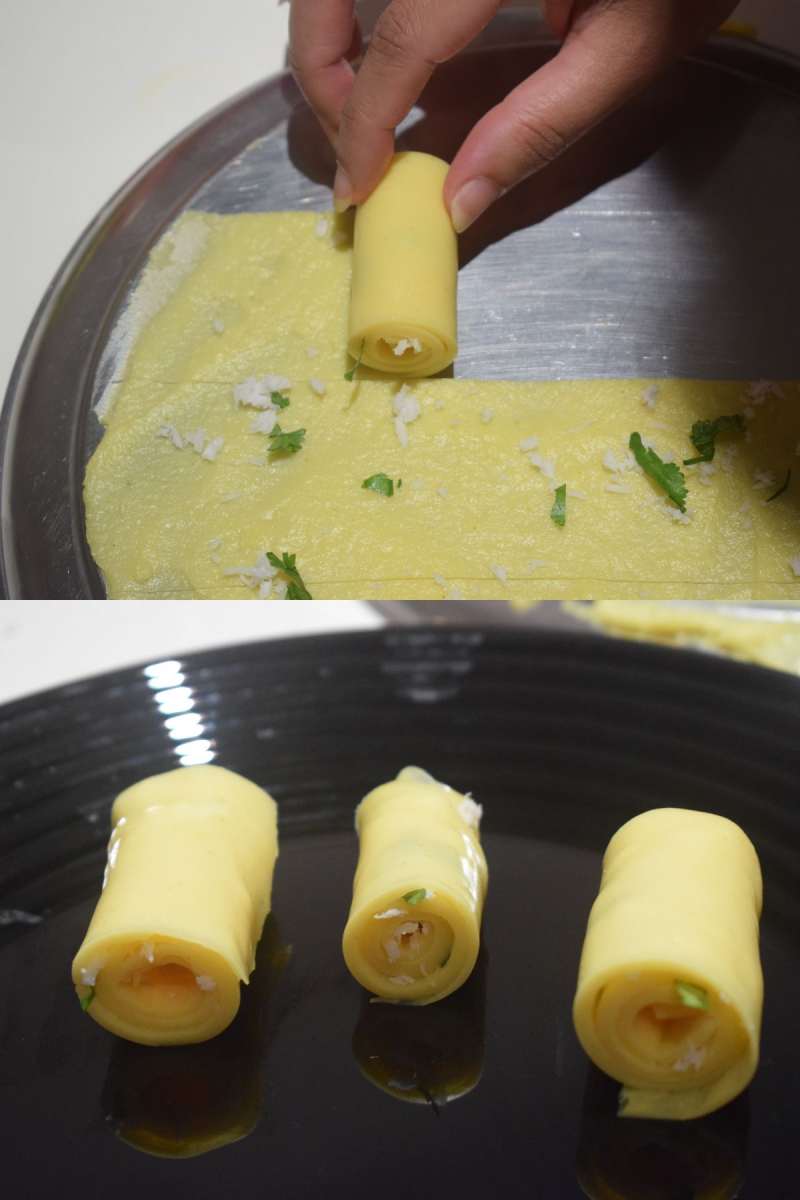
- Follow the same procedure and make all the khandvi.
Tempering for khandvi
- Now take a pan and 2 tablespoons of oil into it.
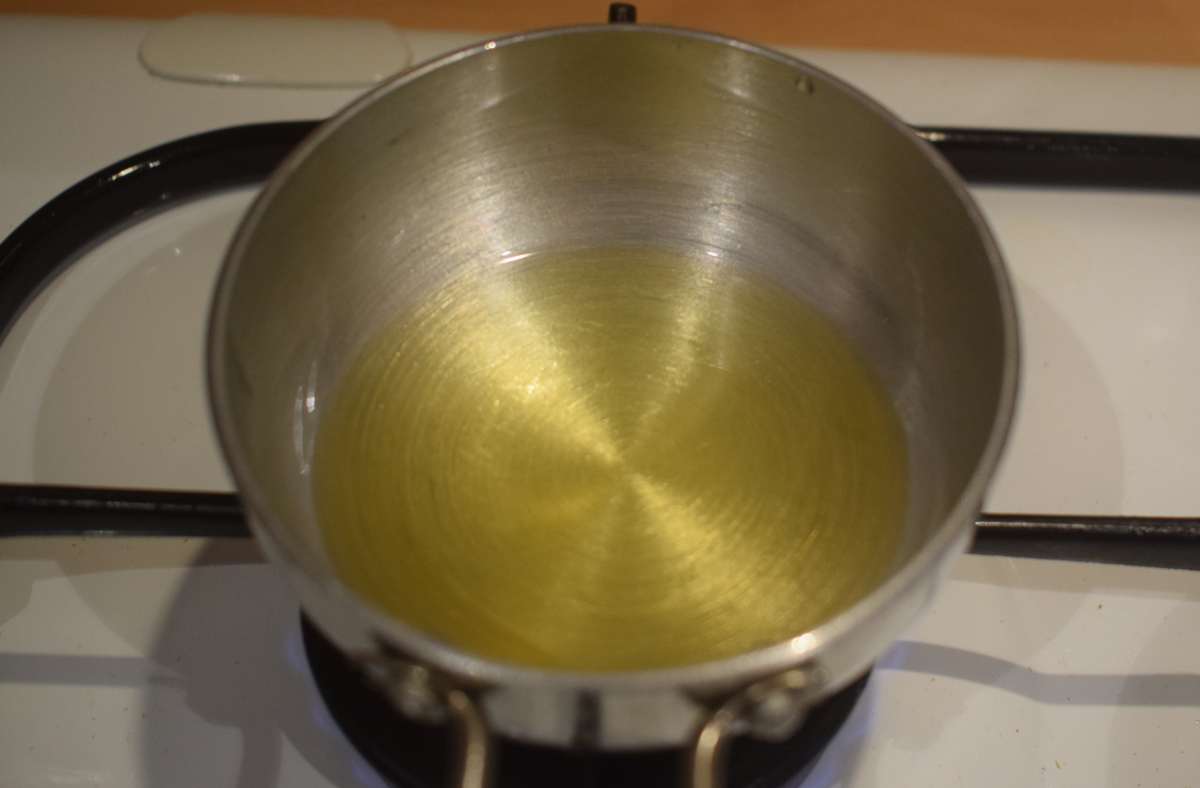
- Once the oil is hot, add 1 teaspoon of mustard seeds and let them crackle.
- Add 1 teaspoon sesame seeds, 12-15 curry leaves, 2 chopped green chillies and let them crackle and change colour.
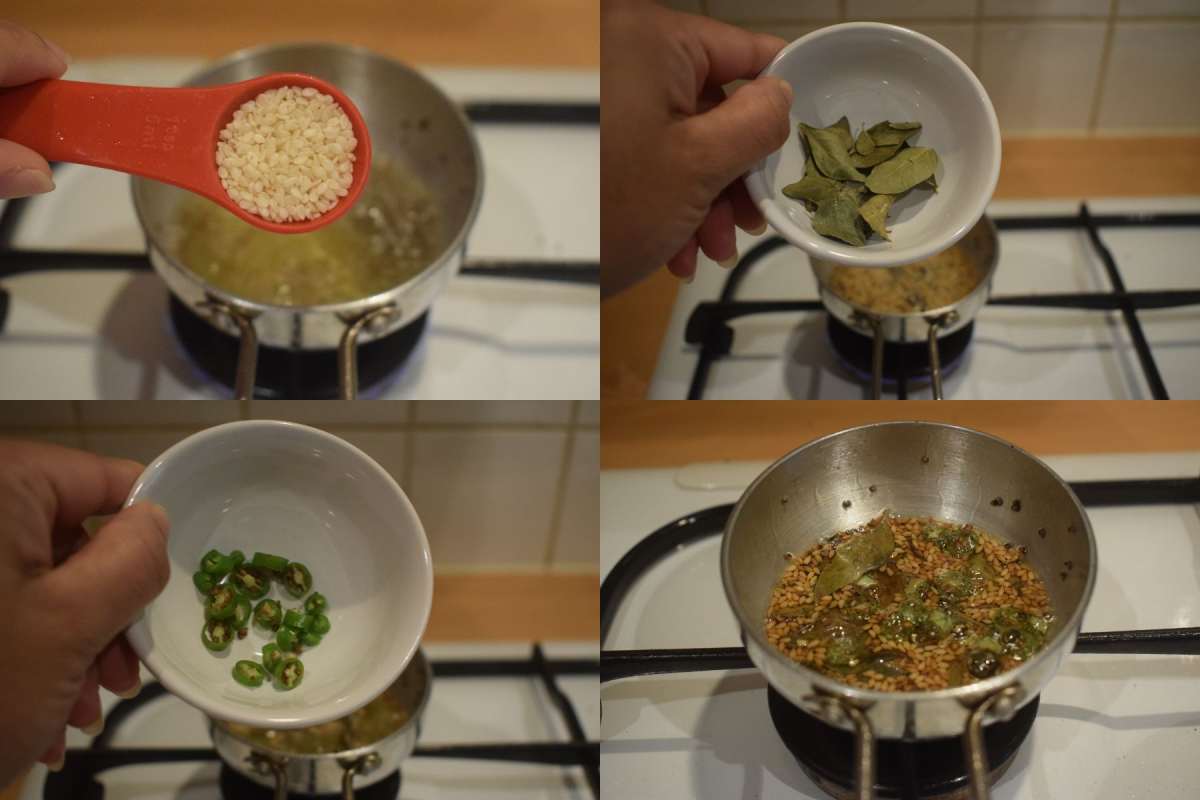
- Pour the tempering along with oil on the khandvis.
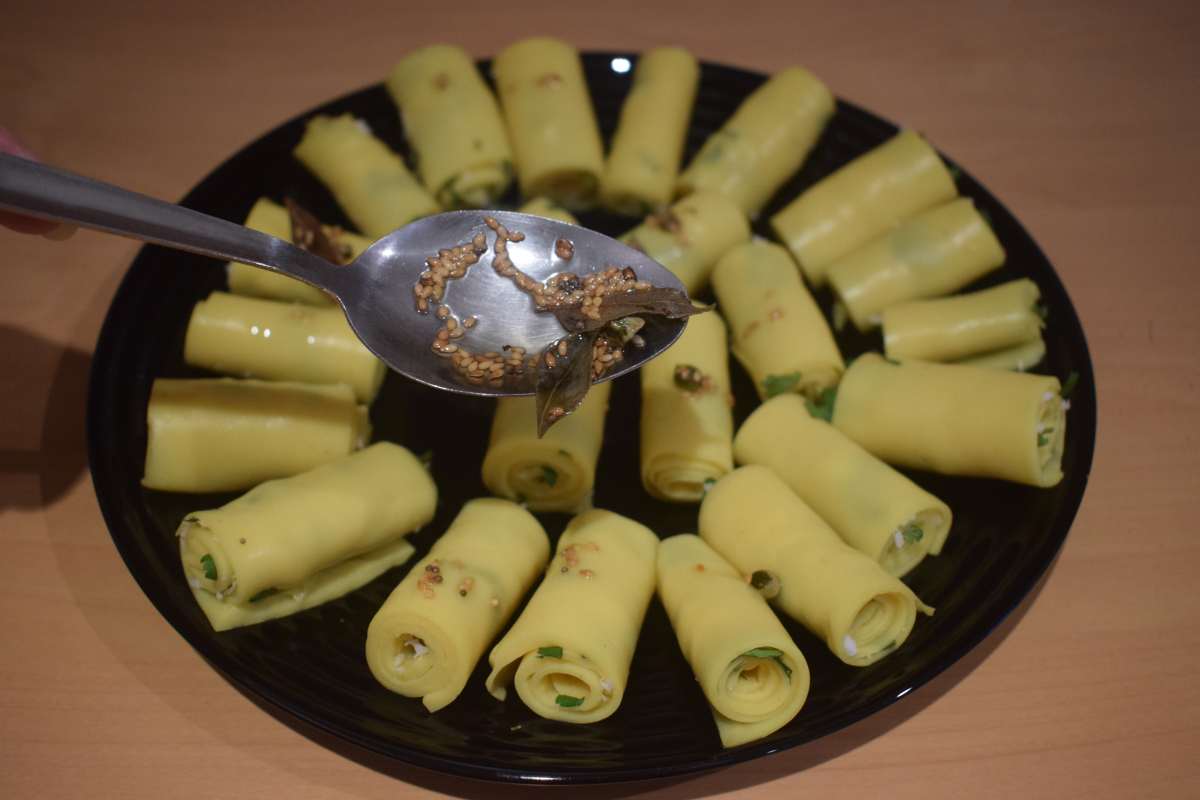
- Sprinkle some grated coconut and chopped coriander leaves on the top for garnishing. Now your khandvi is ready to serve.
Serving Instruction
Serve the khandvi recipe on a serving plate. Serve it cool or at room temperature with tea. Enjoy your homemade Gujarati snacks with your family and friends with lots of chitchats.


Ingredients
1 cup = 250 ml
For the khandvi batter
- 1 cup Gram flour (Besan)
- 1 cup Yogurt (Dahi)
- 2 cups of Water
- ½ tablespoon Ginger paste
- 1 teaspoon green Chilli paste
- ½ teaspoon Turmeric powder
- ¼ teaspoon Asafoetida (Hing)
- ¾ teaspoon Salt, adjust accordingly
For the filling
- 2 tablespoons Coriander leaves
- 2 tablespoons grated Coconut
For the tempering of khandvi
- 2 tablespoons Oil
- 1 teaspoon Mustard seeds
- 1 teaspoon Sesame seeds
- 12-15 Curry leaves
- 2 green Chillies, chopped
For garnishing
- 1 tablespoon Coriander leaves
- 1 tablespoon grated Coconut
Instructions
Making khandvi
- First, chop coriander leaves and keep some grated coconut handy.
- Take a large mixing bowl and add 1 cup besan aka gram flour in it.
- Add 1 cup of yogurt slowly into the besan and mix it with a whisker.
- Add ½ tablespoon ginger paste, 1 teaspoon green chilli paste into the bowl and mix it.
- Add salt, ½ teaspoon turmeric powder, and ¼ teaspoon hing aka asafoetida, one by one into the bowl and mix it thoroughly.
- Add 2 cups of water slowly into the mixture and mix it nicely till smooth.
- Put a pan on low flame and set a sieve on it. Strain the batter to avoid any lumps.
- Cook the khandvi batter on low flame for 10-11 minutes. Stir the mixture continuously to prevent lumps and to let it stick at the bottom and sides. Once the batter gets thickened like custard consistency and when it's not pourable and goes plonk, switch off the flame immediately. Switch off the flame immediately. For me, it took exactly 10 minutes.
Note: The duration of cooking may vary due to the quantity of cooking, the heat of the hob, quality of ingredients etc.
Note: Don’t overcook or else the mixture will turn blob and it would not be spreadable.
Making khandvi rolls
- Take a steel plate and pour some khandvi mixture on it and spread it quickly as thin as possible with a knife or icing scraper.
- Spread the rest of the mixture as quickly as possible either on steel plates or on a clean kitchen top. Allow it to cool down for 4-5 minutes. No need to refrigerate them.
- Cut them to thin strips with a knife.
- Sprinkle some grated coconut and chopped coriander leaves on it.
- Gently roll each strip tightly using your fingers and place it on a plate.
- Follow the same procedure and make all the khandvi.
Tempering for khandvi
- Now take a pan and 2 tablespoons of oil into it.
- Once the oil is hot, add 1 teaspoon of mustard seeds and let them crackle.
- Add 1 teaspoon sesame seeds, 12-15 curry leaves, 2 chopped green chillies and let them crackle and change colour.
- Pour the tempering along with oil on the khandvis.
- Sprinkle some grated coconut and chopped coriander leaves on the top for garnishing. Now your khandvi is ready to serve.
1 comment
what a beautiful looks.