
Ladi pav recipe aka pav bread recipe is considered as the official staple bread of Mumbai street food. These golden bread rolls are soft, pillowy, light, fluffy and simply irresistible with extraordinary taste and flavour. Basically, it is an oven baked Indian style bread recipe which is prepared with plain flour, yeast and milk. Homemade pav recipe is one of the most versatile bread recipes which can be had any time of the day as breakfast, lunch, snacks and even dinner.

Table of Contents
About the recipe
Tips and Suggestions
How to make Ladi Pav (step wise photos)
Recipe Card
What is ladi pav?
Ladi pav recipe is a pillow like soft buttery Indian bun. They look like golden rolls attached to each other in rows. Hence, they are referred as ladi pav. In Hindi, the word Ladi means Chain. They have two different textures and colours. The outer layer is golden in colour with a super thin crust and is completely white and super soft from inside. Traditional ladi pav recipe is always prepared with maida aka all-purpose flour but now a day’s whole wheat buns are also available in market.
Pav bread recipe is the heart of many crazily popular Indian street foods like pav bhaji, vada pav, missal pav, masala pav, dabeli, keema pav, maska pav and many more. Every morning, the tea stalls and breakfast stalls along the Mumbai streets, start their day by preparing tea and opening ladi pav packets for breakfast.
Pav bread recipe of India is popular as dinner rolls in western countries. It is quite surprising for many people but it’s true. In short, it is an integral part of worldwide dietary. This adaptable pav recipe can be paired up with your favourite soup or simply with jam or butter. It can even be taken as a side with curries for dinner.
Most of the people in India always prefer to buy pav bread recipe from market rather than preparing it at home. Baking bread at home is not so common in Indian culinary culture unlike baking cake at home. In fact, I was also included with the same crowd until I got stuck in COVID-19 LOCKDOWN. My entire thought process got changed during this pandemic.
One day, I was badly craving for dabeli but I did not have ladi pav in house. So, I decided to bake pav bread at home. It is not so easy to prepare perfect homemade pav recipe on first attempt and I was not an exception.

It took few attempts to get the perfect feathery light and pillow soft pav recipe without using any preservatives. It is all about correct measurement, correct techniques, and of course correct baking temperature and time to prepare perfect homemade pav. Baking ladi pav recipe at home is always a fun. The whole house smells wonderful and nothing can beat the taste of freshly baked warm bread.
Ladi pav recipe aka pav bread recipe is a simple and super easy recipe. Though it sounds complicated and people rush to the market to buy packet of it but it’s true. Homemade pav recipe requires only few simple ingredients to get prepared and each ingredient is easily available around the world. The best part is that it can be prepared in larger numbers without investing any extra time and effort. I have included all the tips and tricks to make the recipe easier for you so that you can bake perfect pav bread on your very first attempt.
Ladi pav recipe with step by step photos and instructions have been provided in the ‘Instruction’ section of the recipe. If you follow the step precisely then you will get perfect pav recipe which is even better than the market bought ones.
Tips to prepare perfect ladi pav
- Please follow the measurement of each ingredient for perfect result.
- Check the expiry date of the yeast before use. Yeast is the most essential component of preparing pav recipe and nothing can be compromised in it.
- Activate the yeast separately in a bowl before adding into the flour. If it does not form any foam after activation time, then discard it and again activate the yeast separately.
- Always use warm water to activate the yeast. High temperature may kill the yeast and then it will not get activated.
- Sieve the flour before making the dough to develop air into it.
- I prefer to knead the dough with warm milk rather than warm water. It makes the ladi pav rich and better in taste.
- Always use warm milk not hot milk to knead the dough. Hot milk may kill the yeast and then the pav will not rise.
- Add the butter at final stage of kneading the dough because fat tends to prevent developing gluten which is very essential for the perfect texture of ladi pav.
- Knead the dough thoroughly for at least 10 minutes to get pillow soft pav.
- Proofing the dough is another vital part of the recipe. After kneading the dough, cover it and keep it in a warm place so the dough can get fermented and rise more than double in size. At this stage, the yeast cells consume carbohydrate and release carbon dioxide for which the dough expands.
- It is important to divide the dough into equal size and make equal size balls for perfect shape of ladi pav.
- Second rising of the dough balls is equally important as the first proofing of the dough.
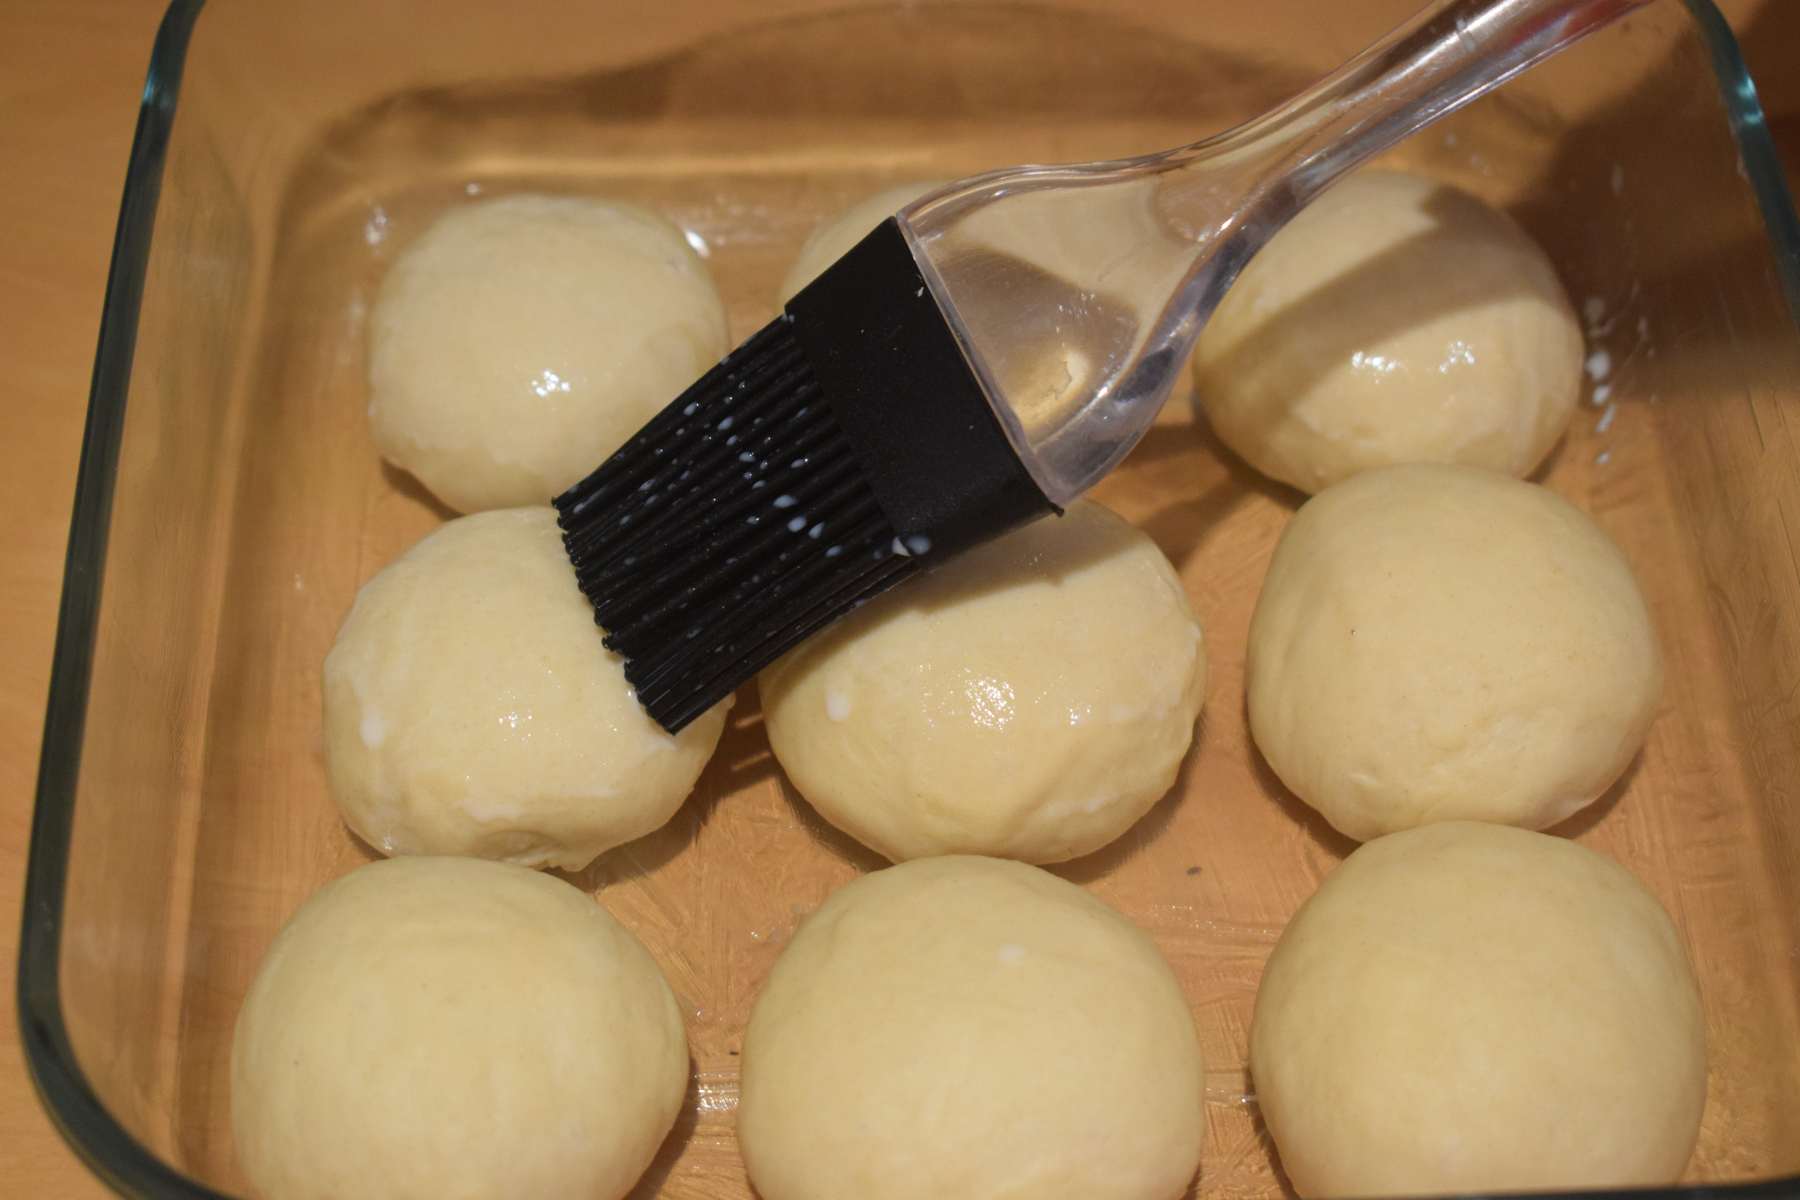
- Don’t forget to brush milk or melted butter before baking the pav recipe. It gives extra shine and nice colour on the top.

How to make ladi pav?
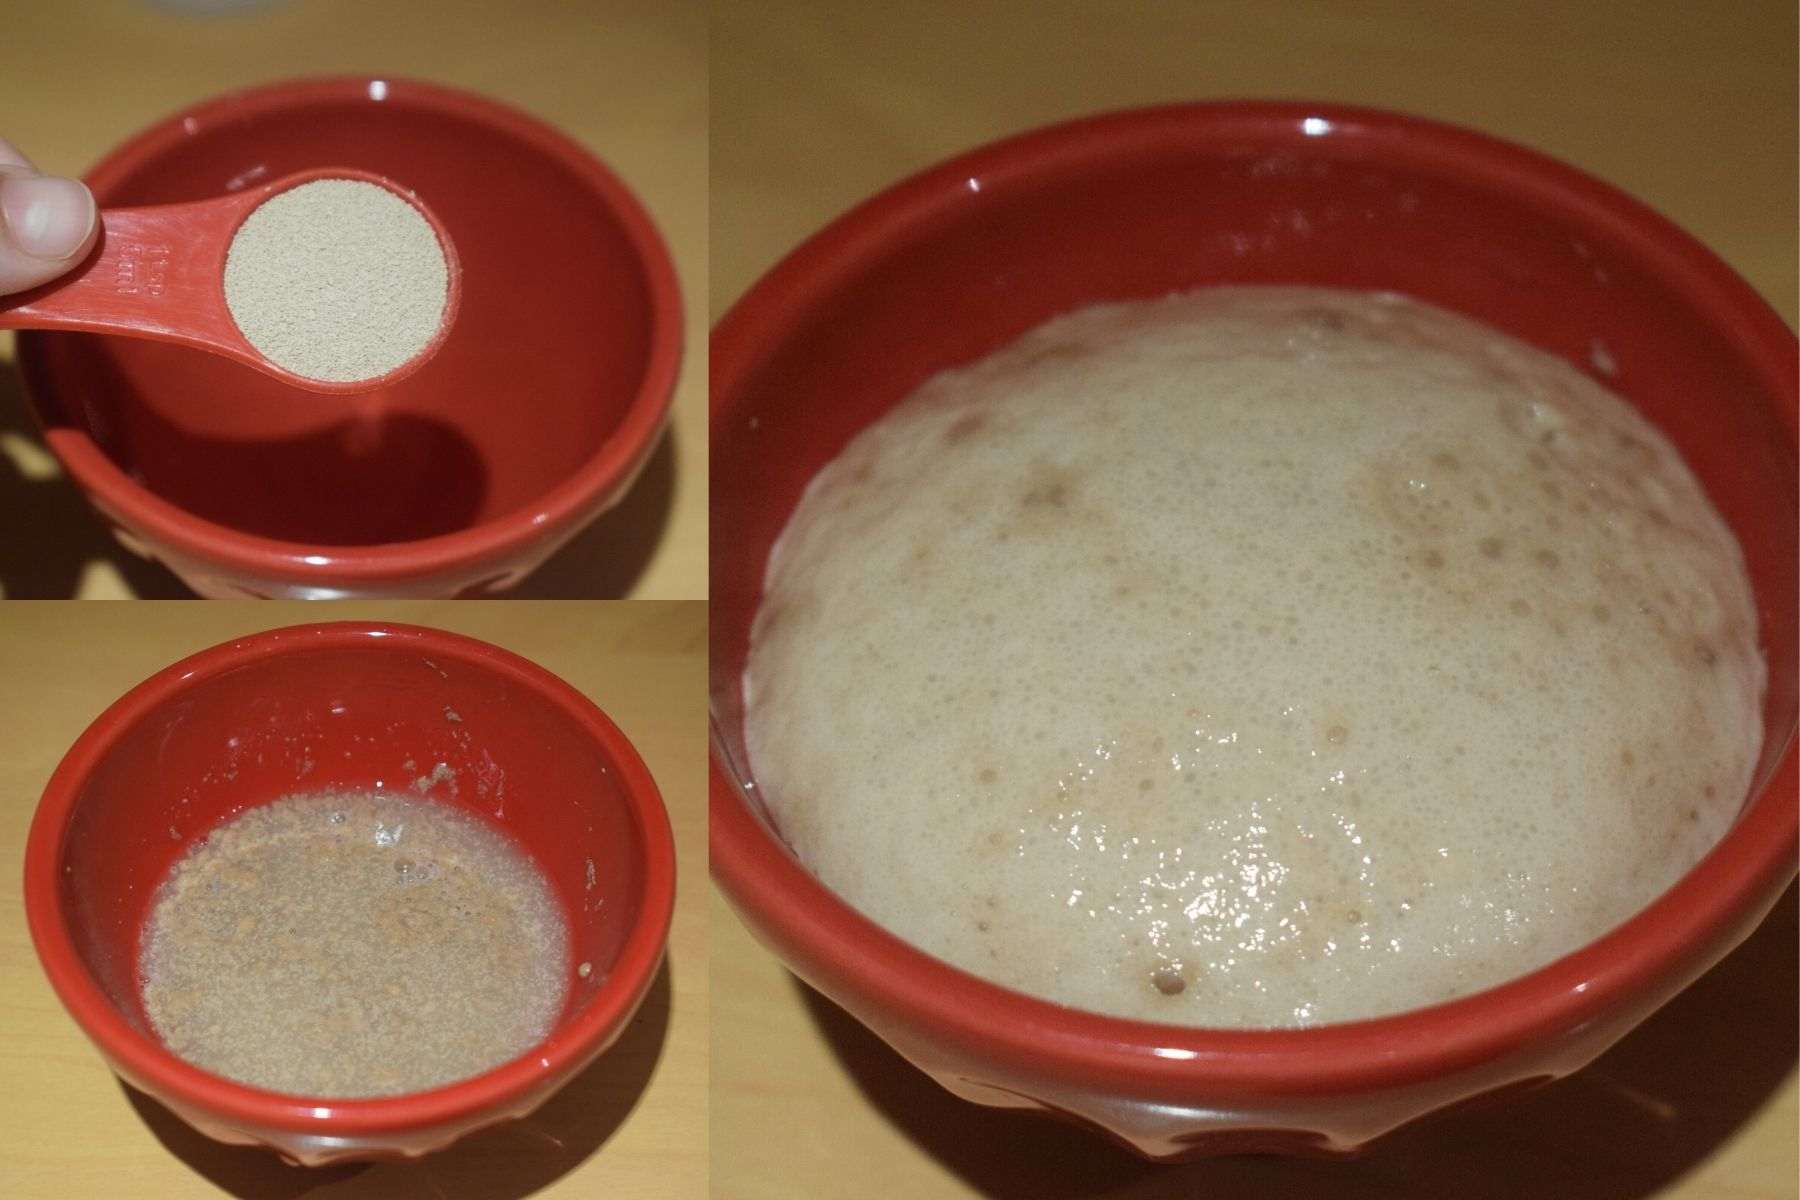
To prepare ladi pav recipe, first activate the yeast in a separate bowl. To activate it, first take water and sugar into a microwavable bowl and mix it well. Then microwave it till warm and not hot so that you can easily dip your finger into the mixture. Add yeast into the bowl and give a quick mix. Cover the bowl and allow it to rest for 15-20 minutes. Don’t disturb the bowl in between.
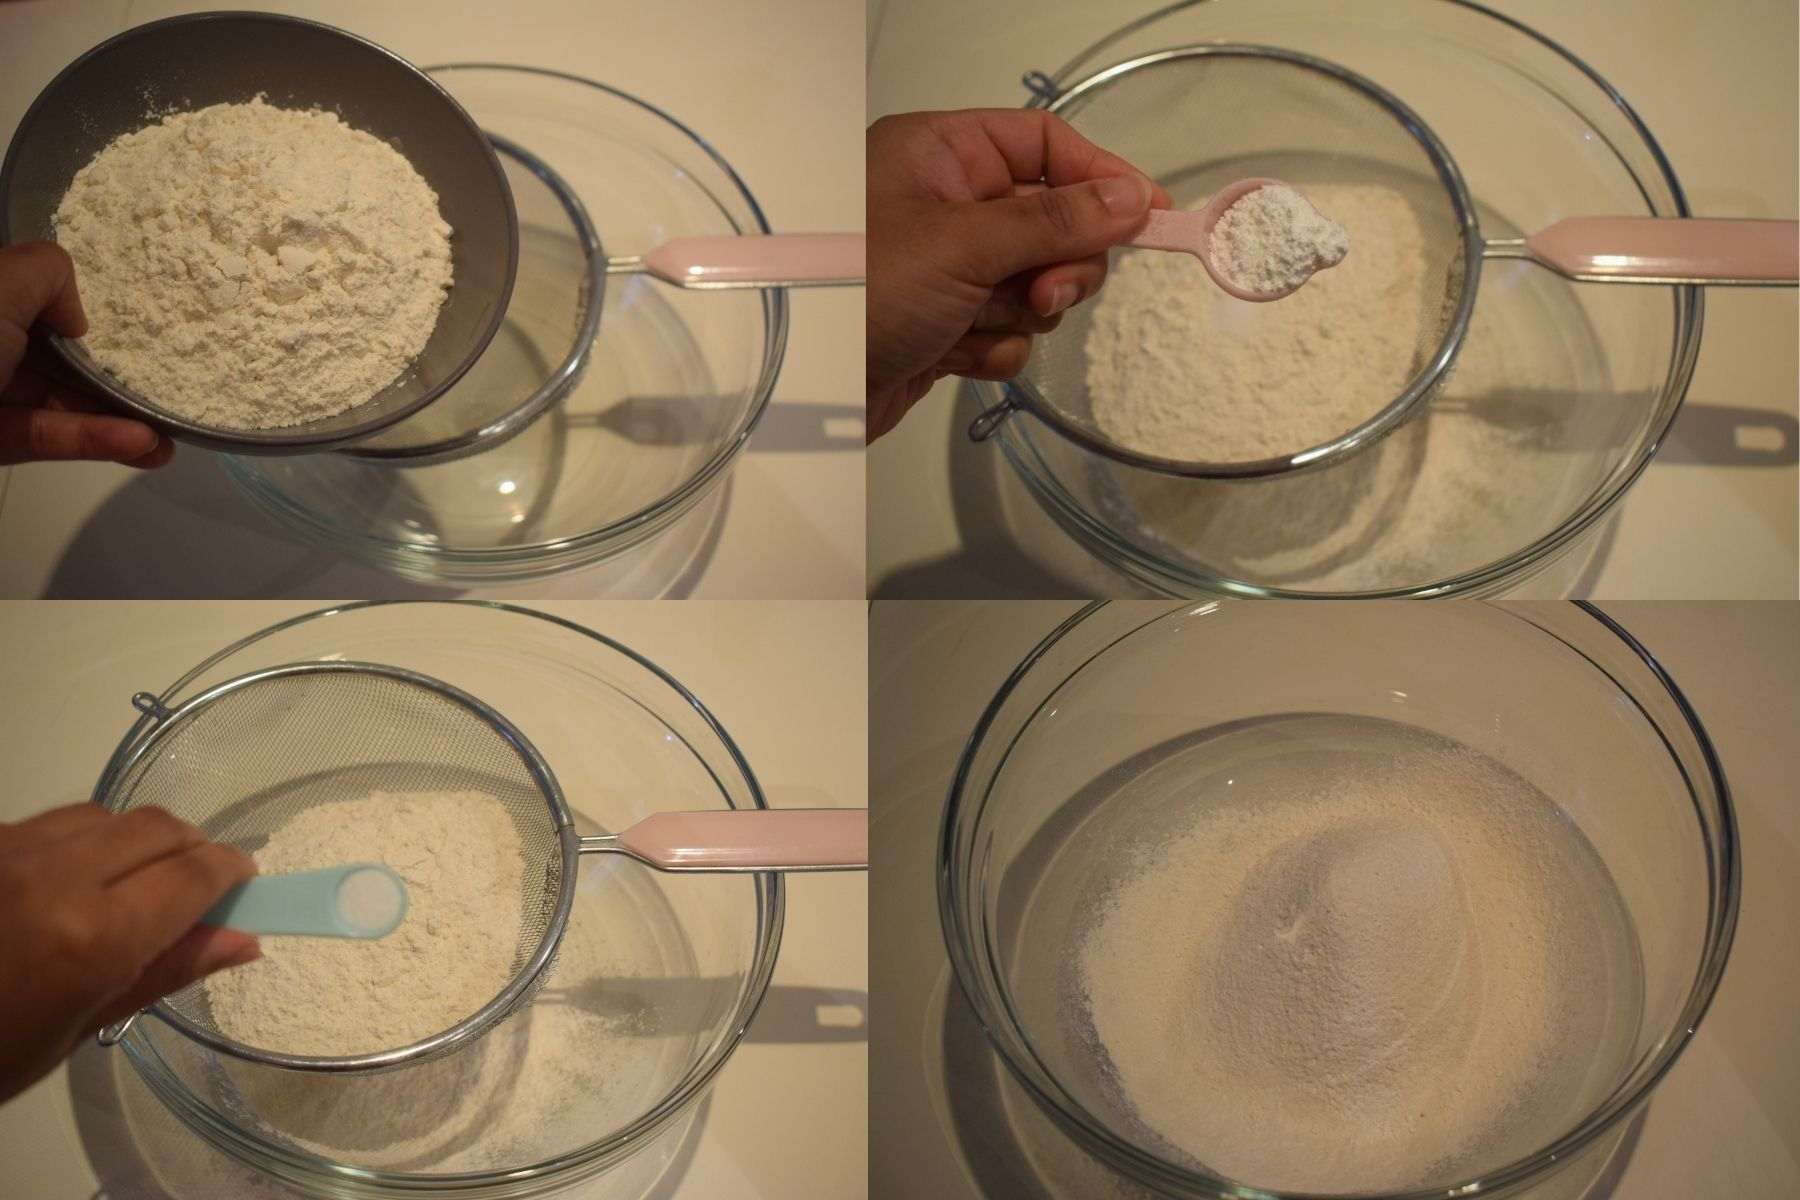
Then in a large mixing bowl, place a sieve. Add all-purpose flour, baking powder, salt and sieve them nicely to develop air.
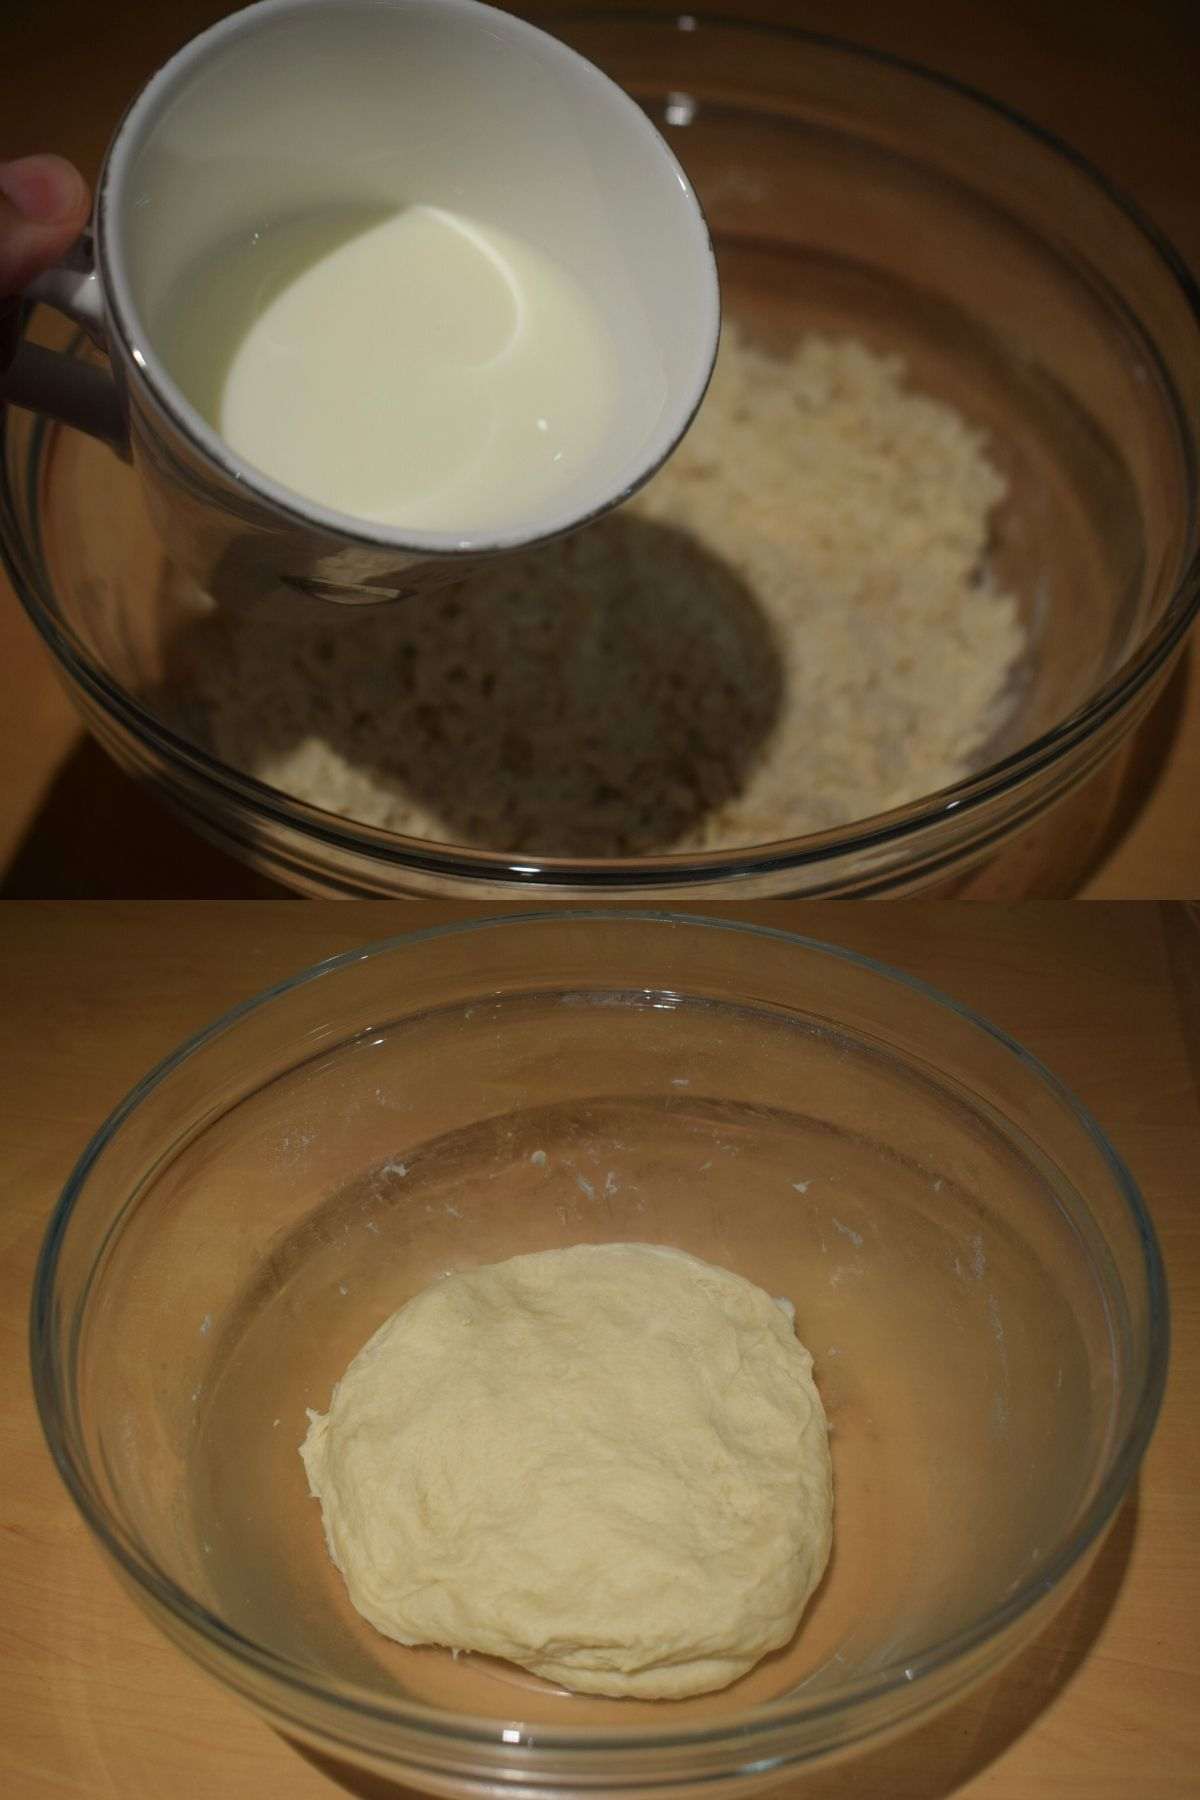
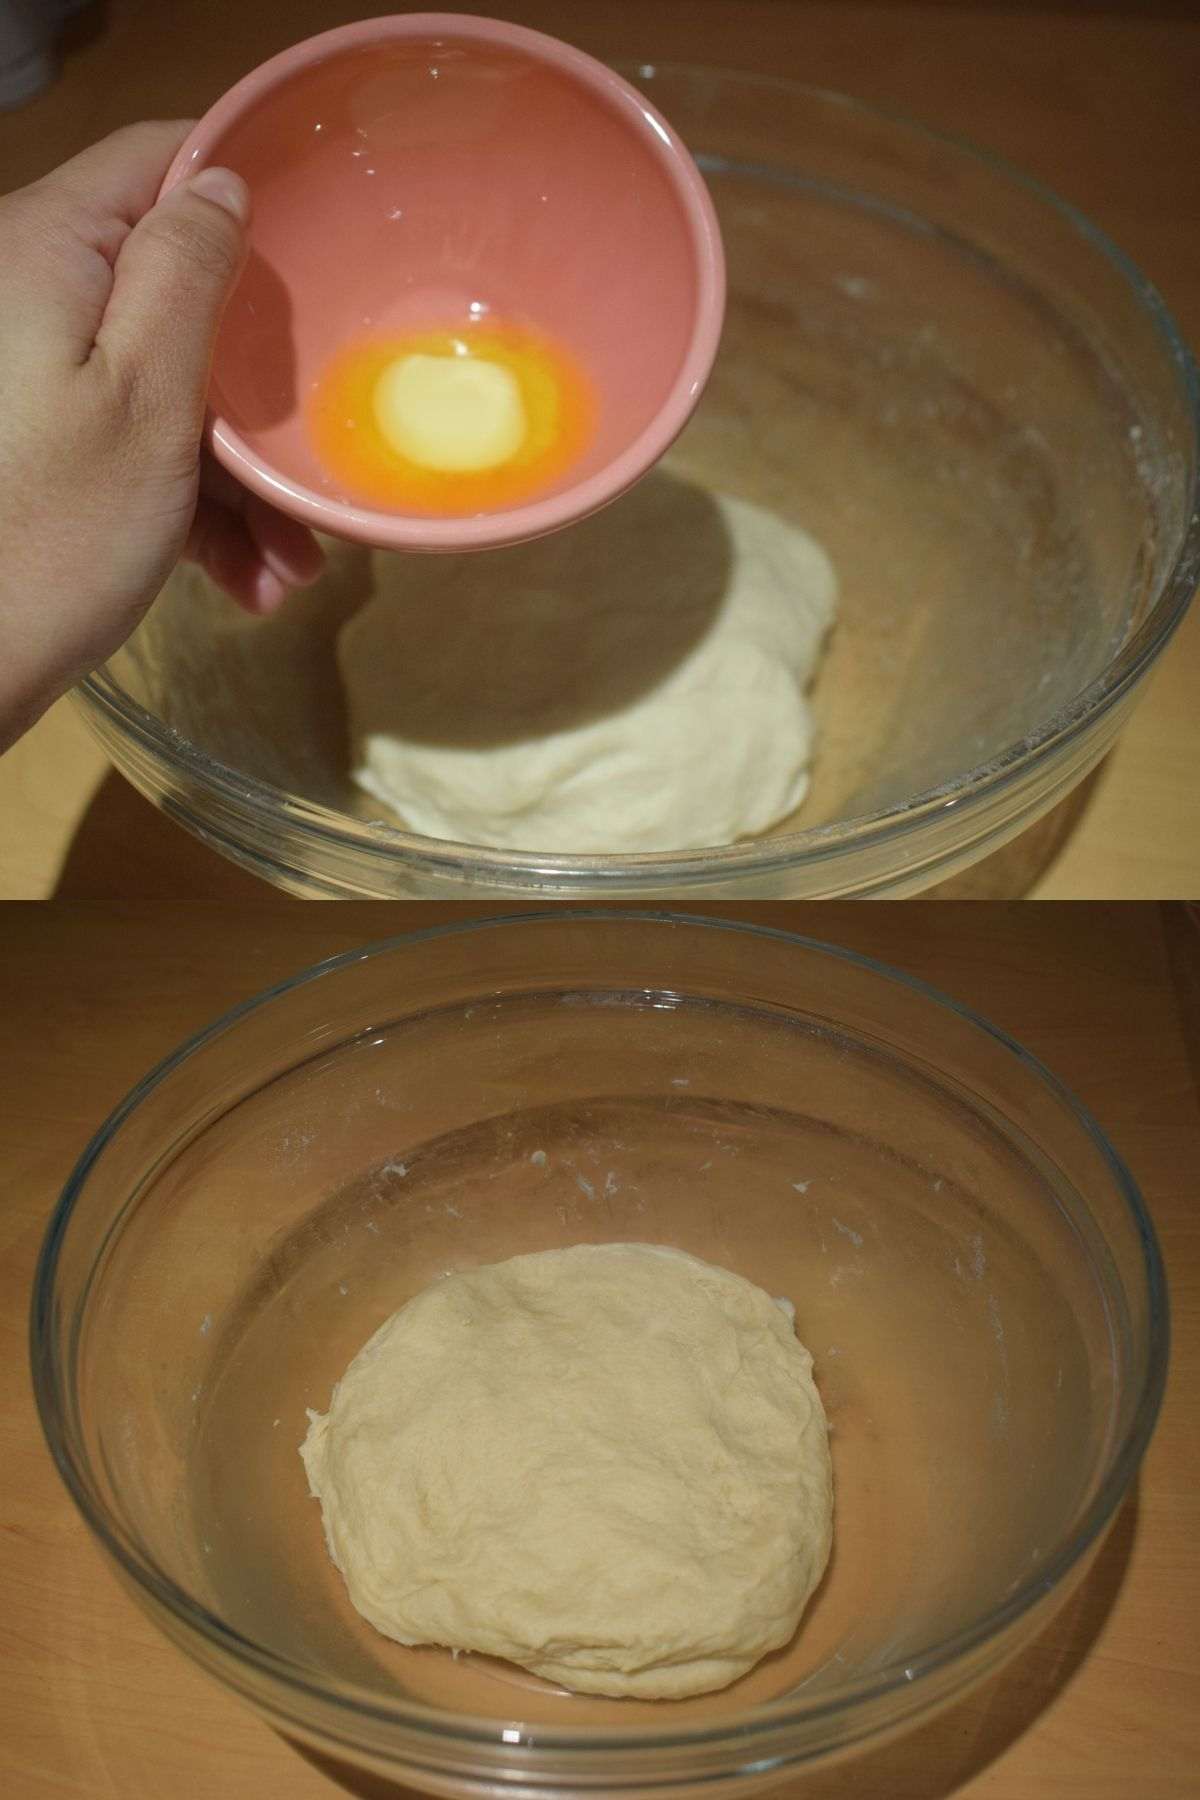
Check the yeast. If it has got activated, then it will rise, and foam would form. Add the activated yeast into the flour and mix it well. Then add warm milk slowly into the flour and knead it to a super soft, smooth and non-sticky dough. Initially, the dough will be sticky but don’t worry after kneading for some time it will become non-sticky. Add soft or melted butter into the dough and mix it thoroughly. Initially, the dough will get oily but later it will absorb the oil. Knead the dough thoroughly for around 10 minutes. You can use food processor as well to minimize your effort. Tuck the dough and place into the mixing bowl.
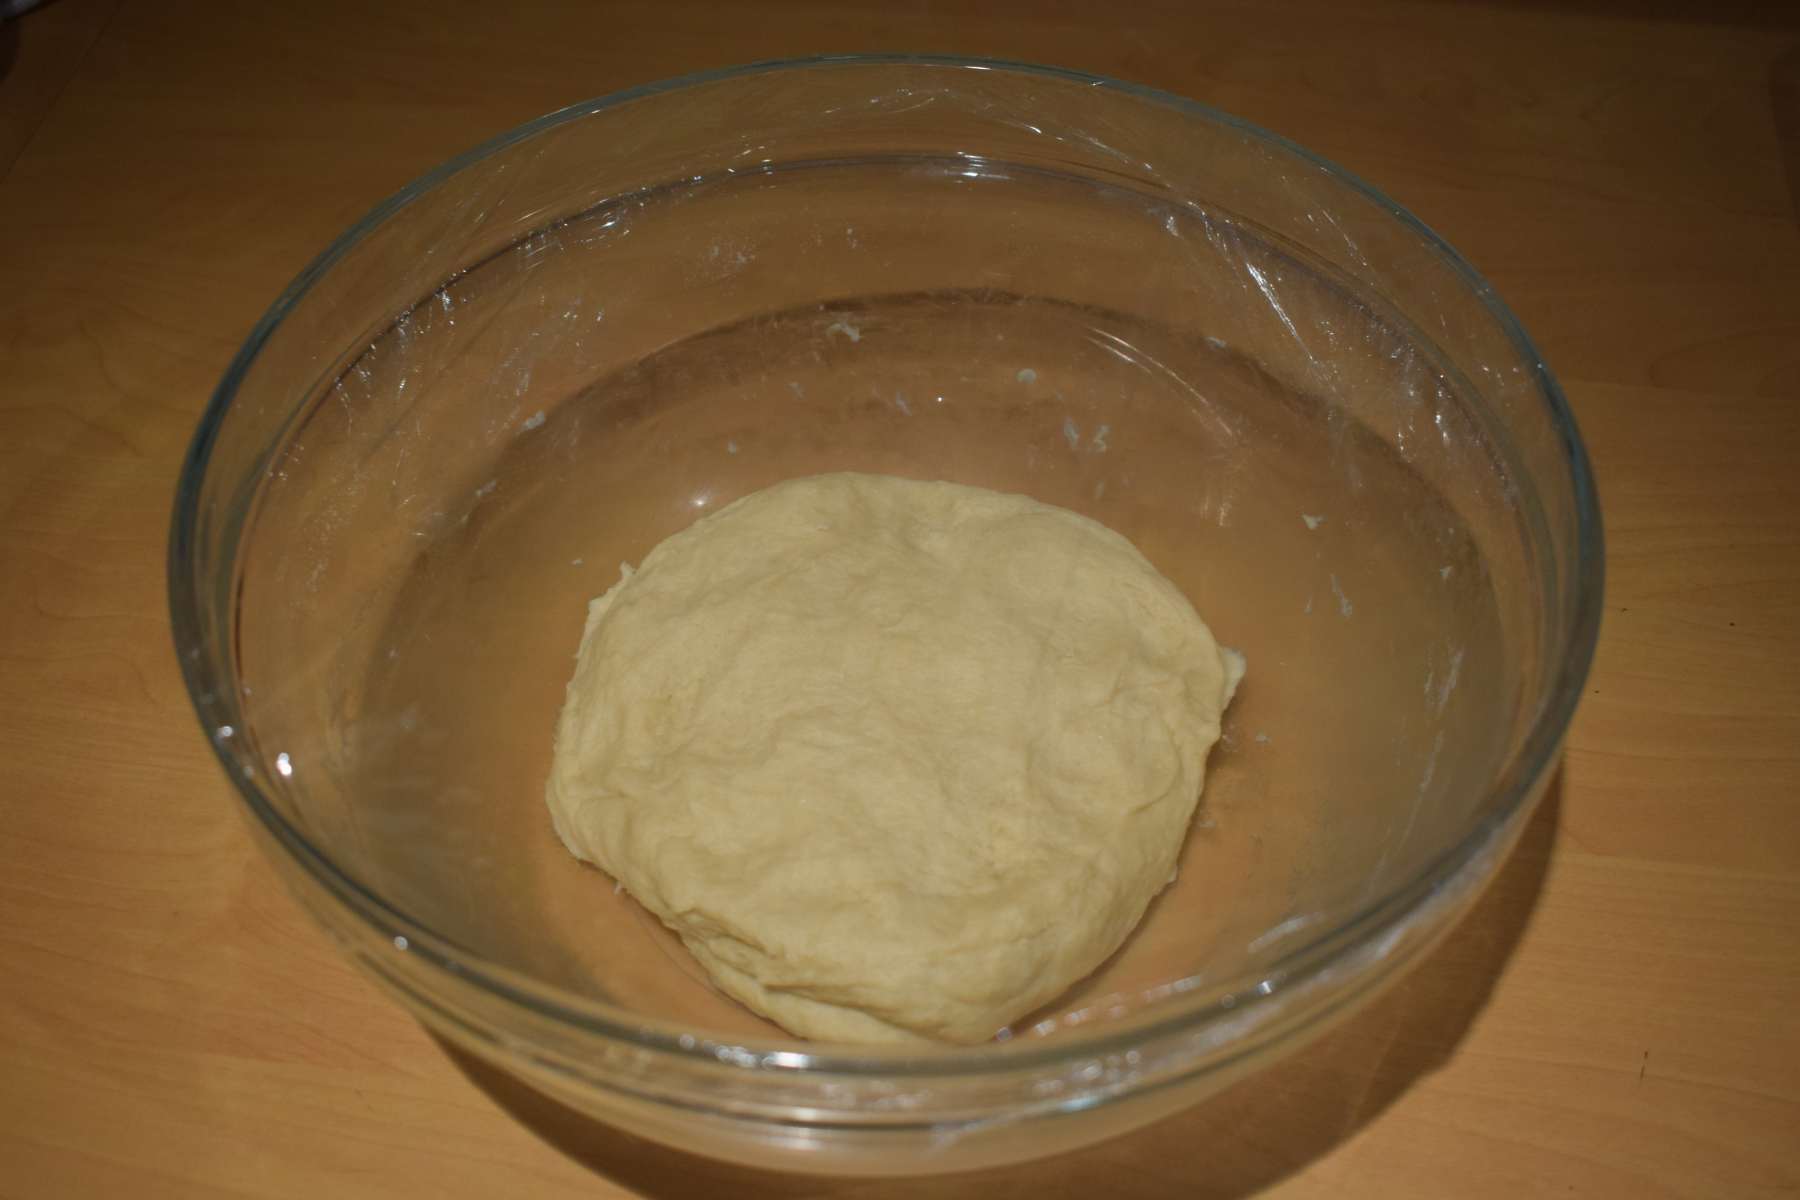
Then cover the mixing bowl and keep it into a warm place for proofing for 1½ hours to 2 hours.
Proofing: After kneading, the dough is covered and kept in a warm place for some time so it can get fermented and rise more than double in size. At this stage, the yeast cells consume carbohydrate and release carbon dioxide for which the dough expands.
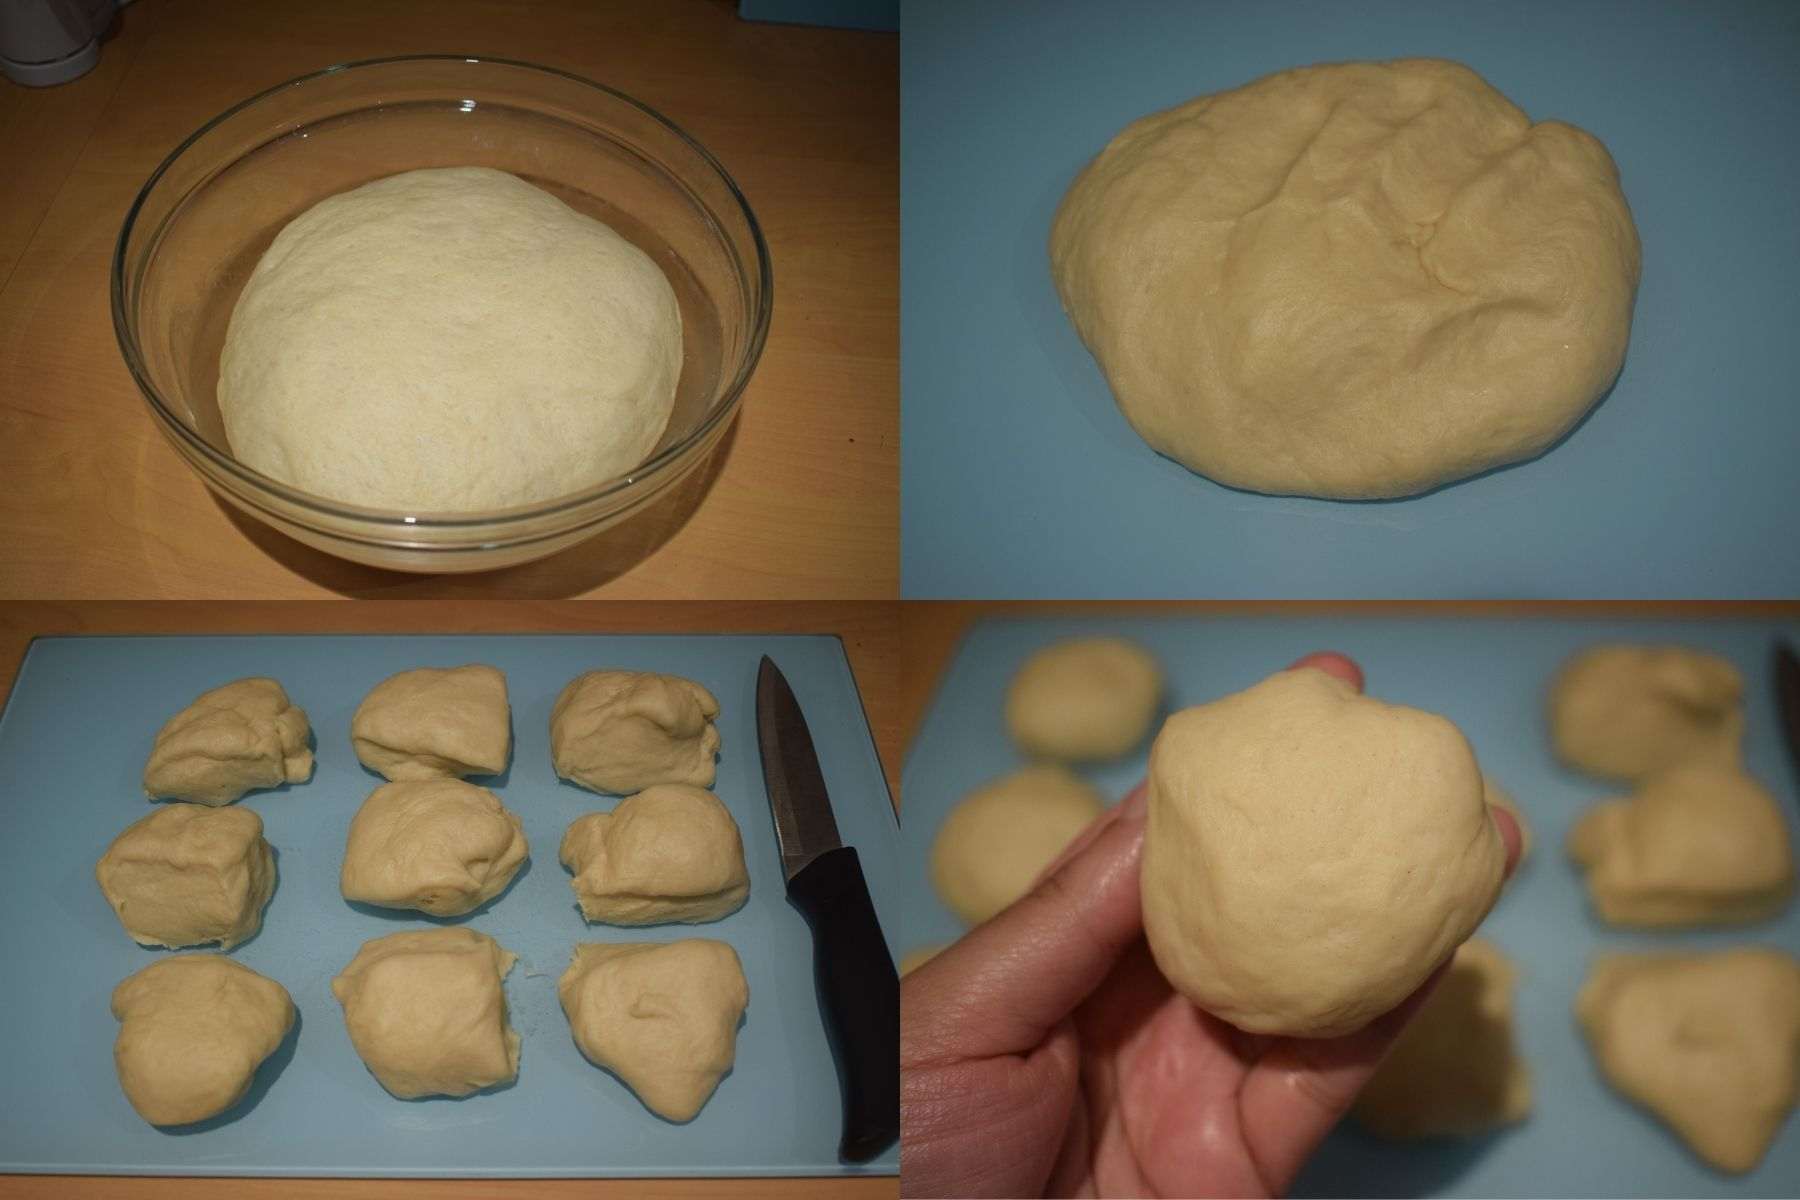
After proofing, the dough will be double in size with lots of air incorporated in it. Punch the dough and release the air. Then knead the dough for a minute and divide them into equal portions and make smooth balls by tucking them to the bottom to avoid scars.
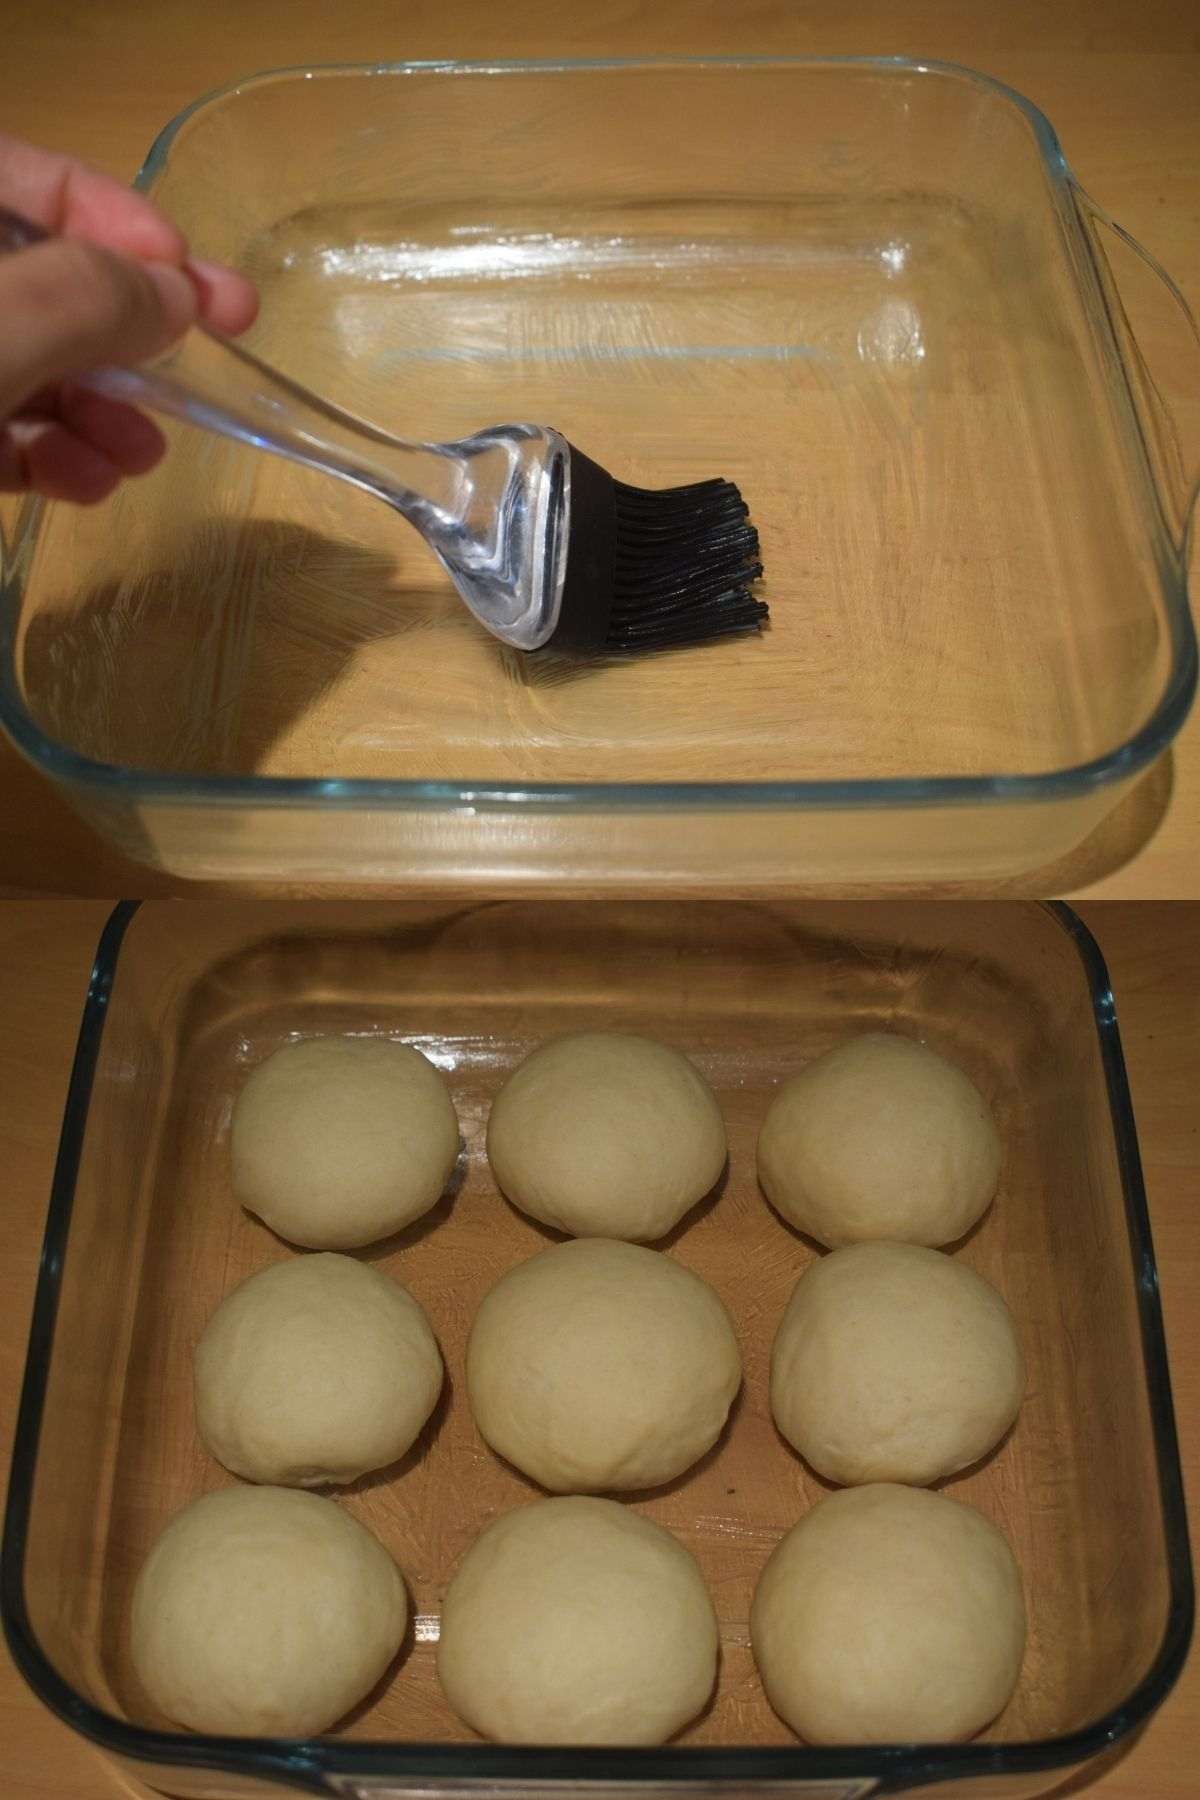
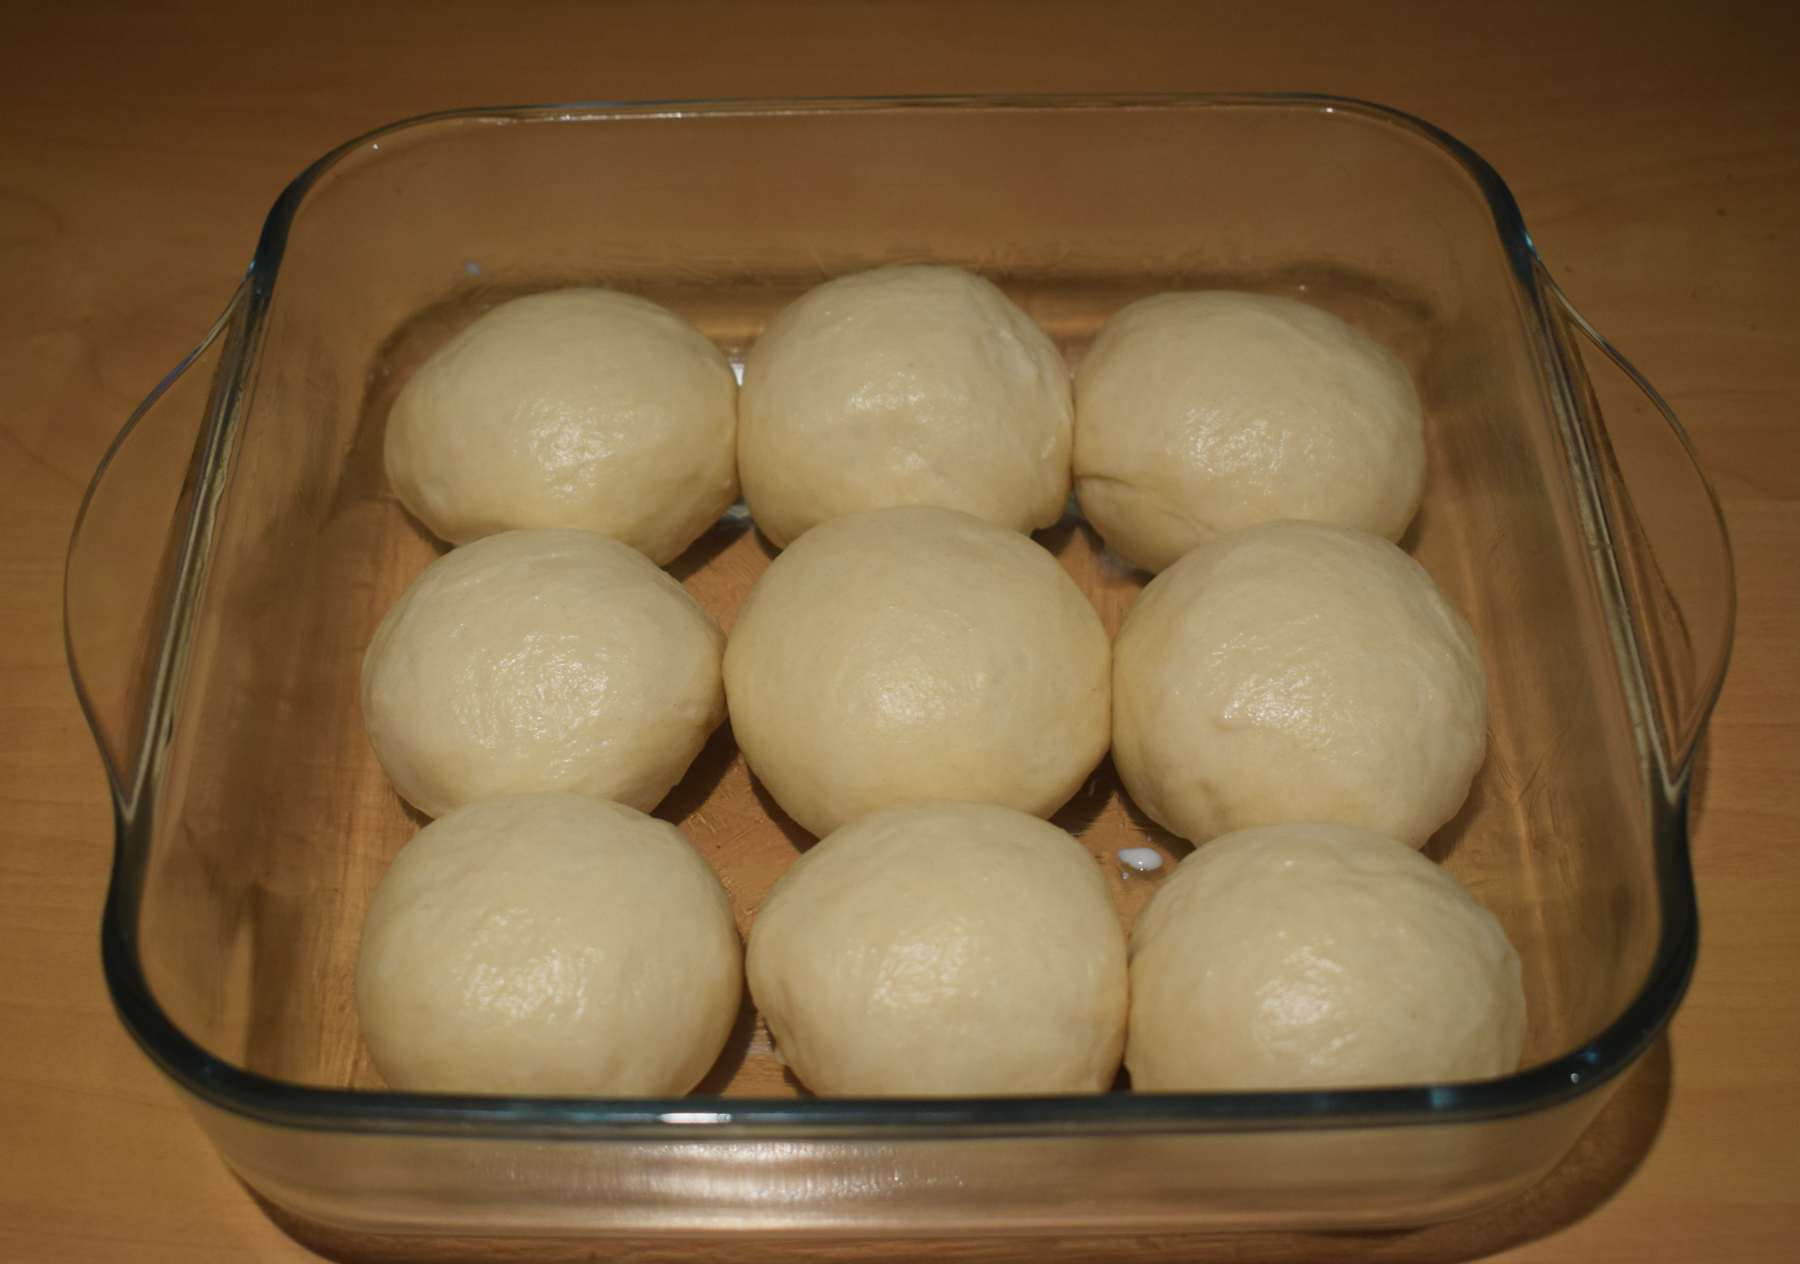
Grease the baking tray and place the dough balls into it. Cover the tray and keep it in a warm place for at least 20 minutes, preferably half an hour. After that, the dough balls will rise to bigger in size.
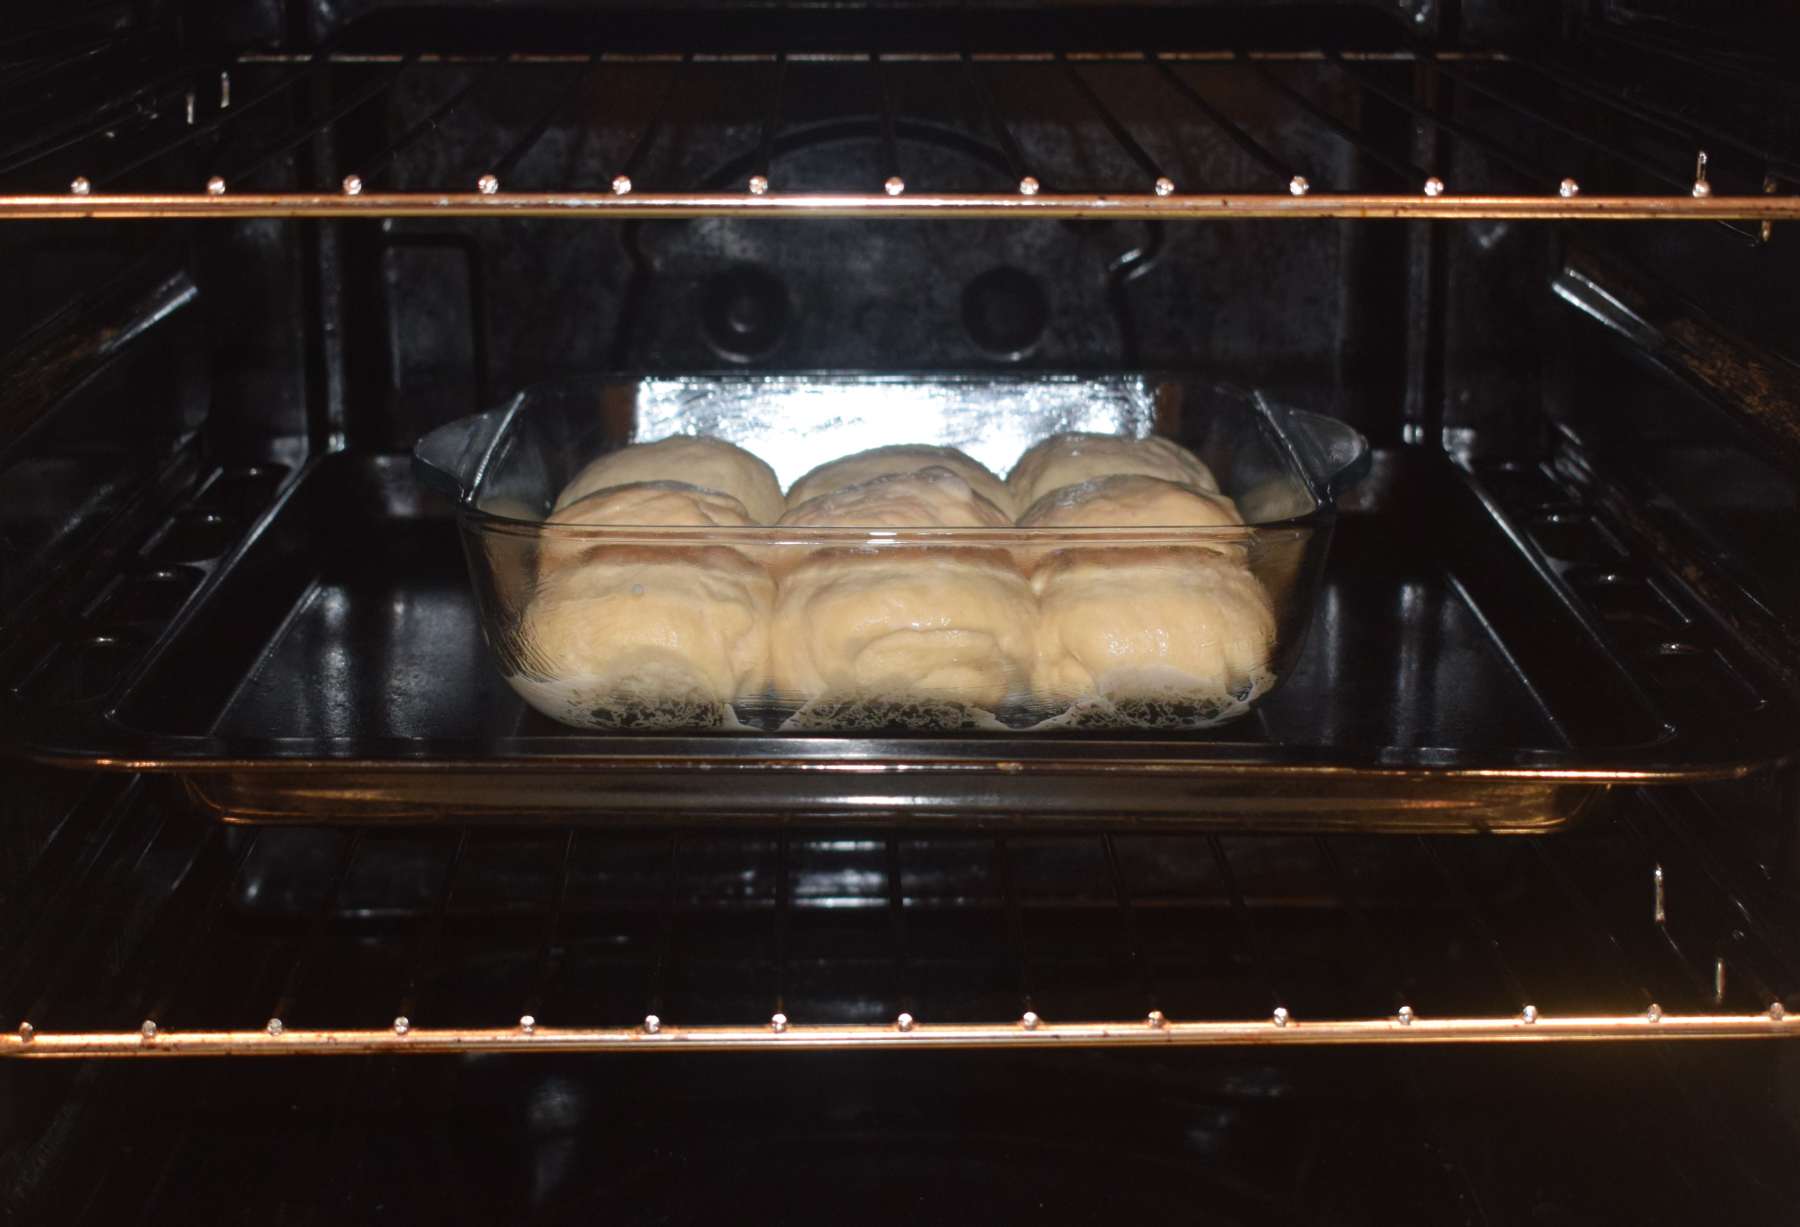
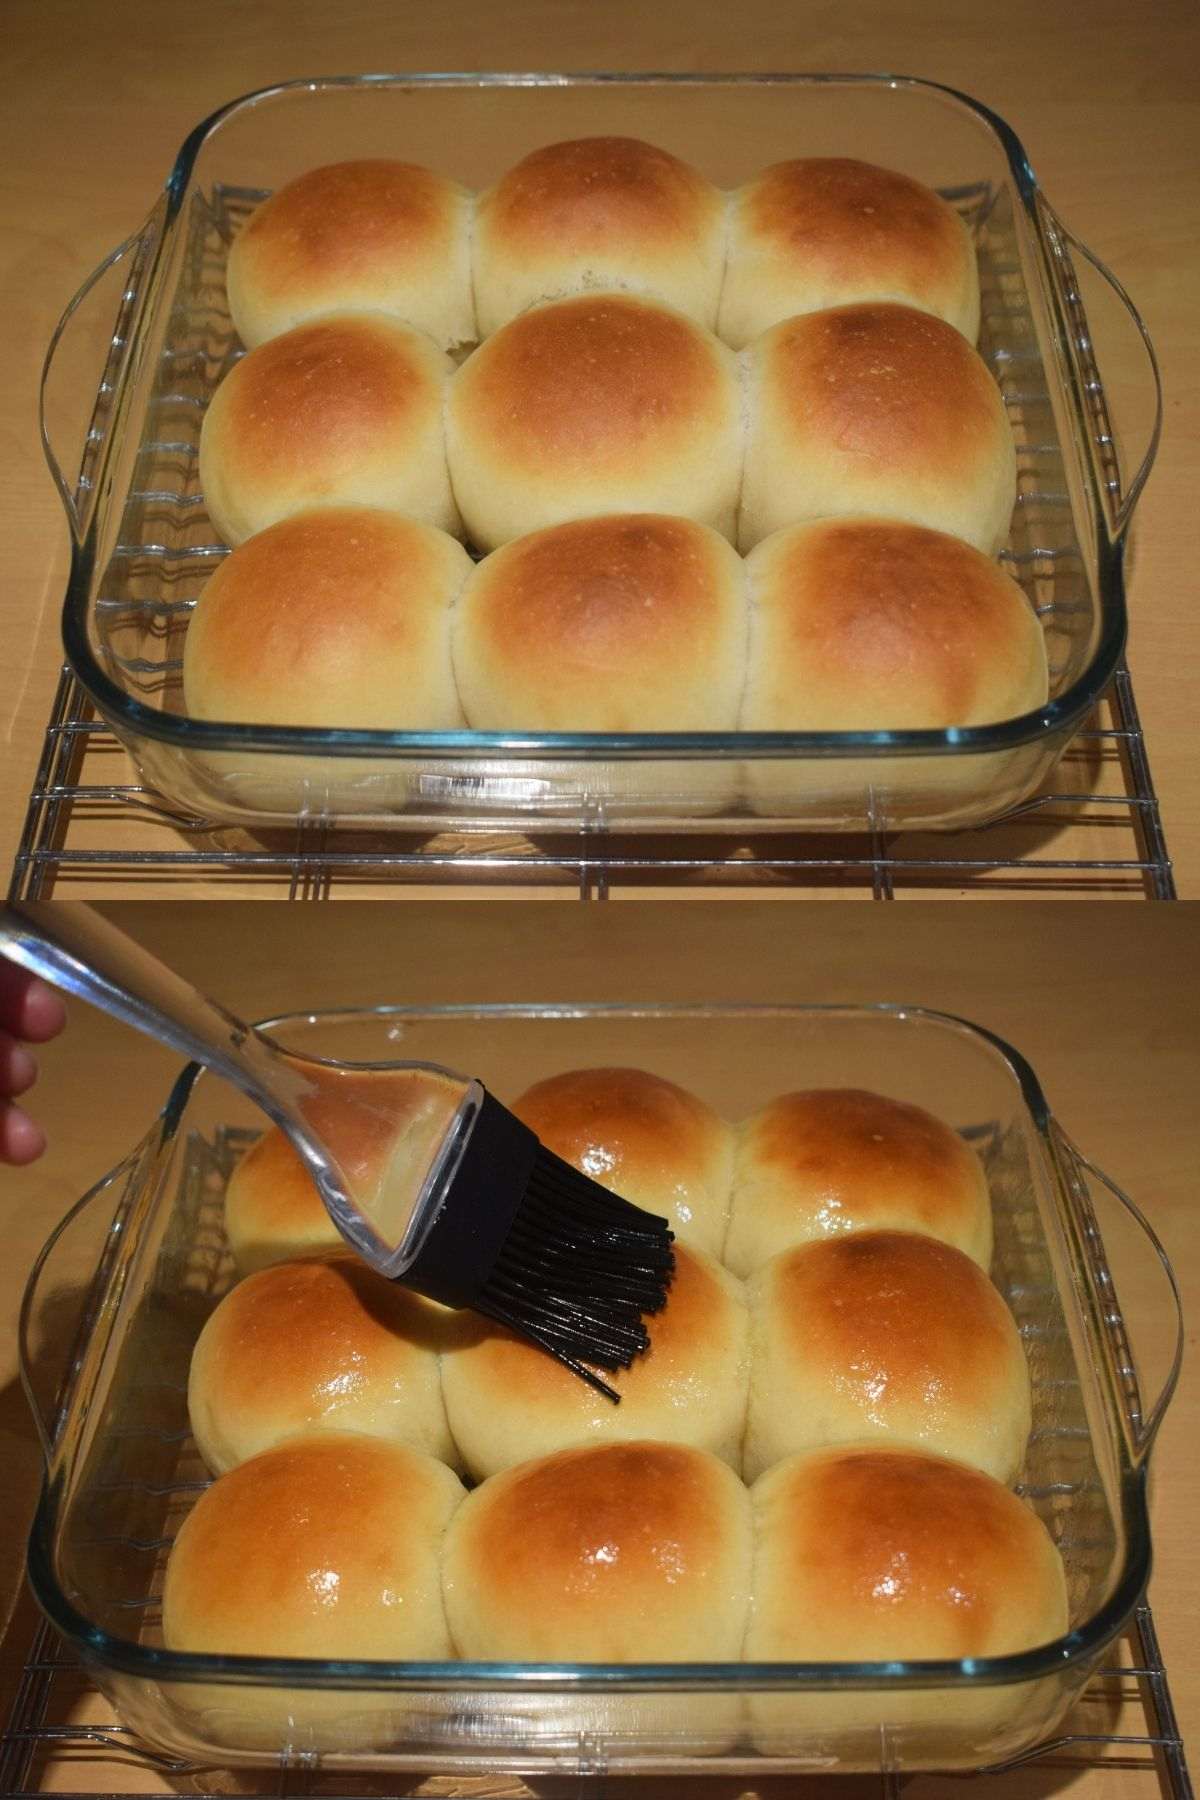
Brush with some milk (at room temperature) or melted butter on the top the dough balls for beautiful shine and colour. Then bake it in the middle of the preheated oven for 14-18 minutes until the top is golden in colour. For me, it took exactly 15 minutes.
Take out the tray from the oven and place it on a wired rack. Brush butter on the top and the outer layer will become soft. Run knife on the edges of the pav attached with the side of the tray and demould them.
Place it on a rack and allow it to cool down. Then store it in an airtight container for upto 3 days in a cool dry place away from sun light.
Many Indian Street food recipes have already been shared in my previous posts. You can check few of them like
..And Many more…

Ingredients:
To activate the yeast
- 1¼ teaspoon Yeast
- 2 tablespoons Water, warm
- 1 tablespoon Sugar
Other ingredients for ladi pav
- 2 cups Maida (All-purpose Flour)
- ½ teaspoon Baking powder
- 1 teaspoon Salt
- 2 tablespoon Butter, soft or melted
- 150ml warm Milk
- 1 teaspoon Milk, to brush the dough balls
- 1 teaspoon melted Butter, to brush the bun and grease the baking tray
Instructions:
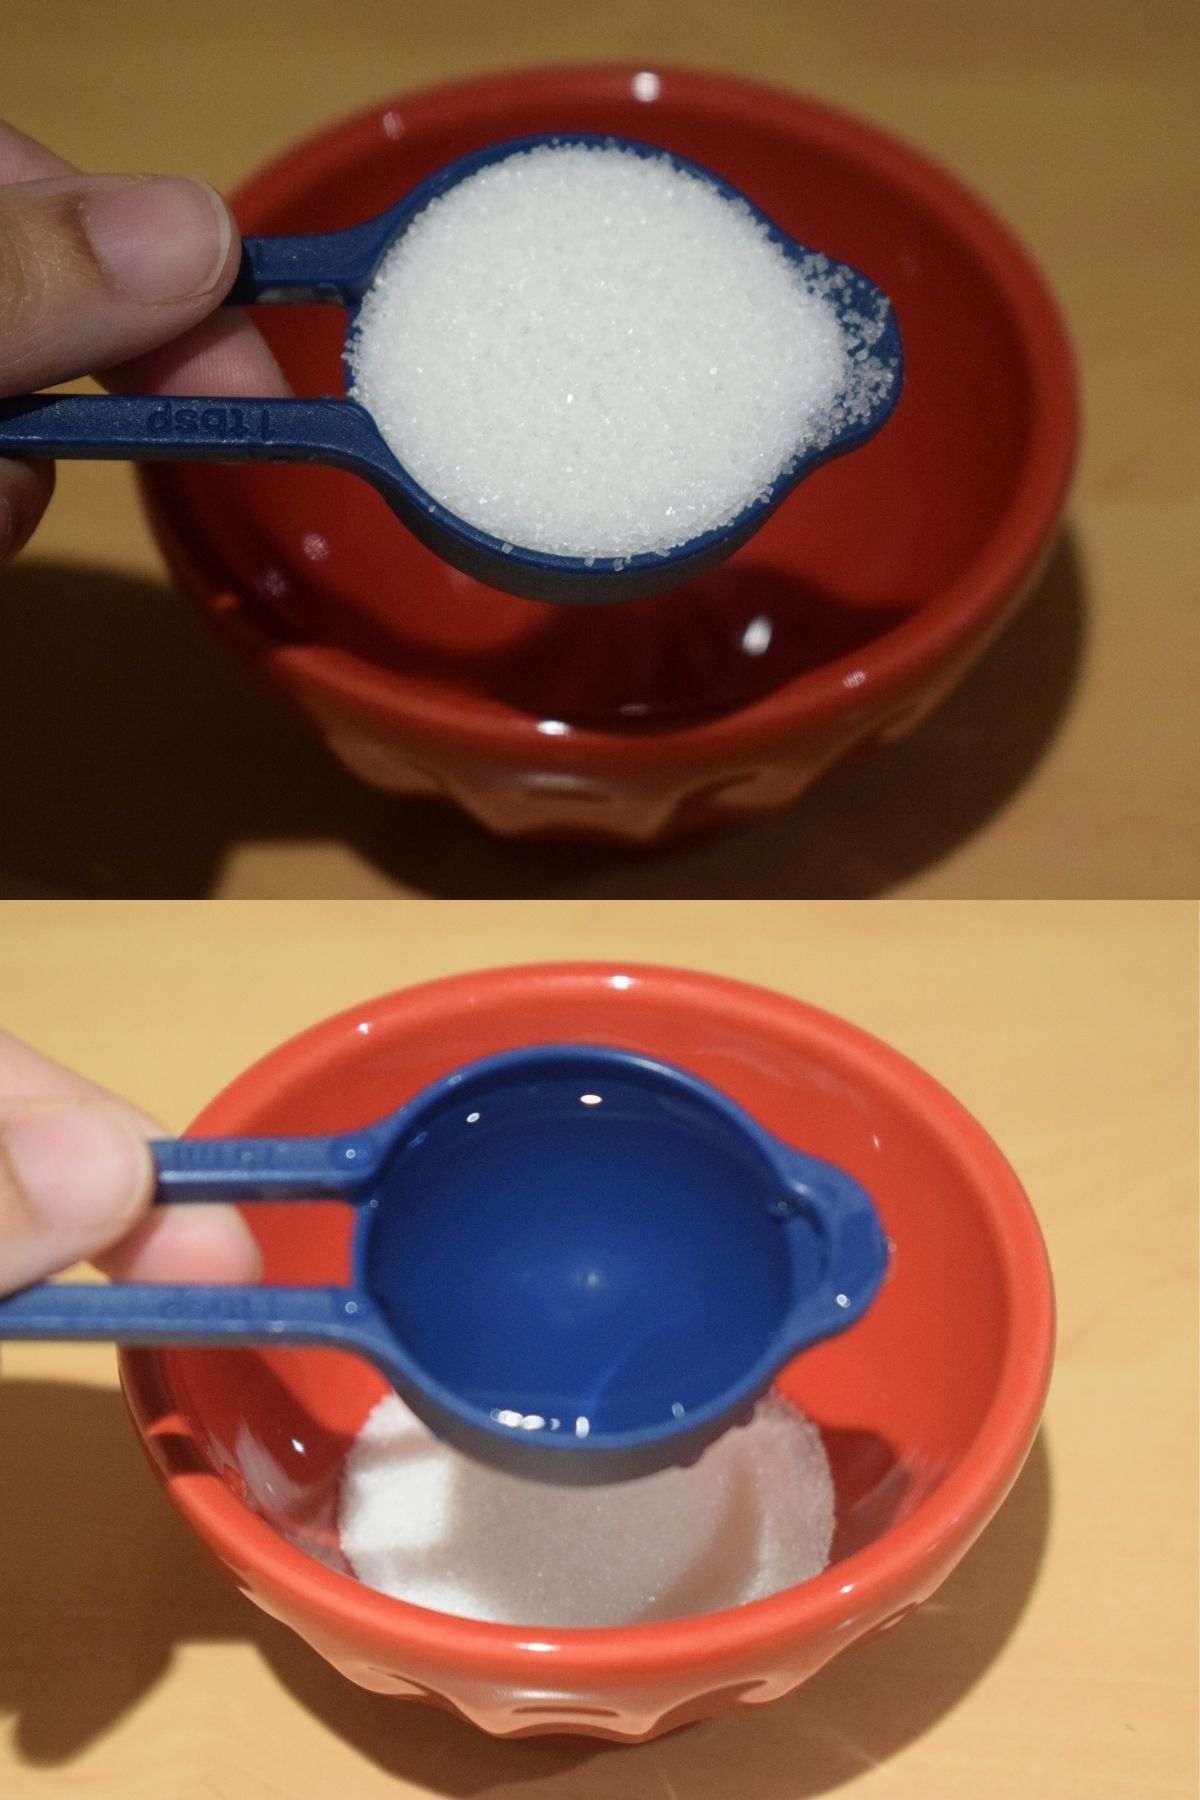
- Take a microwave proof bowl and add 1 tablespoon sugar in it. Add 2 tablespoons water into the bowl and give a nice mix. Microwave the bowl for few seconds till the mixture is warm but not hot. If you don’t have microwave, then you can directly add warm water to the bowl and give a mix.
- Add 1¼ teaspoon yeast into the bowl and give a quick mix. Cover the pan and allow it to rest for 15-20 minutes. Don’t disturb the bowl in between. After activation of the yeast, it will rise, and foam would form.
- Take a large mixing bowl and place a sieve on it. Add 2 cups all-purpose flour, ½ teaspoon baking powder, 1 teaspoon salt and sieve them nicely to develop air.
- Add the activated yeast into the flour and mix it well.
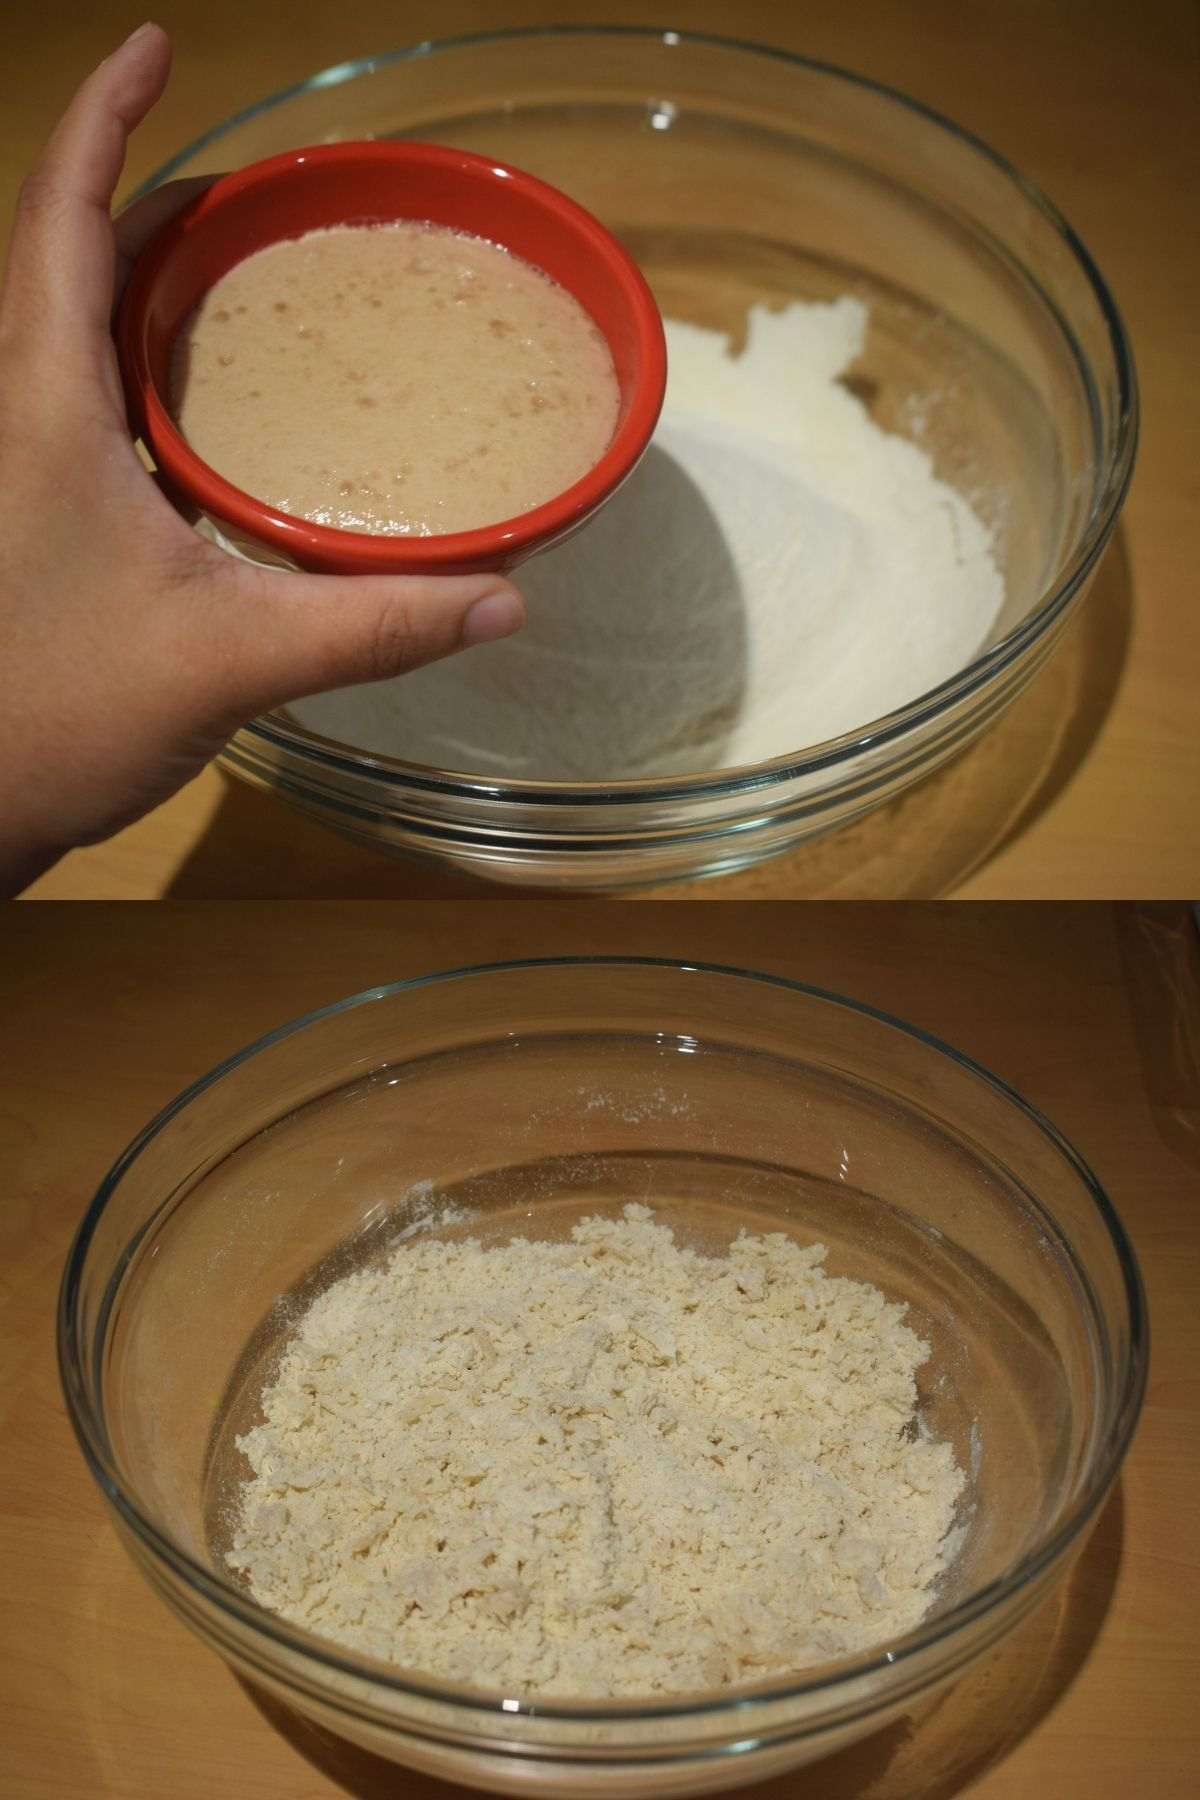
- Add 150 ml warm milk slowly into the flour and knead it. Initially, the dough will be too sticky but don’t worry. After kneading for some time, it will become super soft and non-sticky.
- Add 2 tablespoons soft or melted butter into the dough and mix it thoroughly. Initially, the dough will get oily but later the dough will absorb the oil. Knead the dough thoroughly for around 10 minutes. For the perfect texture of pav bread, kneading is very essential.
- Cover the mixing bowl and keep it in a warm place for proofing for 1 ½ hours to 2 hours.
- After proofing, the dough will be double in size with lots of air incorporated in it. Punch the dough and release the air. Then knead the dough for a minute and divide them into 9 equal portions and make smooth balls by tucking them to the bottom to avoid scars.
- Grease the baking tray with melted butter and place the dough balls into it. Cover the tray and keep it in a warm place for at least 20 minutes, preferably for half an hour. After that, the dough balls will again rise to bigger in size.
- On the other hand, preheat the oven at 200°C/180°C Fan/Gas 6.
- Brush room temperature milk on the top the dough balls for beautiful shine and colour.
- Put the tray in the middle of the preheated oven for 14-18 minutes until the top is golden in colour. For me, it took exactly 15 minutes.
- Take out the tray from the oven and place it on a wired rack. Brush melted butter on the top for soft outer layer.
- Run knife on the edges of the pav attached with the side of the tray and demould them.
- Place the pav on a wired rack and allow it to cool down.

- Store it in an airtight container.
Serving Instruction
Transfer the ladi pav on a serving plate and serve as a side with any curry or use the pav recipe to prepare popular Indian street food like pav bhaji, vada pav, missal pav, masala pav, dabeli, keema pav and enjoy. You can also accompany the pav bread recipe with some butter as a snack, with a cup of hot tea too.
How to store ladi pav?
After baking the ladi pav recipe, let them completely cool off. Then store them in an airtight container. Keep the container in a cool and dry place. You can store the pav bread for upto 3 days and enjoy them.


Ingredients
To activate the yeast
- 1¼ teaspoon Yeast
- 2 tablespoons Water, warm
- 1 tablespoon Sugar
Other ingredients for ladi pav
- 2 cups Maida (All-purpose Flour)
- ½ teaspoon Baking powder
- 1 teaspoon Salt
- 2 tablespoon Butter, soft or melted
- 150ml warm Milk
- 1 teaspoon Milk, to brush the dough balls
- 1 teaspoon melted Butter, to brush the bun and grease the baking tray
Instructions
- Take a microwave proof bowl and add 1 tablespoon sugar in it. Add 2 tablespoons water into the bowl and give a nice mix. Microwave the bowl for few seconds till the mixture is warm but not hot. If you don’t have microwave, then you can directly add warm water to the bowl and give a mix.
- Add 1¼ teaspoon yeast into the bowl and give a quick mix. Cover the pan and allow it to rest for 15-20 minutes. Don’t disturb the bowl in between. After activation of the yeast, it will rise, and foam would form.
- Take a large mixing bowl and place a sieve on it. Add 2 cups all-purpose flour, ½ teaspoon baking powder, 1 teaspoon salt and sieve them nicely to develop air.
- Add the activated yeast into the flour and mix it well.
- Add 150 ml warm milk slowly into the flour and knead it. Initially, the dough will be too sticky but don’t worry. After kneading for some time, it will become super soft and non-sticky.
- Add 2 tablespoons soft or melted butter into the dough and mix it thoroughly. Initially, the dough will get oily but later the dough will absorb the oil. Knead the dough thoroughly for around 10 minutes. For the perfect texture of pav bread, kneading is very essential.
- Cover the mixing bowl and keep it in a warm place for proofing for 1 ½ hours to 2 hours.
- After proofing, the dough will be double in size with lots of air incorporated in it. Punch the dough and release the air. Then knead the dough for a minute and divide them into 9 equal portions and make smooth balls by tucking them to the bottom to avoid scars.
- Grease the baking tray with melted butter and place the dough balls into it. Cover the tray and keep it in a warm place for at least 20 minutes, preferably for half an hour. After that, the dough balls will again rise to bigger in size.
- On the other hand, preheat the oven at 200°C/180°C Fan/Gas 6.
- Brush room temperature milk on the top the dough balls for beautiful shine and colour.
- Put the tray in the middle of the preheated oven for 14-18 minutes until the top is golden in colour. For me, it took exactly 15 minutes.
- Take out the tray from the oven and place it on a wired rack. Brush melted butter on the top for soft outer layer.
- Run knife on the edges of the pav attached with the side of the tray and demould them.
- Place the pav on a wired rack and allow it to cool down.
- Store it in an airtight container.
2 comments
[…] minutes. The recipe for gobhi bhurji could be a perfect option for weekday breakfast with bread or pav or for lunchbox with a pair of paratha or […]
[…] northern India, paneer bhurji is a popular breakfast recipe which is served with pav or with bread toast. Other than that, it is also served with paratha, roti or phulkas for […]