
Vaja puli pitha recipe is one of the most delicious and easy-to-make Bengali pitha recipes which is prepared in almost every Bengali house during “PoushParbon”. Maidar puli is hugely popular in Bangladesh, West Bengal and Odisha. In this preparation, half-moon-shaped sweet coconut-jaggery stuffed dumplings are prepared with all-purpose flour dough and then deep-fried till crispy and golden. It is mostly served as a snack with tea, but it can be relished at any time of the day whenever hunger calls.

Table of Contents
About the recipe
Tips and Suggestions
How to make Vaja Puli pitha (step wise photos)
Recipe Card
What is Puli pitha?
Puli pitha is basically a Bengali pitha recipe where puli aka half moon dumplings are prepared with rice flour or all-purpose flour or semolina dough and stuffed with sweetened coconut and then cooked by steaming, deep frying, or boiled in sweetened milk. There are various ways to prepare puli pithe. Other than that, there are immense varieties of puli pithe prepared in Bengal. Vaja puli pitha is one of them.
Previously, when people used to stay in joint families, all the homemakers used to sit together and prepare puli pitha in large batches. This pitha preparation requires time, dedication, and patience. Surprisingly, even after the massive availability of junk foods and a busy life schedule, this traditional pithe recipe did not fade away. Till now, puli pitha is crazily popular and prepared in almost every Bengali house during winter. Every Bengali tries to prepare this delight at least once in winter.
Today, just before the special occasion of Poush Sankranti, I am going to share the traditional vaja puli pitha recipe with you. Before going through the recipe, I know many people are not aware of a few terms ‘Poush Parbon’ and ‘Bengali pitha‘. First, let me tell a few words about both the terms.
Poush parbon is one of the most integral parts of Bengali culture which has been conserved by generations and is celebrated each year in January. Poush parbon is celebrated in Poush mash of Bengali year which is also popular as the month of pitha-puli. During this occasion, every Bengali house is flavoured with Nolen gur (date palm jaggery), coconut, and kheer (reduced milk). Various kinds of Bengali pithe are prepared in each Bengali kitchen to celebrate the festival of food.
During poush parbon, new harvests and nolen gur arrive and this is used to prepare Bengali pithe in each house to celebrate the culinary diversity. There are myriad Bengali pithe recipes in Bengali cuisine, among which patishapta, puli pitha, choshir payesh, pua pitha, nokshi pitha are a few of the most popular ones.
Vaja puli pitha is undoubtedly one of the most luscious varieties of Bengali pitha puli recipe. As a Bengali, I have grown up eating this delight. I still remember how my mother used to prepare large batches of maidar puli and I and my elder brother used to stand in the kitchen to finish her frying the puli pitha. We just couldn’t wait for the puli to warm and started eating them when it was hot. I can’t forget the taste of this warm delight even now.
Honestly, vaja puli pitha is not a very simple Bengali pithe recipe. The difficulty level of preparing this Bengali recipe is moderate. This recipe demands only time and patience from you like most of the other Bengali pithe puli. All the ingredients required to prepare the dish are very basic and they are easily available in any kitchen pantry, except patali gur. But nowadays you can buy nolen gur or patali gur online any time of the year.
The preparation of the maidar puli recipe is divided into three parts. First, we need to prepare the stuffing for the puli. The stuffing is prepared with grated coconut and nolen gur. You can add mawa as well to enhance the taste.
Secondly, all-purpose flour dough is prepared. We use this to shape half-moon-shaped dumplings.
In the third stage, we need to deep fry these half-moon-shaped dumplings aka puli.
Vaja puli pitha recipe with step-by-step photos and instructions have been provided in the ‘Instructions’ section of the recipe. I have included all the tricks and tips below and in the instruction section to make the recipe easier for you on your very first attempt. If you follow the steps precisely then you will definitely get perfect maidar puli as an outcome.
Tips to prepare perfect Vaja Puli pitha
- Add a little bit of salt during the time of preparing the dough. It enhances the taste and flavour of the pitha.
- It is very important to add moyen (fat added to the flour) properly. It provides a perfect flaky texture along with crispness to the dish.
- You can use ghee aka clarified butter or refined oil for moyen. But I always prefer to use ghee for this because it gives better taste and flavor along with a crispier and flakier texture.
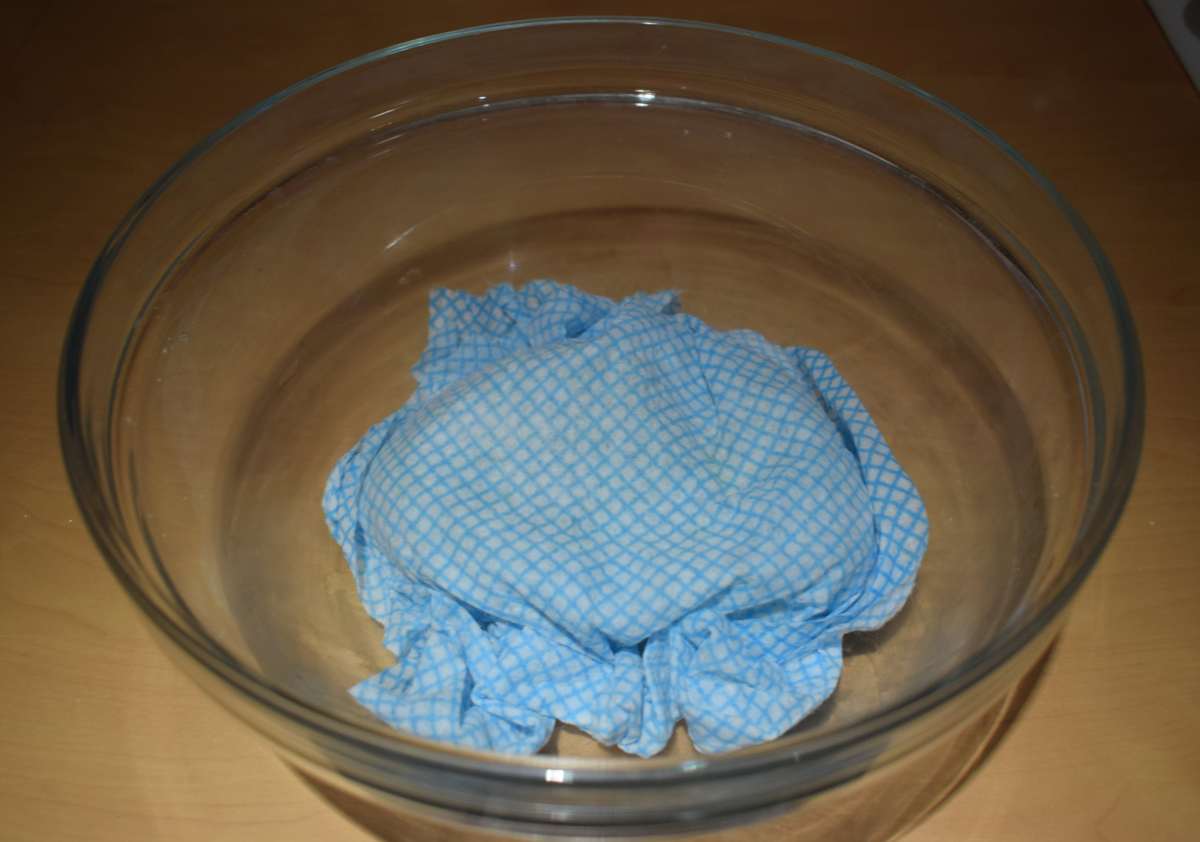
- After preparing the dough, cover it with a wet cloth, or else the dough will become dry and hard. As a result, cracks will occur during the time of shaping them.
- Always prepare tight dough for the perfect texture of maidar puli. The addition of too much water makes the dough soft and the addition of less water makes the dough stiff and hard.
- After preparing the dough, always cover it with a wet cloth and allow it to rest for 30 minutes. It helps to relax the glutens.
- Roll the dough ball into a medium-thick circular disc. The thickness should be like a poori. If you roll it too thin, then the flaky texture won’t come to the dish.
- Don’t add too much filling into the puli or else it can get open during the time of frying.
- Always apply water with your fingertip at the edges before sealing the puli if you are doing design with your fingers. Then it won’t get open at the time of frying.
- If you are preparing the puli pitha with a dumpling maker, then no need to apply water at the edges of the rolled-out dough.
- Always fry the puli pitha at low or medium-low flame for perfectly even frying.
- Always fry the maidar puli only till the color is light golden brown, not more than that.
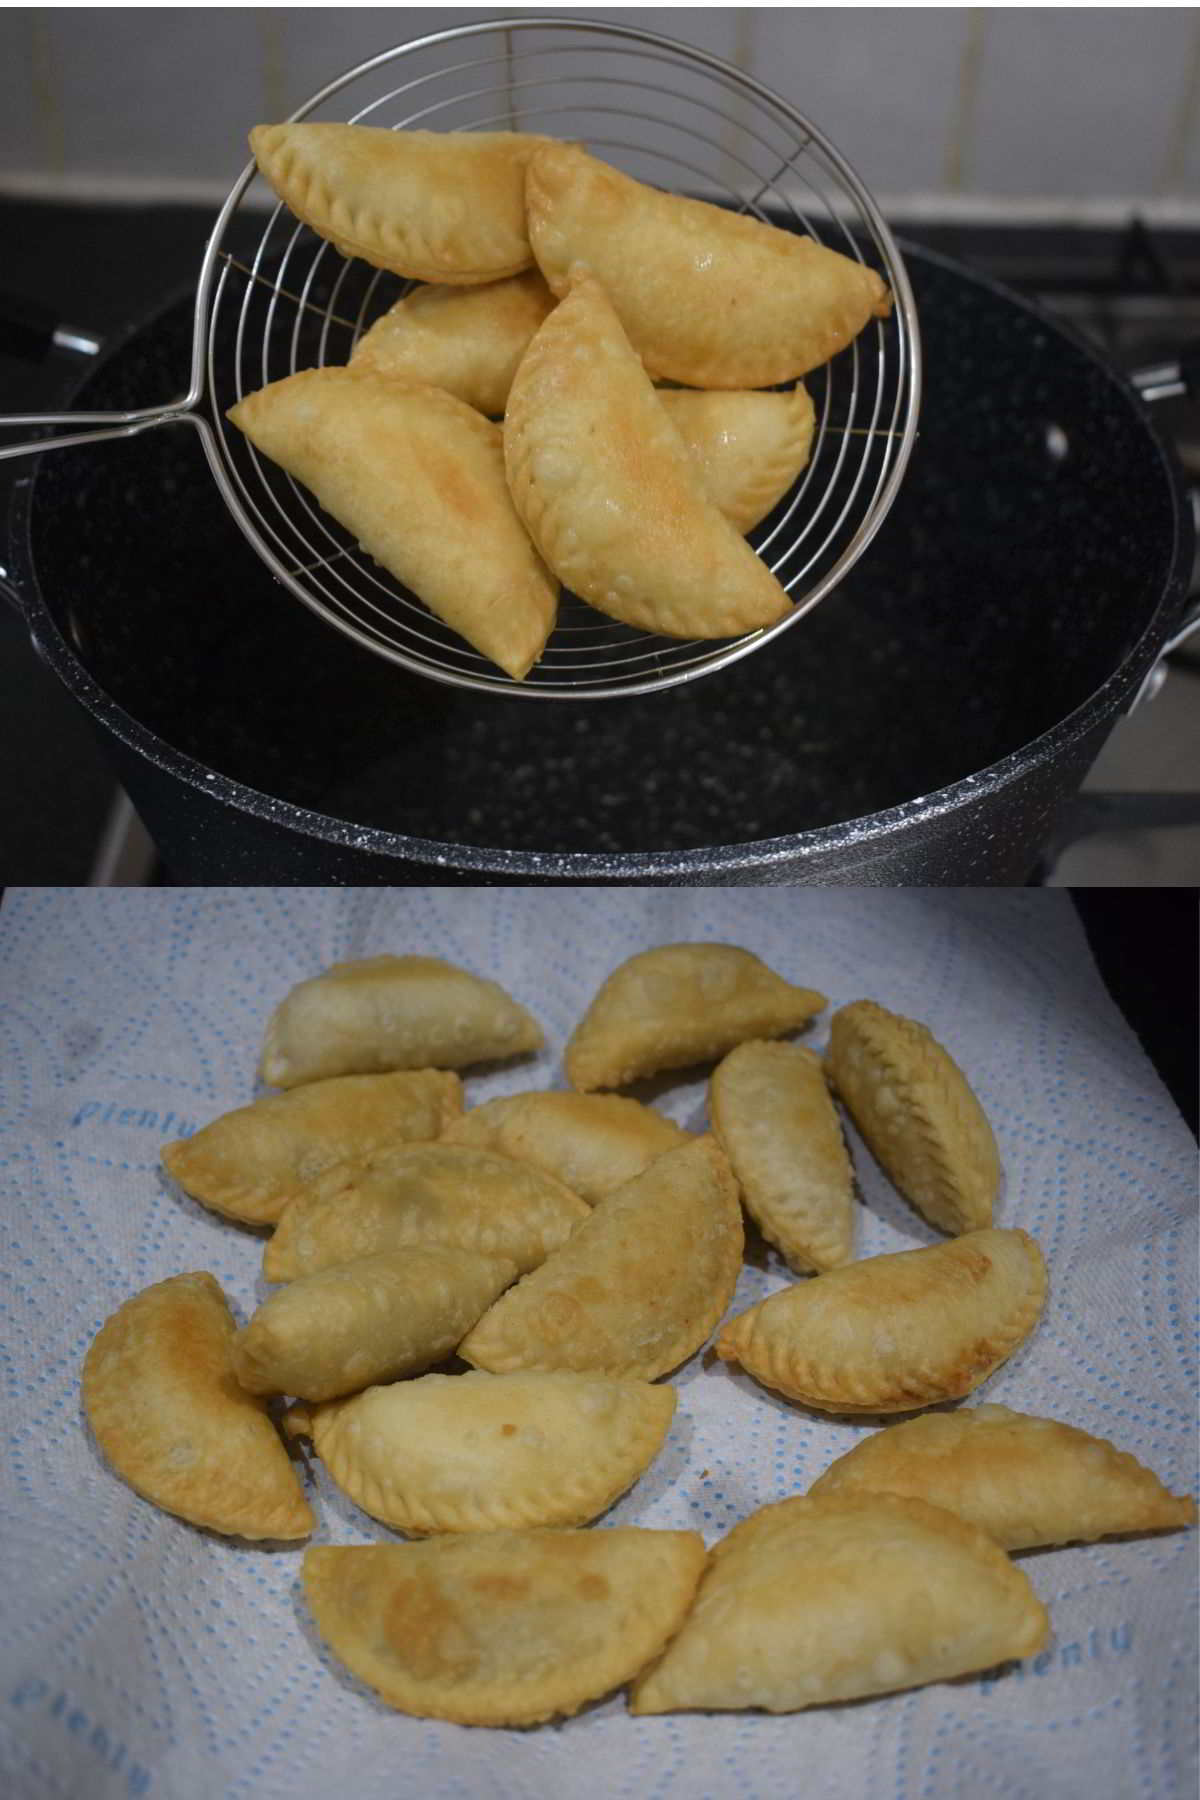
- After straining the excess oil, transfer them to a tissue-lined plate. The kitchen tissue will absorb the excess oil.
How to make Vaja Puli pitha?
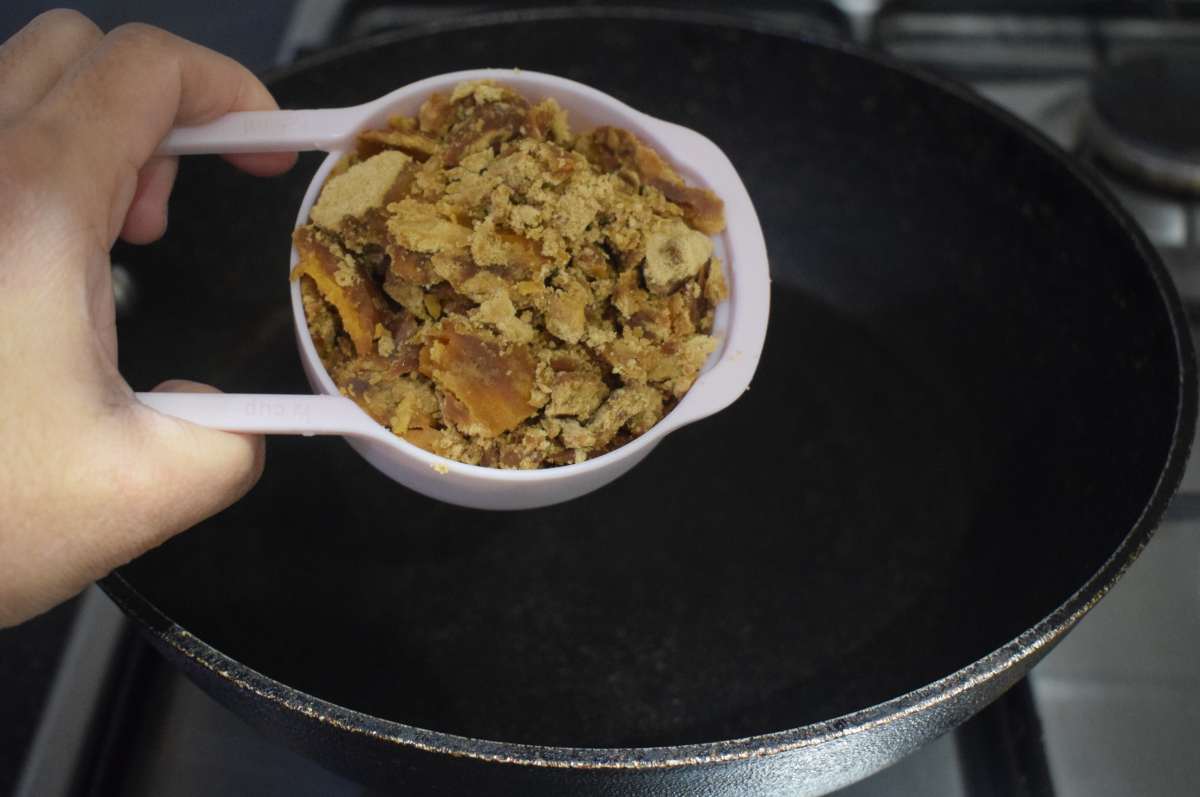
To prepare vaja puli pitha, first, prepare the stuffing for the puli. I usually prepare it one day before preparing the maidar puli. It saves a lot of time and effort on the day.
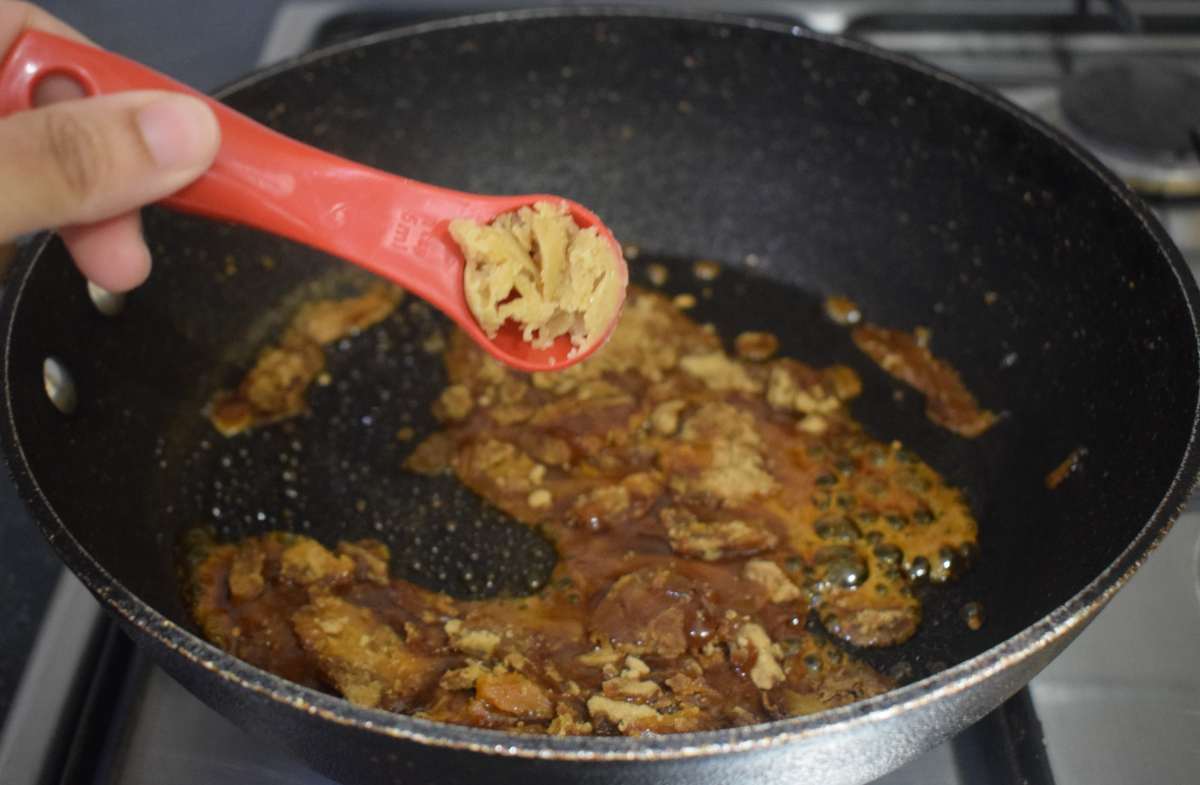
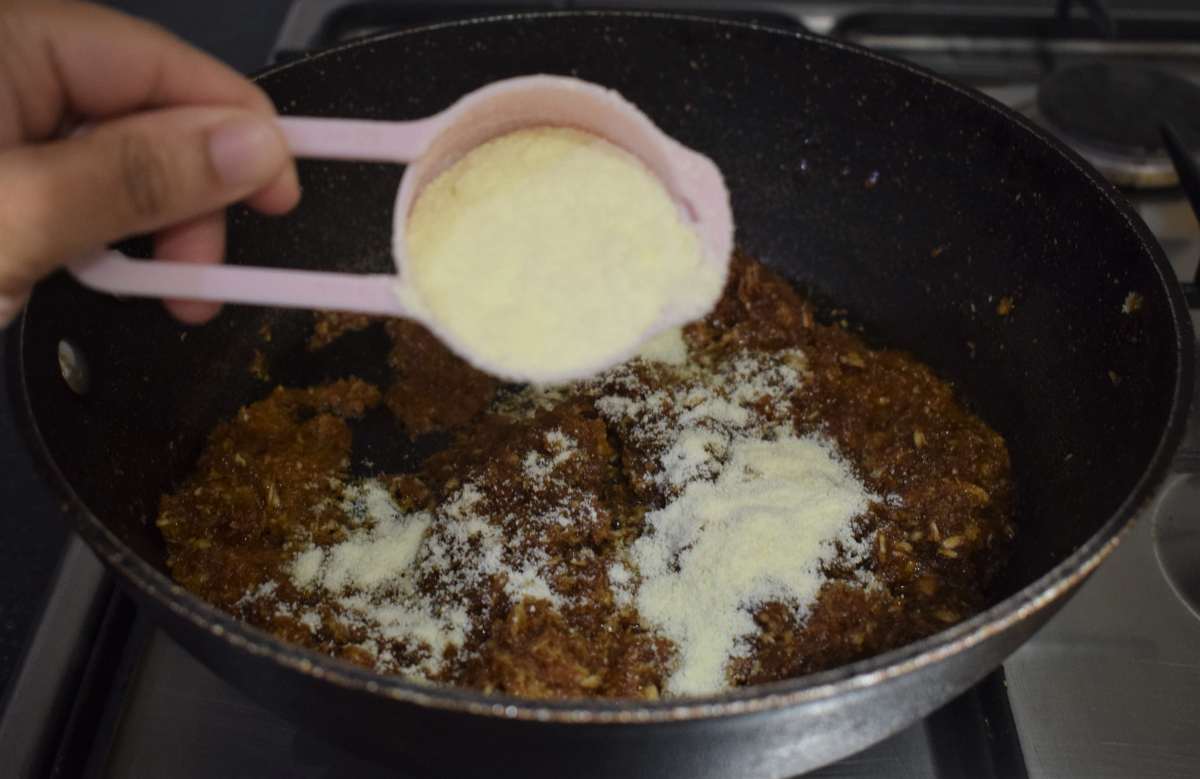
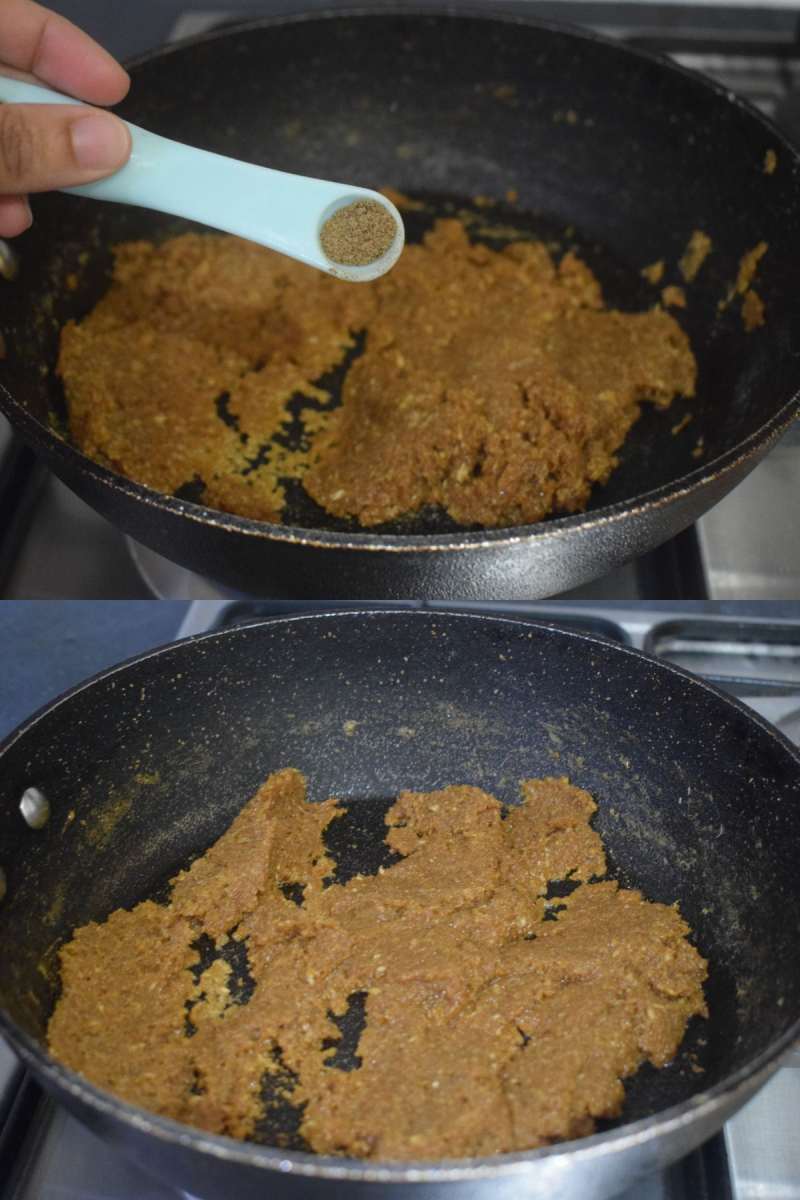
To prepare the stuffing, I used only 5 ingredients for the recipe. First, add grated or roughly chopped date palm jaggery aka patali gur into a pan. Then add a little bit of ghee into it and allow the jaggery to melt. After this, add the grated coconut and mix it well. Cook it over low flame for a few minutes until the raw mixture becomes sticky. Then add powdered milk and mix it well. Now, add cardamom powder at the final stage and mix it well. Switch off the flame and put the pan down.
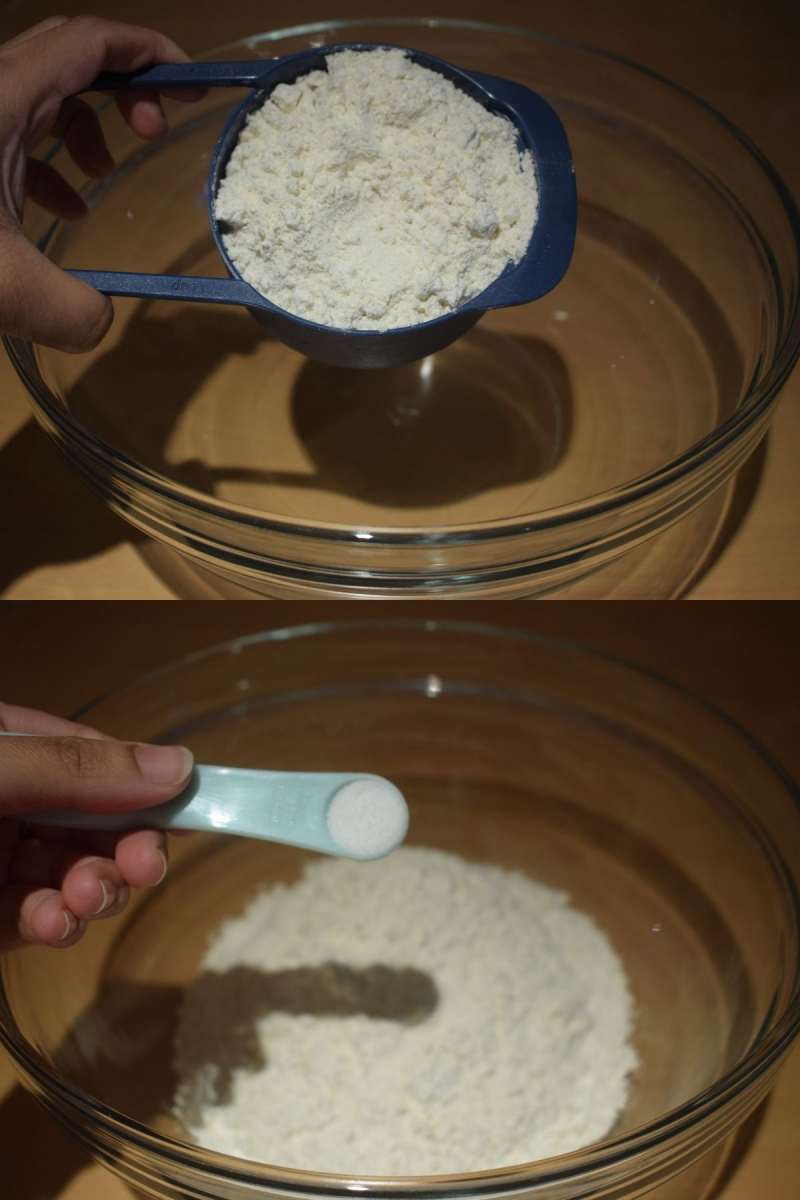
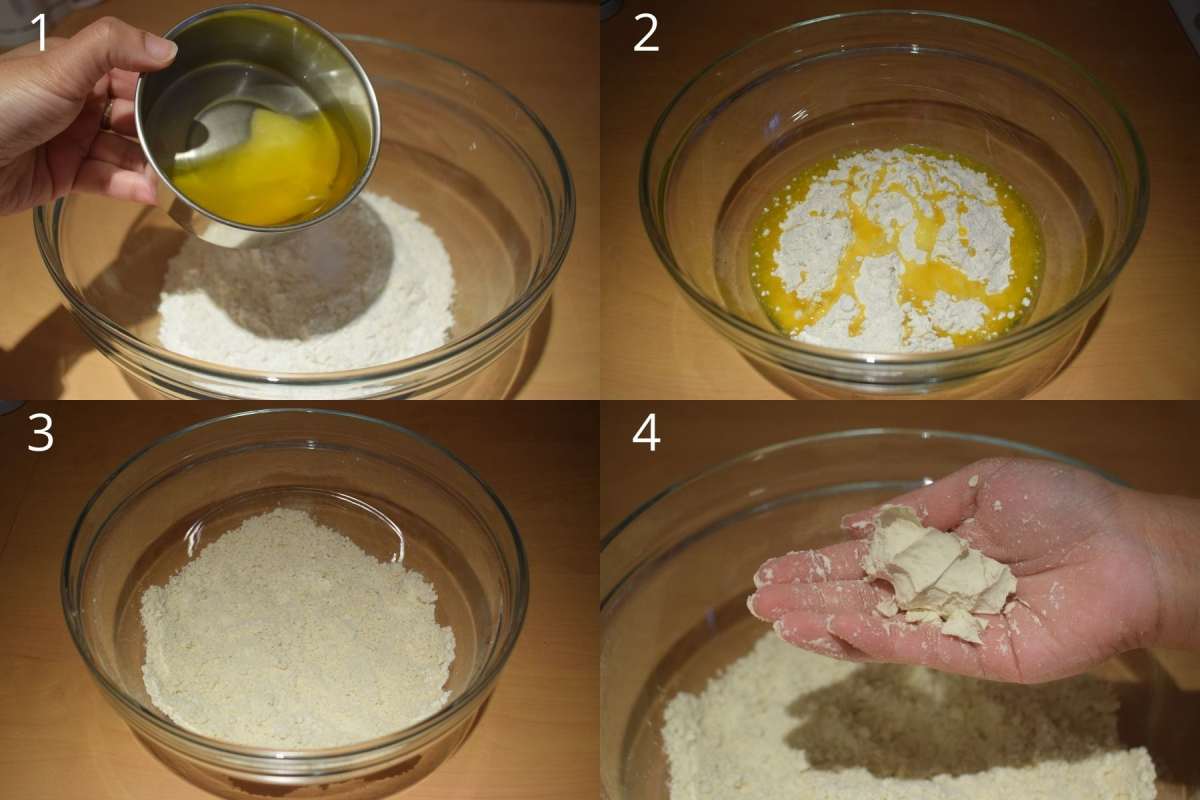
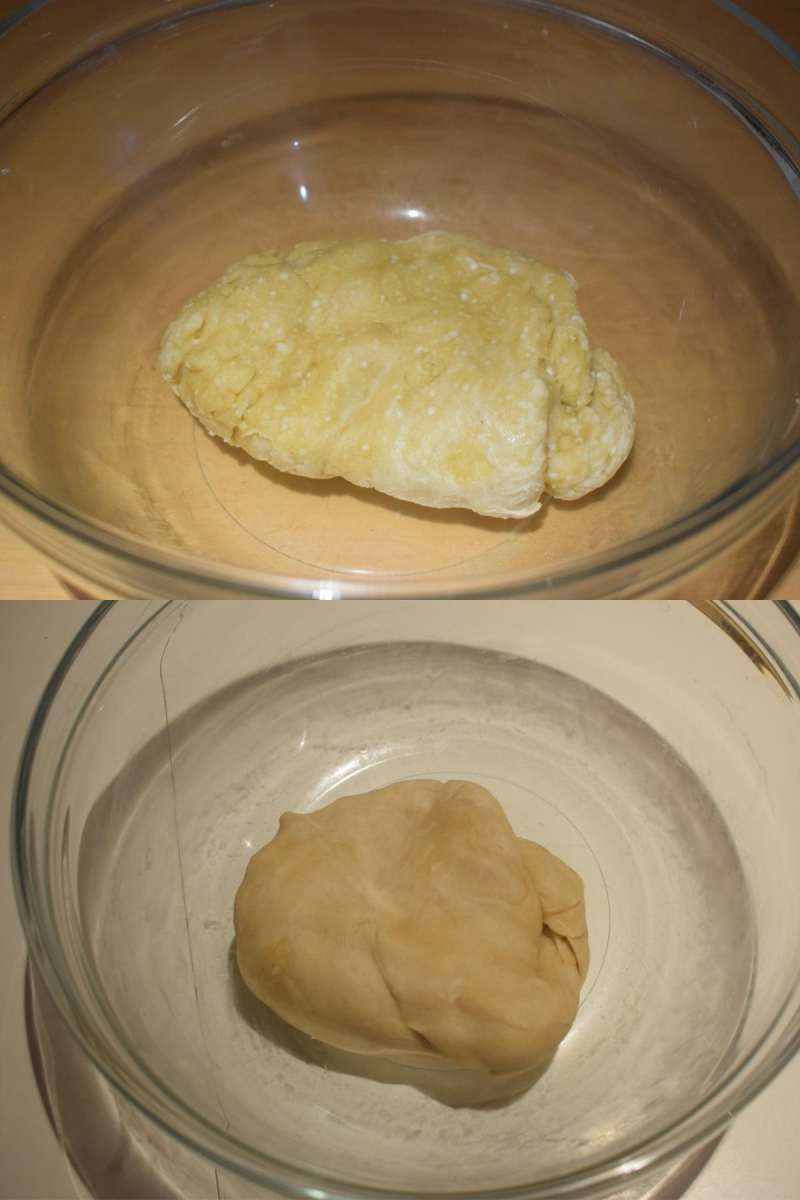
On the other hand, we need to prepare the all-purpose flour dough. For the dough, take a large mixing bowl and add all-purpose flour aka maida into it. Add ¼ teaspoon salt into the bowl. Then add melted ghee aka clarified butter(at room temperature) into it and mix it evenly with the help of fingers. The flour should get bonded when you take it in your fist and apply pressure. The moyan (fat added to the flour) of the dough is very important to get the perfect texture of vaja puli.
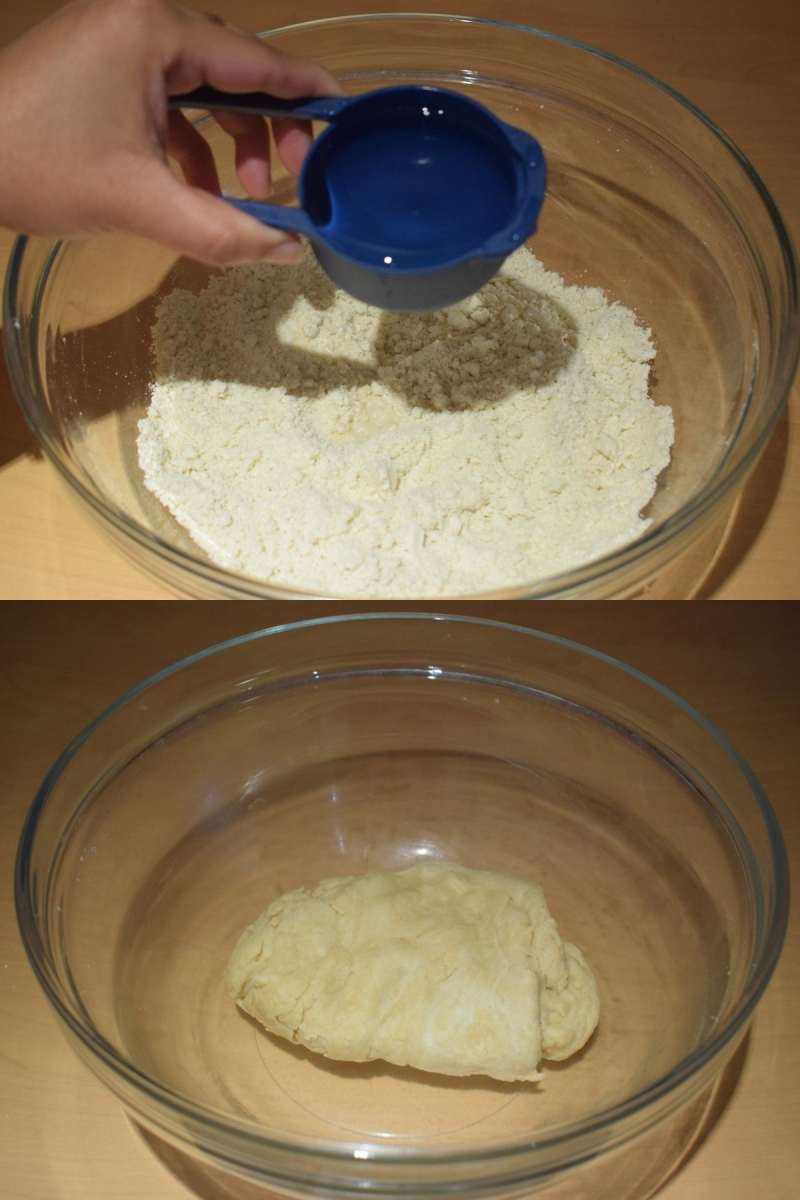
Then add water slowly at a time and prepare tight dough. Don’t over knead the dough or else it will release gluten and you won’t get the flaky texture. Cover the dough completely with either a wet cloth or cling film and allow it to rest for half an hour.
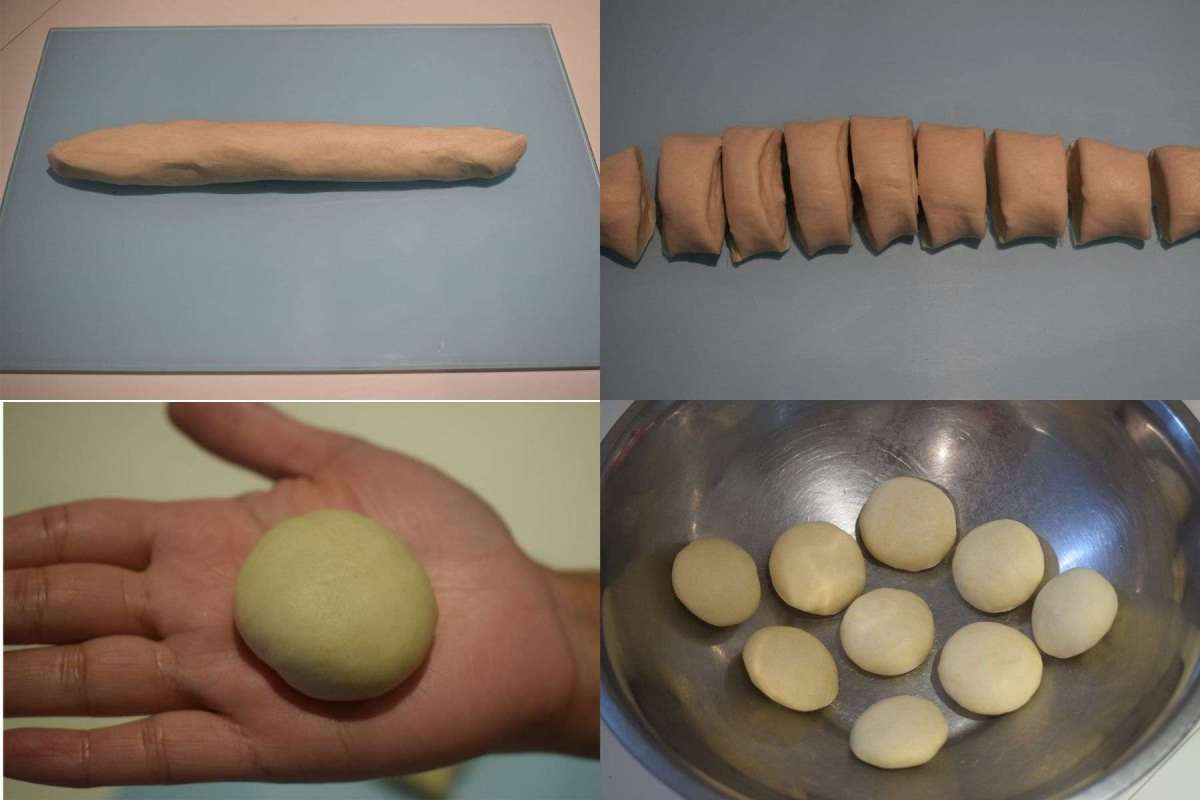
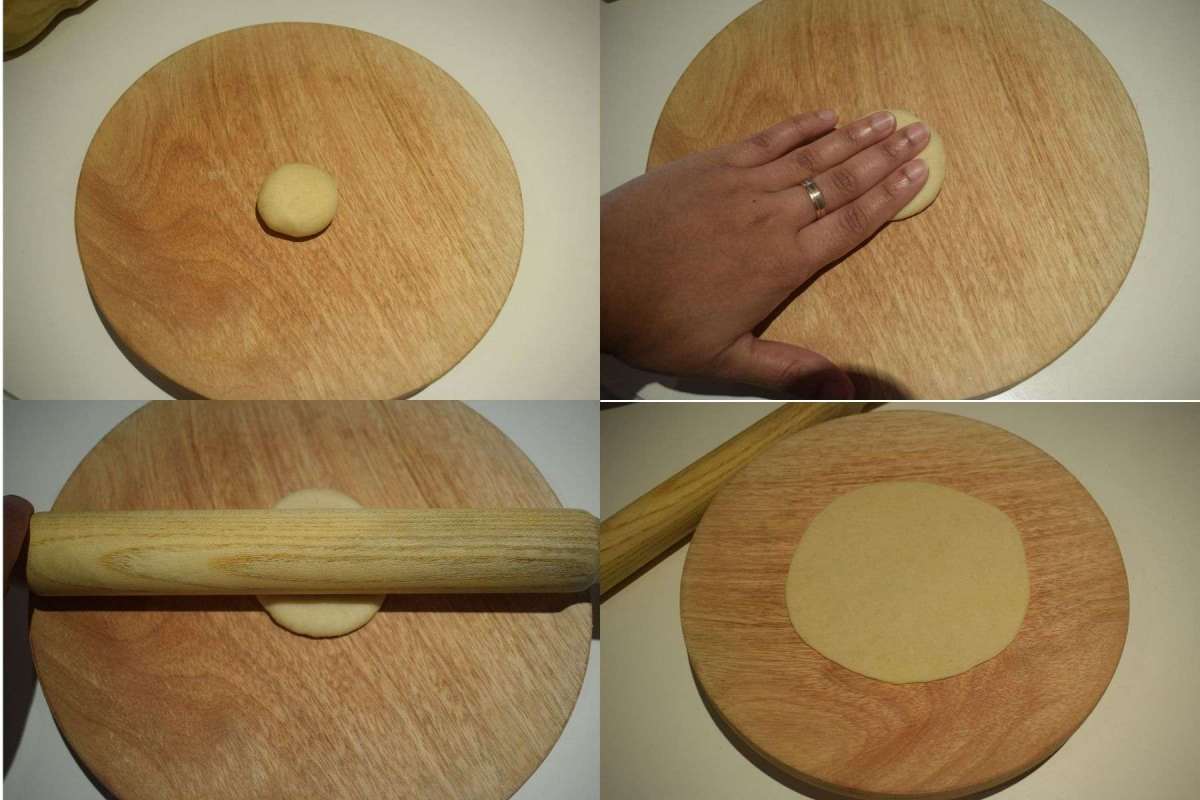
After half an hour, uncover the dough, knead it once again, and make it smooth. Divide them into 20 equal portions to prepare small flat dough balls. Cover the rest of the dough balls while working on one. Place the dough ball on a rolling board and roll it with a rolling pin to a round shape of 3-3.5 inches in diameter. The thickness should be medium like poori. It neither be too thick nor too thin.
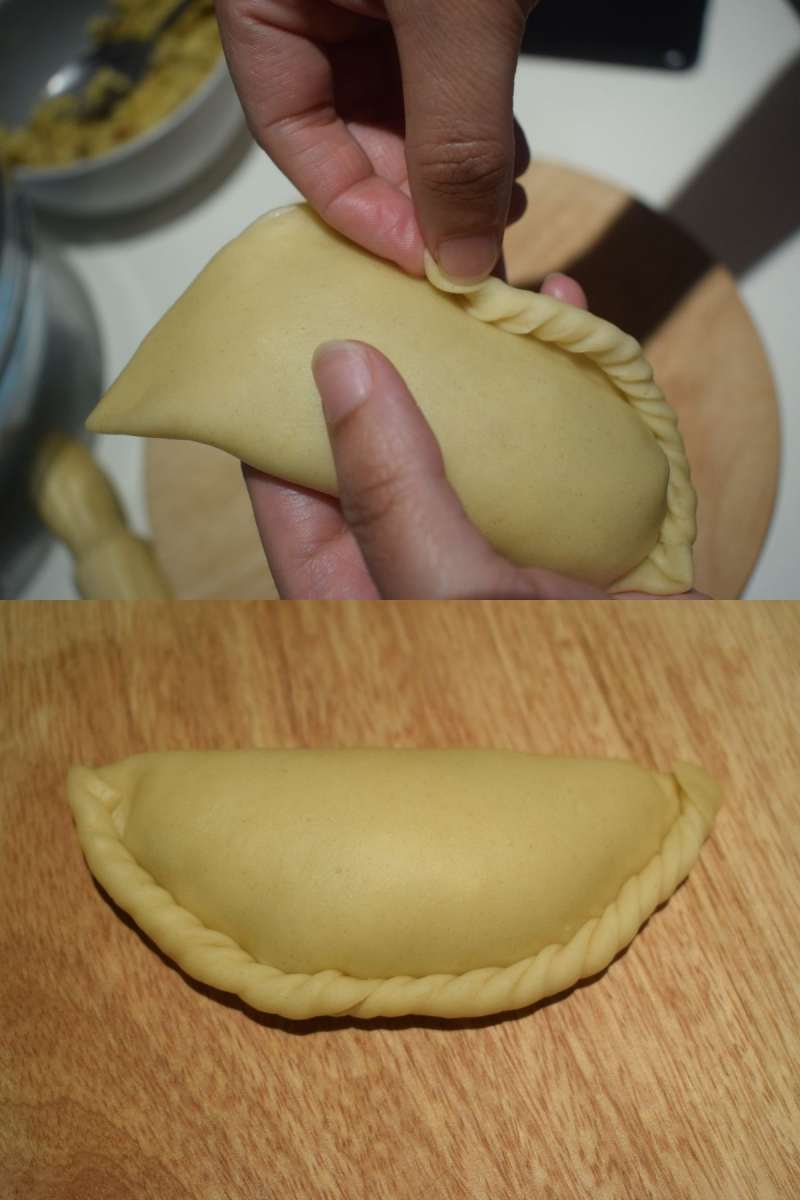
Now apply water at the edges of the rolled-out dough. Add 2 teaspoons of stuffing on one side and keep the edges empty. Don’t add too much stuffing or else it will be difficult to seal the puli. Now carefully fold and join the edges with your fingers. Gently press the edges and seal the puli properly so that the stuffing cannot come out. At this moment, you can design the puli pitha according to your preferred choice.
- You can trim the edges with the help of a pizza cutter.
- If you have puli pitha mould then you can use it to make designs.
- With the help of a fork, you can make a design around the edges and seal it perfectly.
- The traditional way is by using hands. Just keep on twisting the edges and fold till the end.
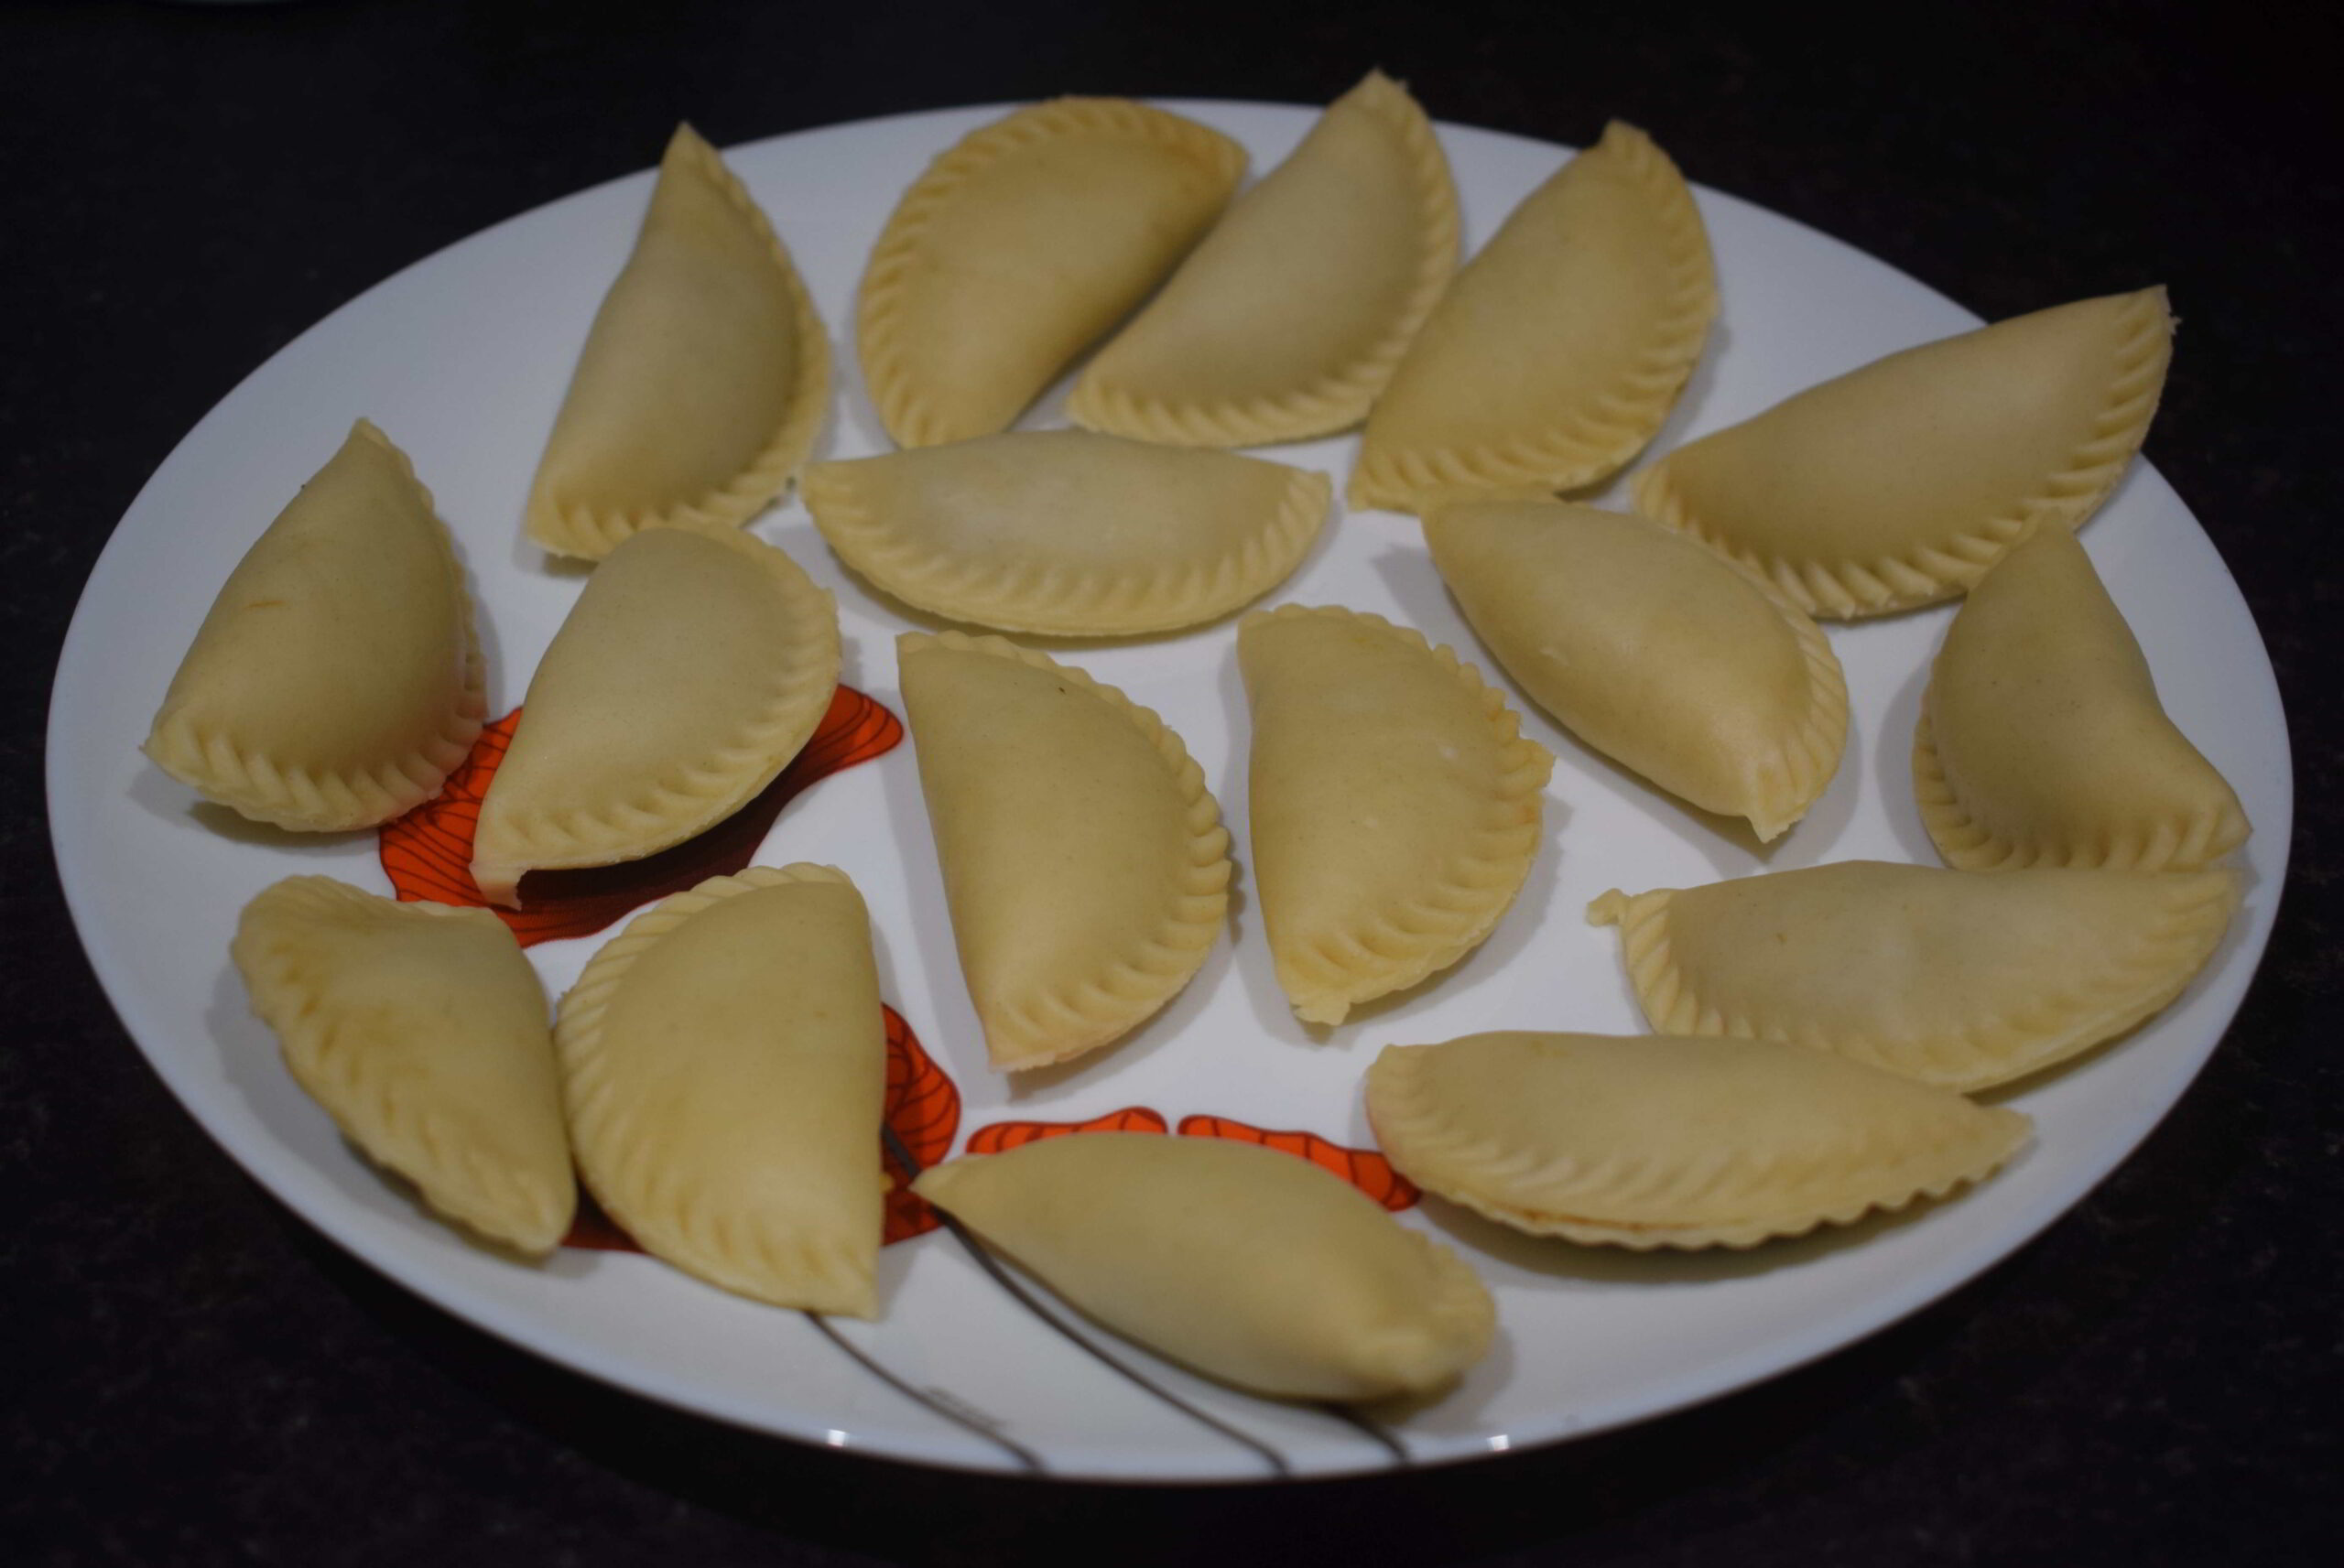
After shaping all the maidar puli, cover them with a wet cloth before frying.
Put a pan on flame and add oil to deep fry the maidar puli. The oil has to be medium hot and not smoking hot. Now put the flame on low and add the shaped puli pitha slowly into the oil. Vaja puli pitha should be fried at low or medium-low flame till light golden brown. Flip the pulis in between and fry them evenly. One batch takes around 6-8 minutes to get fried evenly and perfectly. So be patient at this stage. If you fry them over high flame then the puli will become brown from outside and won’t get cooked from inside. Strain the maidar puli with a slotted spoon and remove the excess oil. Place them carefully on a tissue-lined plate.
Now it is ready to serve. Serve it warm or at room temperature. After cooling down, store them in a dry airtight container.
Many Bengali pitha recipes have already been shared in my previous posts. You may like a few of them like
Patishapta
Pua pitha
Nolen gurer payesh
Choshir payesh
Rosh bora
..And Many more…

Ingredients:
1 cup = 250 ml
For the stuffing
- 1 cup grated coconut
- ½ cup Patali gur aka date Palm jaggery
- ¼ cup Milk powder
- ¾ teaspoon Ghee aka clarified Butter
- ¼ teaspoon Cardamom powder aka Elaichi powder
For the dough
- 1½ cups all-purpose Flour aka Maida
- 2 tablespoons melted Ghee aka clarified Butter, at room temperature
- ¼ teaspoon Salt
- 100 ml Water, at room temperature
Other ingredients
- Oil to deep fry the Puli pithe
- 1 tablespoon Water to seal the puli, during the time of shaping if you are not using a dumpling maker
Instructions:
For the filling
- Add ½ cup grated roughly chopped date palm jaggery aka patali gur into a pan.
- Add ¾ teaspoon ghee into it and mix it. Allow the jaggery to melt.
- Add 1 cup of grated coconut and mix it well. Cook it over low flame for 4-5 minutes until the raw smell of coconut disappears and the mixture becomes sticky.
- Add ¼ cup powdered milk and mix it well.
- Add ¼ teaspoon of cardamom powder at the final stage and mix it well. Switch off the flame and put the pan down.
For the dough
- For the dough, take a large mixing bowl and add 1½ cups of all-purpose flour aka maida into it. Then add ¼ teaspoon salt into the bowl.
- Add 2 tablespoons of melted ghee aka clarified butter at room temperature and mix it evenly with the help of your fingers. The flour should get bound when you take it in your fist and apply pressure. The moyan (fat added to the flour)of the dough is very important to get the perfect texture of puli.
- Add water slowly at a time and prepare tight dough. Don’t over-knead the dough or else it will release gluten and you won’t get the perfect texture of puli. I used 100ml of water to prepare the dough.
- Cover the dough completely with either a wet cloth or cling film and allow it to rest for half an hour.
Shaping the puli pithe
- After half an hour, uncover the dough, knead it once again, and make it smooth.
- Divide them into 20 equal portions to prepare small flat dough balls with the help of hands. Cover the rest of the dough balls while working on one.
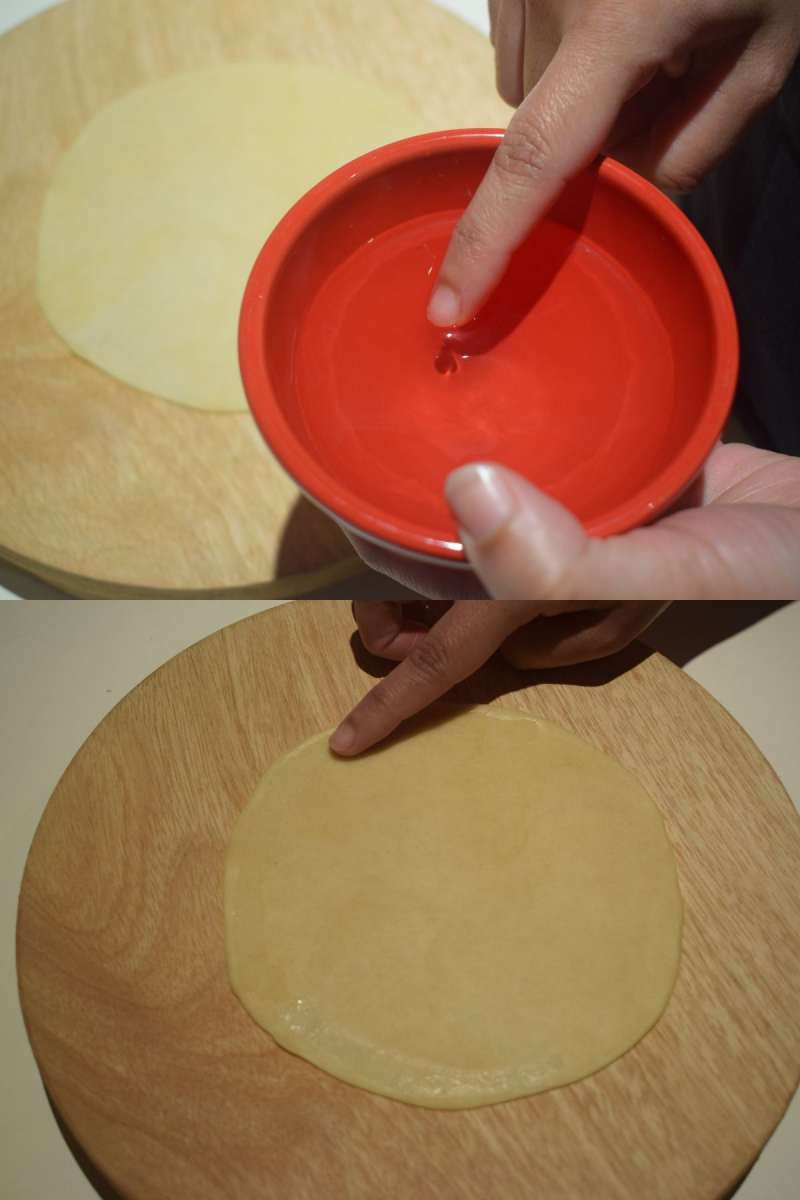
- Place the dough ball on a rolling board and roll it with a rolling pin to a round shape of 3-3.5 inches in diameter. The thickness should be medium like poori. It should neither be too thick nor too thin.
- Take a bowl of water during the time of shaping puli. Now apply water at the edges of the rolled-out dough with your figure tip.
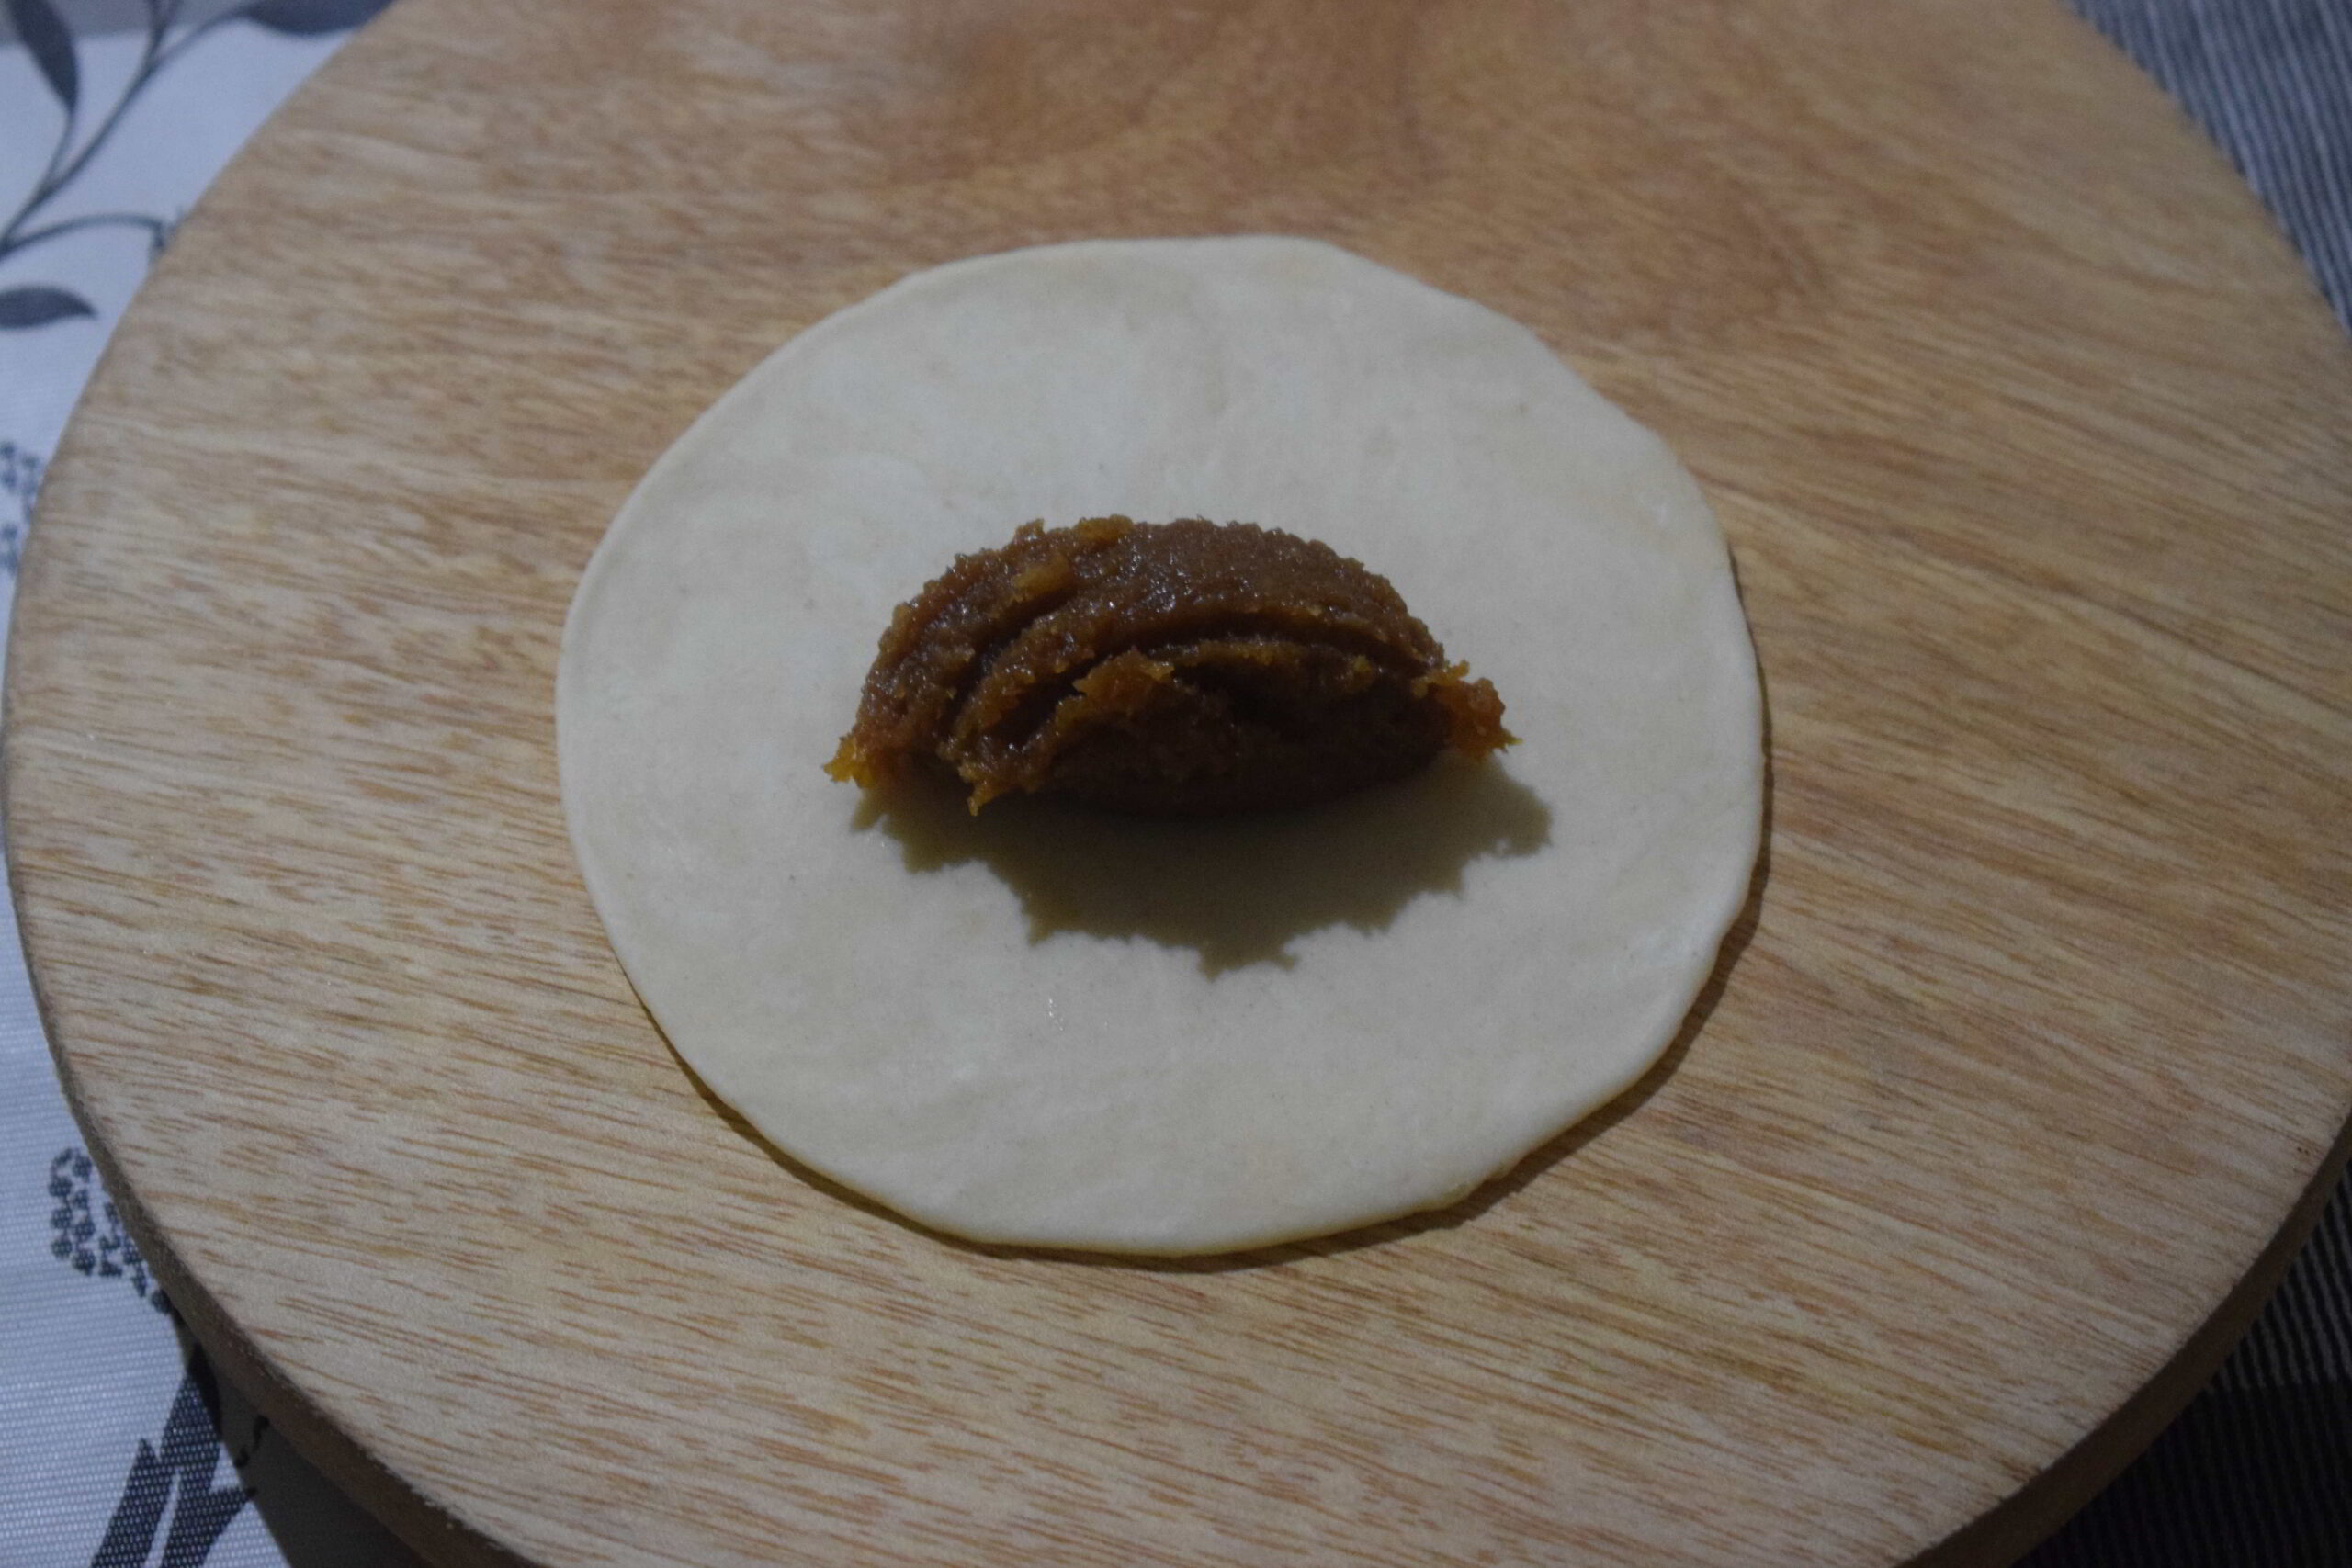
- Add around 2-2.5 teaspoons staffing on one side and keep the edges empty. Don’t add too much stuffing or else it will be difficult to seal the puli.
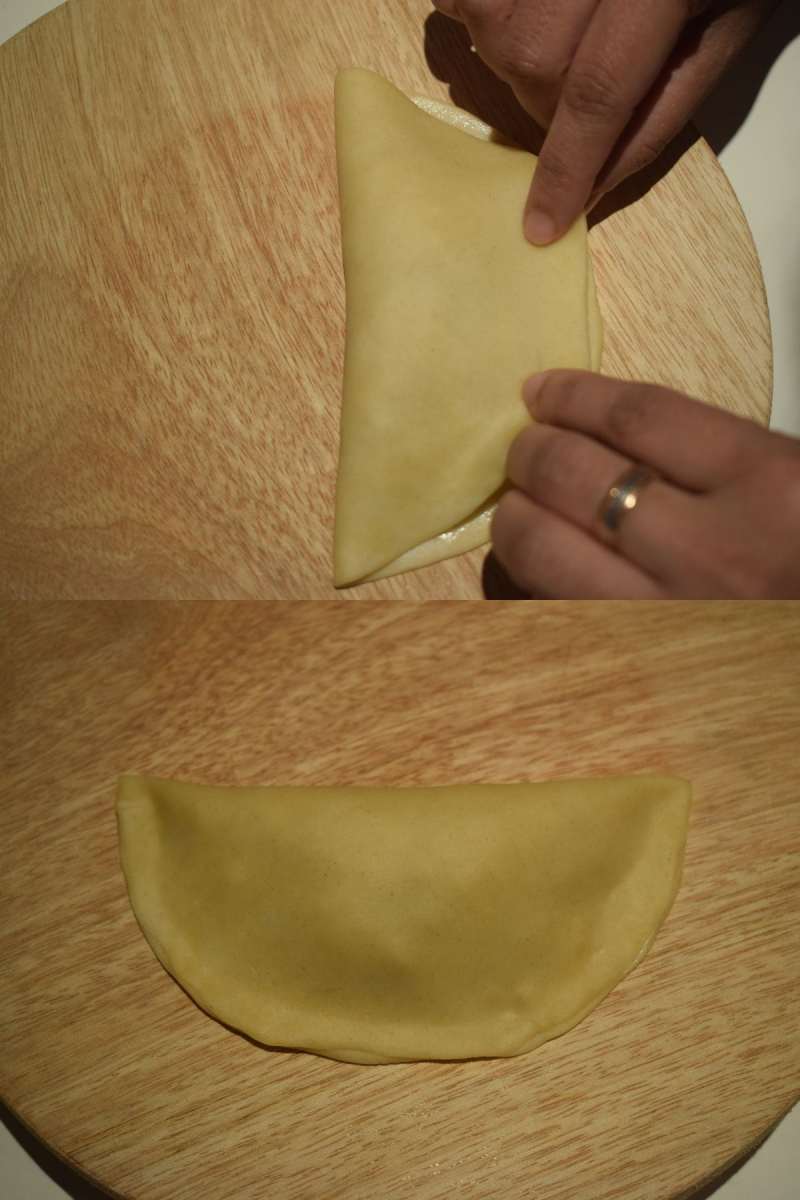
- Now carefully fold and join the edges with your fingers. Gently press the edges and seal the puli properly so that the stuffing cannot come out. At this moment, you can design the puli pitha according to your preferred choice.
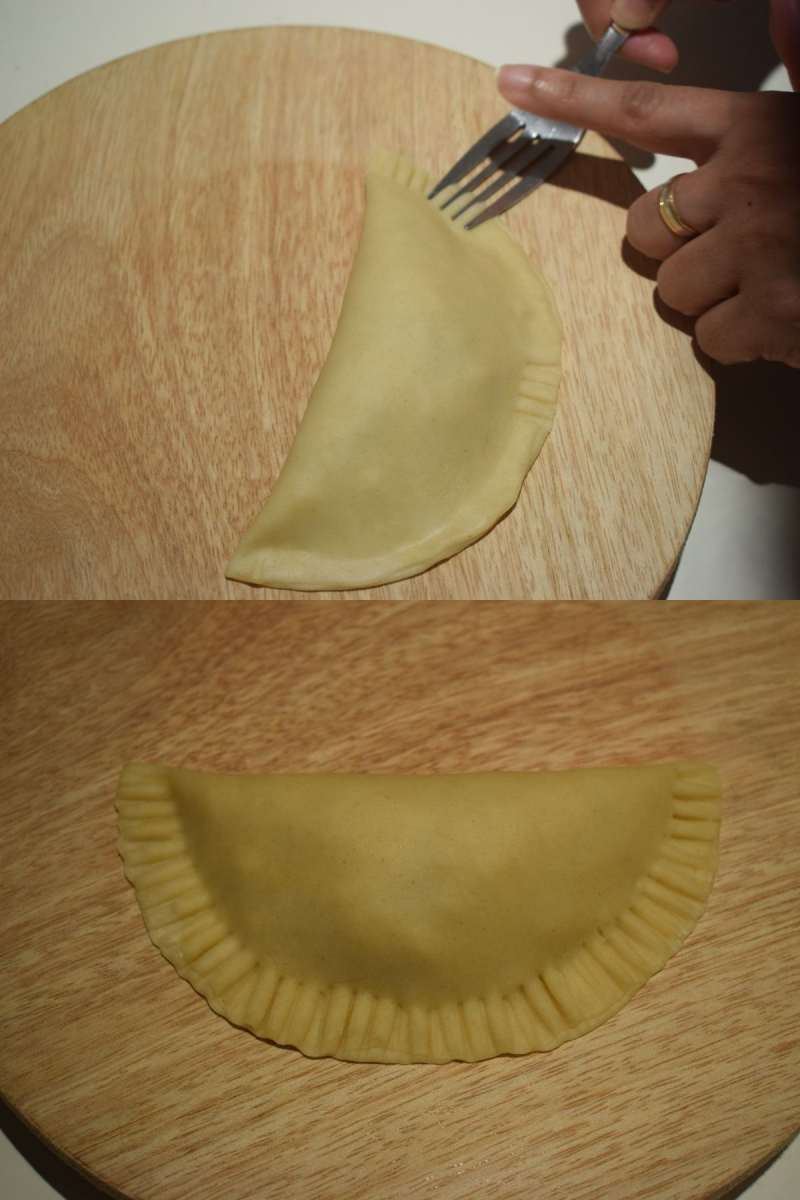
- With the help of a fork, you can make a design around the edges and seal it perfectly.
- If you have puli pitha mould or dumpling maker then you can use it to make designs. I have used a dumpling maker for the recipe.
 Note: If you are using a dumpling maker then no need to apply water at the edge of the rolled-out dough.
 - The traditional way is by using hands. Just keep on twisting the edges and fold till the end.
- Repeat the same process and shape the puli pitha with the rest of the dough and staffing. After shaping all the puli pitha, cover them with a wet cloth before frying.
Frying the puli pithe
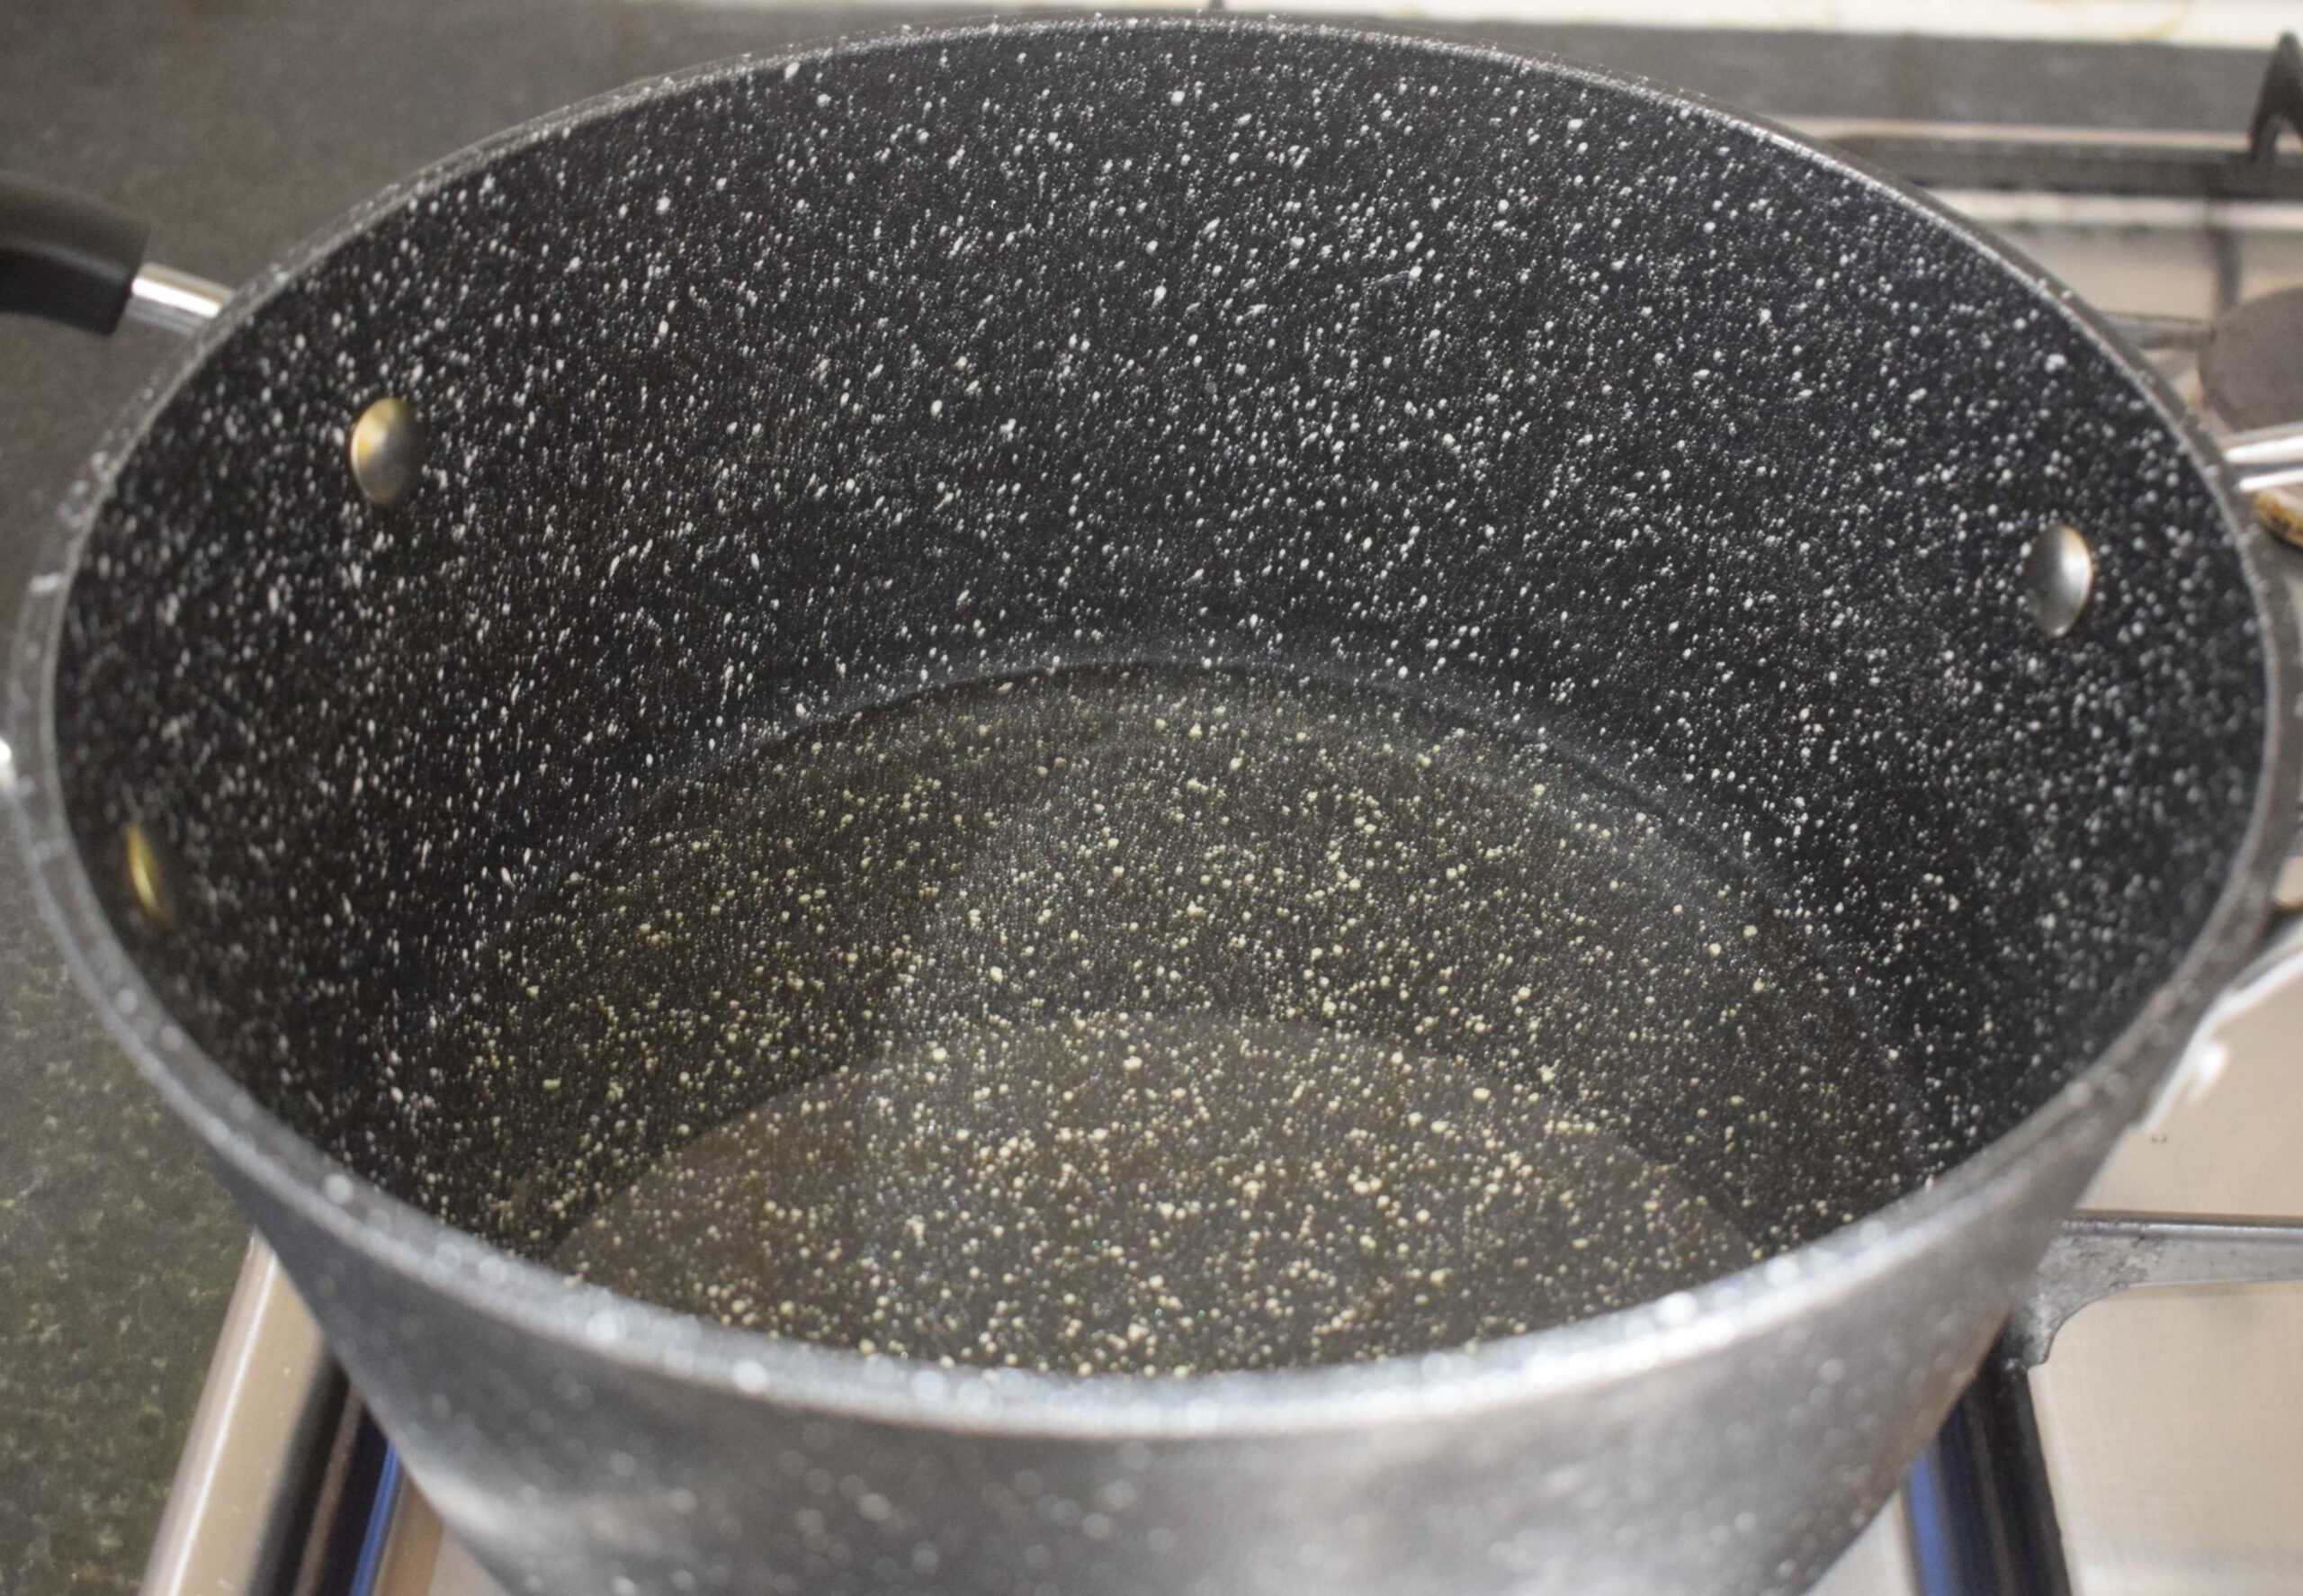
- Put a pan on flame and let it become completely dry. Add enough oil to deep fry the puli pithe properly. Put the flame on medium and wait until the oil is ready. The oil has to be medium hot and not smoking hot.
- Now turn the flame low and add the shaped puli slowly into the oil. It should be fried at low or medium-low flame till light golden brown. Flip the pulis in between and fry them evenly. One batch takes almost 6-8 minutes to get fried evenly and perfectly. So be patient at this stage.
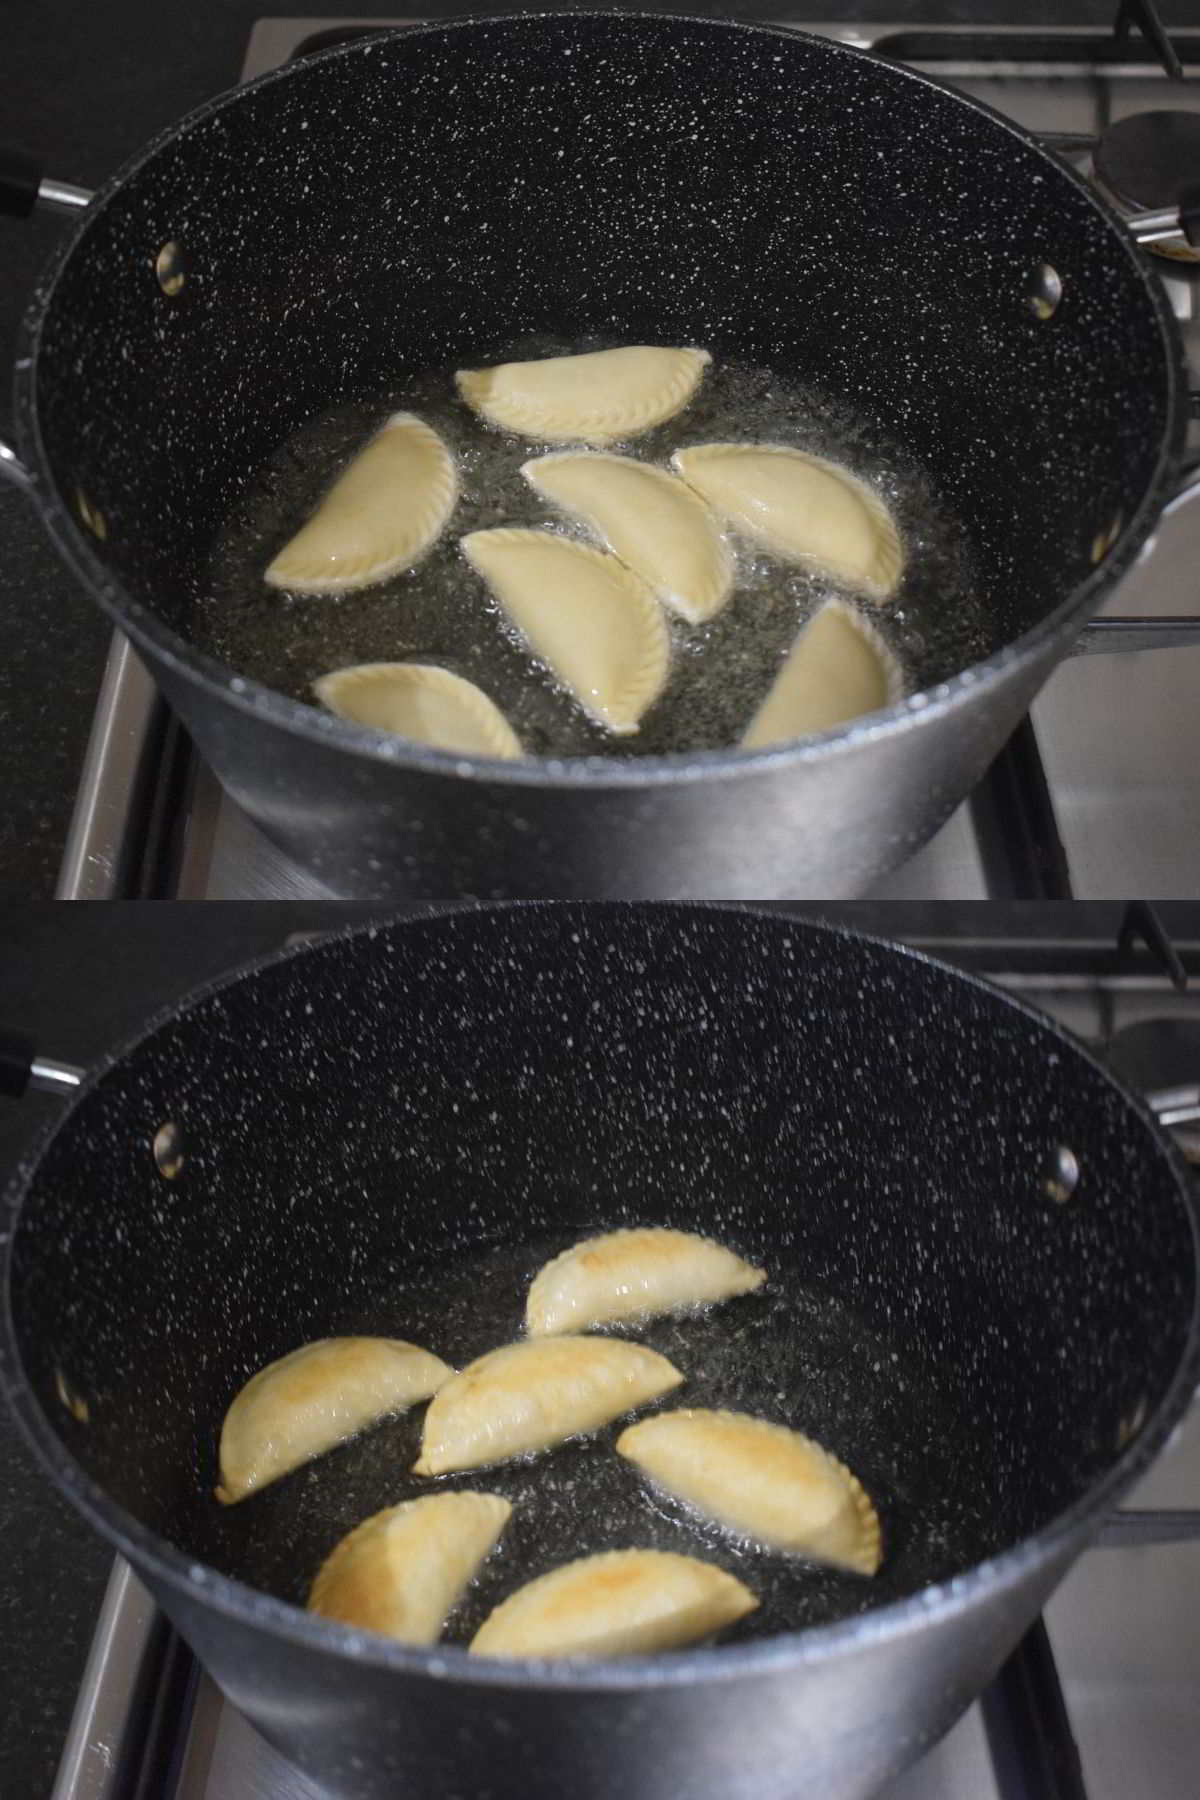 Note: If you fry them over high flame then the puli pitha will become brown from the outside and won’t get cooked from inside. Don’t overcrowd the pan during the time of frying them.
 - Strain the maidar puli with a slotted spoon and remove the excess oil. Place them carefully on a tissue-lined plate. Now it is ready to serve. Serve it warm or at room temperature. After cooling down, store them in a dry airtight container.
Serving Instruction
Transfer the vaja puli pitha to a serving plate and serve them with a cup of hot tea or have it when hunger calls. Enjoy your homemade Indian sweet recipe with family and friends with a lot of gossip during festive days.
How to store maidar puli?
After frying the maidar puli, allow it to come to room temperature. Then store them in an airtight container and keep them in a cool dry place away from sunlight. In this way, you can store them for 2-3 days.


Ingredients
1 cup = 250 ml
For the stuffing
- 1 cup grated coconut
- ½ cup Patali gur aka date Palm jaggery
- ¼ cup Milk powder
- ¾ teaspoon Ghee aka clarified Butter
- ¼ teaspoon Cardamom powder aka Elaichi powder
For the dough
- 1½ cups all-purpose Flour aka Maida
- 2 tablespoons melted Ghee aka clarified Butter, at room temperature
- ¼ teaspoon Salt
- 100 ml Water, at room temperature
Other ingredients
- Oil to deep fry the Puli pithe
- 1 tablespoon Water to seal the puli, during the time of shaping if you are not using a dumpling maker
Instructions
For the filling
- Add ½ cup grated roughly chopped date palm jaggery aka patali gur into a pan.
- Add ¾ teaspoon ghee into it and mix it. Allow the jaggery to melt.
- Add 1 cup of grated coconut and mix it well. Cook it over low flame for 4-5 minutes until the raw smell of coconut disappears and the mixture becomes sticky.
- Add ¼ cup powdered milk and mix it well.
- Add ¼ teaspoon of cardamom powder at the final stage and mix it well. Switch off the flame and put the pan down.
For the dough
- For the dough, take a large mixing bowl and add 1½ cups of all-purpose flour aka maida into it. Then add ¼ teaspoon salt into the bowl.
- Add 2 tablespoons of melted ghee aka clarified butter at room temperature and mix it evenly with the help of your fingers. The flour should get bound when you take it in your fist and apply pressure. The moyan (fat added to the flour)of the dough is very important to get the perfect texture of puli.
- Add water slowly at a time and prepare tight dough. Don’t over-knead the dough or else it will release gluten and you won’t get the perfect texture of puli. I used 100ml of water to prepare the dough.
- Cover the dough completely with either a wet cloth or cling film and allow it to rest for half an hour.
Shaping the puli pithe
- After half an hour, uncover the dough, knead it once again, and make it smooth.
- Divide them into 20 equal portions to prepare small flat dough balls with the help of hands. Cover the rest of the dough balls while working on one.
- Place the dough ball on a rolling board and roll it with a rolling pin to a round shape of 3-3.5 inches in diameter. The thickness should be medium like poori. It should neither be too thick nor too thin.
- Take a bowl of water during the time of shaping puli. Now apply water at the edges of the rolled-out dough with your figure tip.
- Add around 2-2.5 teaspoons staffing on one side and keep the edges empty. Don’t add too much stuffing or else it will be difficult to seal the puli.
- Now carefully fold and join the edges with your fingers. Gently press the edges and seal the puli properly so that the stuffing cannot come out. At this moment, you can design the puli pitha according to your preferred choice.
- With the help of a fork, you can make a design around the edges and seal it perfectly.
- If you have puli pitha mould or dumpling maker then you can use it to make designs. I have used a dumpling maker for the recipe. Note: If you are using a dumpling maker then no need to apply water at the edge of the rolled-out dough.
- The traditional way is by using hands. Just keep on twisting the edges and fold till the end.
- Repeat the same process and shape the puli pitha with the rest of the dough and staffing. After shaping all the puli pitha, cover them with a wet cloth before frying.
Frying the puli pithe
- Put a pan on flame and let it become completely dry. Add enough oil to deep fry the puli pithe properly. Put the flame on medium and wait until the oil is ready. The oil has to be medium hot and not smoking hot.
- Now turn the flame low and add the shaped puli slowly into the oil. It should be fried at low or medium-low flame till light golden brown. Flip the pulis in between and fry them evenly. One batch takes almost 6-8 minutes to get fried evenly and perfectly. So be patient at this stage. Note: If you fry them over high flame then the puli pitha will become brown from the outside and won’t get cooked from inside. Don’t overcrowd the pan during the time of frying them.
- Strain the maidar puli with a slotted spoon and remove the excess oil. Place them carefully on a tissue-lined plate. Now it is ready to serve. Serve it warm or at room temperature. After cooling down, store them in a dry airtight container.